e of thumb using a nickel and dime. The dime can be used for the minimum measurement. If the air gap is thinner than a dime, it’s too thin. Use a nickel to measure the maximum thickness. If you find that the nickel easily slides in and out of the air gap, you can bet that the clutch is totally worn out.
While this is a simple, quick test, to get the best results, you always want to use the appropriate service information and check it the way the car manufacturer would want you to do it.
In The Clutch
Belt-driven compressors have a magnetic clutch on the input shaft that cycles the compressor on and off to control cooling. If needed, the clutch can be replaced separately. If the compressor has failed, the replacement unit may or may not come with a new clutch installed. We recommend ordering a new clutch if one is not included.
Hose Concerns
One concern techs have is the issue of replacing A/C hoses following a compressor failure.
Metallic debris that is spewed into the A/C system when a compressor fails can block orifice tubes and possibly damage a new compressor when it is installed.
Getting all of the debris out of the system is therefore essential to make sure the new compressor won’t suffer the same fate.
While most of the garbage ends up in the condenser, some can migrate from here to other parts of the system or be thrown backward into the suction hose from the compressor’s intake port.
Serpentine-style condensers with large diameter tubes can usually be cleaned by flushing with an approved flushing chemical. But parallel-flow condensers or those with very small tubes may be impossible to clean, requiring replacement to eliminate possible contaminants.
As for the refrigerant hoses, replacing the suction and discharge hoses should not be necessary, provided they can be thoroughly flushed and cleaned. Hoses that contain mufflers or orifice tubes, however, usually cannot be cleaned and must be replaced.
Installing a protective screen in the end of the suction hose that attaches to the compressor and/or installing an inline filter to trap any residual debris that may have been missed also is recommended for added insurance against a future compressor failure.
The suction hose is located is between the evaporator and condenser.
The high-pressure hose is between the compressor and condenser. Late-model vehicles with R-134a A/C systems require “barrier” (nylon lined) hoses with crimped end fittings. Older (1994 and earlier) vehicles with R-12 systems can use unlined hoses with barbed end connections.
When replacing A/C hoses, always use new O-rings or seals.
Check The Radiator
Following an inspection of a compressor clutch and compressor that appear to be in good condition, check the front of the condenser for any type of air flow or debris, or anything that would restrict the ability of the air to flow through the condenser and into the radiator.
A suitable shop light should be used to visually inspect the radiator and condenser.
On most vehicles, you’ll need to remove the plastic cowl on the front of the radiator and then look down in between the components.
Consequently, any vehicle with more than 100,000 miles on the radiator is a perfect candidate for a radiator inspection and evaluation. If the coolant is excessively rusty or the radiator core is excessively damaged from road debris, it’s time to consider replacing the radiator.
Tech Tip: Continued Inspection — How to Spot the Type of Refrigerant Leak for an Accurate Diagnosis
When diagnosing a refrigerant leak, it’s helpful to know what type of leak is present in the air conditioning system. There are two types of refrigerant leaks — active and passive. An active leak is easier to locate than a passive leak. Knowing the type of leak you’re dealing with will help determine the type of refrigerant leak detection tool to use for locating the leak.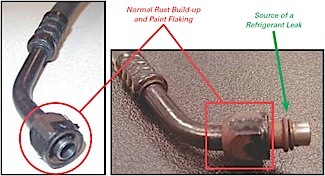
Active Refrigerant Leak
The active refrigerant leak is a continuous leak. Using an electronic leak detector is an effective tool to locate an active leak.
There are a number of common causes for active leaks in an A/C system that include:
• Corrosion porosity on a refrigerant line, evaporator or condenser
Note: Paint flaking from a steel refrigerant line or condenser is not always an indicator of a refrigerant leak. Paint flaking is normal and it will occur over time. Evidence of oil around the rusted or paint-flaked refrigerant line does, however, indicate that a leak is present.
• O-ring or sealing washer
– Debris trapped between an O-ring or sealing washer joint or mating surface.
– An incorrect size O-ring or sealing washer used on a joint or mating surface.
– A rolled O-ring.
– A missing O-ring or sealing washer.
• Refrigerant line
– Damage from bending a line during a refrigerant system repair.
– An impact that caused the line to become deformed.
• Improperly torqued components
– An over- or undertorqued refrigerant line or component joint or component fitting.
– An under-torqued pressure switch or cycling switch.
– A loose service port cap
• Compressor
– A crack in the compressor housing.
– Loose compressor through bolts.
– Compressor shaft seal.
– Compressor body seals.
• Service valve or pressure switch
– A pintle that is off center and is not seating properly
– A loose valve pintle
• Component casting porosity
– Porosity from an improperly manufactured part, such as the compressor housing or a thermal expansion valve (TXV) body.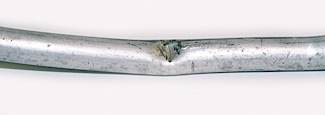
Passive Refrigerant Leak
A passive leak is a type of refrigerant leak that occurs intermittently. Passive refrigerant leaks are caused by changes in pressure, temperature or vibration.
Since this type of leak is intermittent, the use of the electronic leak detector may not be effective; therefore, the use of refrigerant ultraviolet leak detection dye will be more effective at finding the leak.
Once the dye is added to the refrigerant system, it may require time to locate the leak, depending upon the severity of the leak and the driving habits of your customer. This could take from a few minutes to a few days. Some air conditioning systems have dye installed from the vehicle manufacturer. Check before adding additional dye to the system.
The following are some examples of how a passive leak can occur:
• Pressure
– Expansion and contraction of an under-torqued refrigerant line, component joint or component fitting during operation of the air conditioner.
– Compressor shaft seal leak.
• Vibration
– A cracked braze on a condenser or evaporator from a refrigerant line that is not supported properly.
• Temperature
– Compressor body or front head O-ring.
Source: Delphi Product & Service Solutions