A knocking noise from the front of any vehicle can be a cause for concern. If the vehicle is an old pickup truck with 150,000 miles of hard off-road use, noises usually come with the territory and are sometimes acceptable. But, if the vehicle is a 1996-98 Acura RL, not only will the owner notice it, they will probably want it fixed right away.
When an Acura RL owner visits your shop complaining about a knocking noise from the front suspension when driving over bumps, the noise may be caused by worn upper arm bearings. The following tech tip may help you quickly diagnose and repair the problem.
DIAGNOSIS
1. Test-drive the vehicle over a bumpy road to verify the noise and to determine its location.
2. Raise the vehicle on a lift.
3. On the vehicle side where the noise is heard, hit the tire with a large soft-faced mallet while placing your hand over one of the upper arm bearings. Repeat this action with your hand placed over the other bearing.
• If you feel looseness or hear knocking from either bearing, go to the Repair Procedure.
• If no knocking noise is heard and no looseness is felt, look for other possible causes.
• If you heard the noise from both sides of the vehicle, repeat Step 3 on the other side.
SERVICE PROCEDURE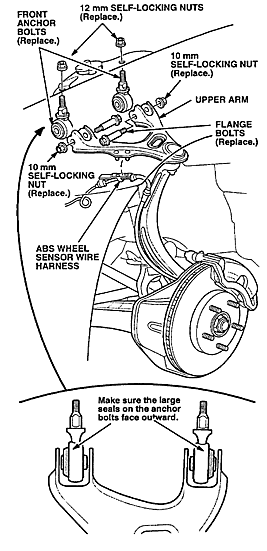 NOTE: This procedure does not require wheel alignment after completion.
1. Remove the wheel.
2. Remove the ABS wheel sensor wire harness from the upper arm.
3. Remove and discard the two upper arm 12 mm self-locking nuts.
NOTE: The upper arm bearings are built into the front anchor bolts.
4. Lower the upper arm, and pull it toward you to access the two front anchor bolts containing the upper arm bearings.
5. Remove and discard the front anchor bolt 10 mm self-locking nuts and the flange bolts, then remove and discard the front anchor bolts.
6. Install new front anchor bolts, making sure the large seal on the bolt faces outward. Secure the anchor bolts with new flange bolts and 10 mm self-locking nuts. Torque the nuts to 22 lb-ft (30 N-m).
7. Reinstall the upper arm, and secure it with new 12 mm self-locking nuts. Torque the nuts to 47 lb-ft (64 N-m).
8. Reinstall the ABS wheel sensor wire harness.
9. Reinstall the wheel. Torque the wheel nuts to 80 lb-ft (108 N-m).
10. Test-drive the vehicle to make sure the noise has been eliminated.
Accura and RL are registered trademark names and model designations of the American Honda Motor Company. All trademark names and model designations are being used solely for reference and application purposes.
Written by ALLDATA Technical Editor, Rich Diegle. Rich is an Advanced Engine Performance Certified and ASE Master Technician with an Associate of Arts degree in automotive technology and 22 years of dealership and independent shop experience.
For additional information, visit www.alldata.com.

