o adjust camber. This will give you ±1.75º.
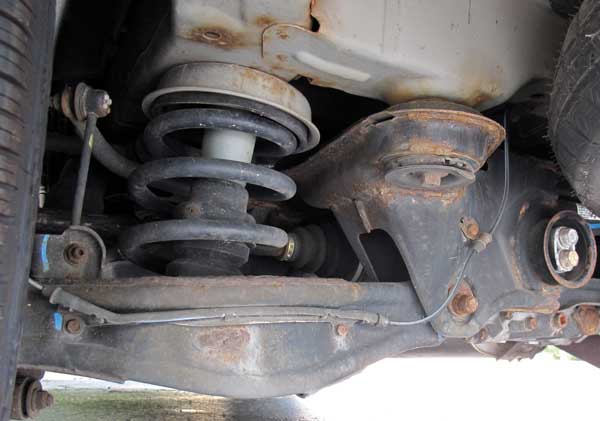 The rear suspension is the multi-link setup. Only toe is adjustable with cam plate bolts on the inboard side of the lower control links. This adjustment yields very little adjustment, it is designed to only compensate for wear in the bushings. It the rear toe cannot be brought into specification, look for other damage in the links and bushings.
 The most common culprits are the upper link with the ball joint or bushing between the knuckle and lower control arm. Always use a new self-locking nut on the cams. Assemble the adjusting bolt and cam plate with the eccentric facing up. Make sure the toe angles are close from side-to-side.
Rear camber is not factory adjustable. It is necessary to replace the upper rear link with an adjustable link that can change the camber by -2.00 degree to +4.00º.
VSA Sensor Neutral Position Memorization
Most Pilots are equipped with stability control called VSA. After any toe adjustment or steering component replacement, it is necessary to reset the steering position sensor. This process does not require a scan tool. Disconnecting the negative battery cable can create more problems than it solves.
If the error in the steering angle is large enough, it will disable the system and turn the system’s malfunction indicator light on to alert the driver. If the error is small, it will operate as normal until certain conditions occur like driving on freeway ramps and tight streets. Under these conditions, the computer might unnecessarily activate the stability control system slowing the vehicle or even fail to respond with the right corrective action causing the vehicle to leave the road.
Do not take any chances with the reprogramming of the steering angle sensor. If your shop cannot do it, send it to a shop that can. Also, you can charge the customer for this procedure. The Honda warranty time is around .3 hours.
TECH TIP: Noise/Judder from Rear of Vehicle
If a customer with a 2003 and later Pilot or 2006 and later Ridgeline complains of a noise and judder from the rear of the vehicle when turning, the VTM-4 differential fluid could likely be contaminated by clutch wear, condensation or both. This causes the VTM-4 differential clutches to make noise and to judder when turning.
Note: Worn VTM-4 fluid that has not been replaced at the recommended service intervals can cause the same condition. Check to see if the VTM-4 fluid has been replaced at the recommended intervals.
Corrective Action:
Replace the VTM-4 differential fluid.
Parts Information:
• Drain Plug Washer (18 mm, drain plug sealing washer), P/N 90471-PX4-000; and
• Drain Plug Washer (20 mm, filler plug sealing washer), P/N 94109-20000.
Required Materials:
• VTM-4 Differential Fluid (5.6 quarts required), P/N 08200-9003.
Diagnosis:
Do 10 figure-eight patterns with the steering wheel at full lock. Listen for a noise and feel for a judder. Accelerate at the start of each circle to make sure the clutches engage and disengage. Do not use the VTM-4 LOCK button.
Note: As an alternative to doing figure-eight patterns, you may do 10 circles to the left and 10 circles to the right.
• If you can hear the noise or feel the judder, go to the Repair Procedure.
• If you cannot hear the noise and feel the judder, continue with normal troubleshooting.
Repair Procedure:
1. With the engine off, raise the vehicle on a lift in a level position.
2. Remove the differential filler plug and its sealing washer. Save the sealing washer.
3. Remove the differential drain plug and its sealing washer to drain the VTM-4 differential fluid. Save the sealing washer.
Note: The drained fluid should look red. If it looks pink, it means water entered the VTM-4 differential through the vent tube breather in the rear subframe. This can happen after launching a boat or driving through water deep enough to cover the tires. If the fluid looks pink, replacing the fluid may not get rid of the noise and judder.
4. Clean the drain plug, then reinstall it with the sealing washer you saved in step 3. Torque the drain plug to 47 Nm (35 lb.-ft.).
5. Fill the differential with VTM-4 differential fluid until the fluid level reaches the bottom of the filler hole.
Note: To avoid contamination, always fill from an unopened VTM-4 fluid container. Always use a dedicated hand-operated fluid pump to fill the differential. Use fluid pump P/N 07AAK-PGJA220 or a commercially available fluid pump. Never use a pump driven by compressed air.
6. Reinstall the filler plug with the sealing washer you saved in step 2. Torque the filler plug to 47 Nm (35 lb.-ft.).
7. Drive the vehicle in a figure-eight pattern with the steering wheel at full lock. Accelerate at the start of each circle to ensure the clutches engage and disengage. Complete at least 10 patterns.
8. With the engine off, raise the vehicle on a lift in a level position.
9. Remove the oil filler plug and its sealing washer. Discard the sealing washer.
10. Remove the drain plug and its sealing washer to drain the VTM-4 differential fluid. Discard the sealing washer.
11. Clean the drain plug, then reinstall it with a new 18 mm sealing washer. Torque the drain plug to 47 Nm (35 lb.-ft.).
12. Fill the differential with VTM-4 differential fluid until the fluid level reaches the bottom of the filler hole.
13. Reinstall the filler plug with a new 20 mm sealing washer. Torque the filler plug to 47 Nm (35 lb.-ft.).
14. Test drive the vehicle in a figure-eight pattern to make sure the noise and judder are gone. Accelerate at the start of each circle to ensure the clutches engage and disengage.
Note: You may need to do up to 10 patterns to get rid of the noise and judder.


