When I started working here at The Swedish Solution 30 years ago, every car I worked on had Continuous Fuel Injection (CIS). Incoming air would lift a plate, allowing the fuel head plunger in the fuel distributor head to drop, and all four injectors would continuously spray fuel. The coolant temp sensor operated only the temperature gauge. The fuel pressure regulator, which we called a warm-up regulator, gave the engine a little more gas when the engine was cold. It was a fairly simple system. We saw very few California emissions cars with EGR systems, but even those never had the issue of carbon deposits on intake valves due to the continuous fuel bath they received. Running pressures were usually around 2.5 to 3.5 bars.
In 1985, SAAB began using the new Bosch LH fuel injection system and Volvo and other carmakers followed suit. The system worked such that incoming air passed through an airflow meter that sent a signal to the engine ECU telling it how much air was going into the engine. The coolant temp sensor then told the ECU how cold or warm the engine was, and it opened and closed the injectors when needed.
The fuel pressure regulator kept the pressure around 3 bar and, with a drop in vacuum, the fuel pressure would rise half a bar to give the car a little extra fuel when accelerating. Through the years, injection systems incorporated more sensors like air temperature, EGR temperature or exhaust gas temperature, and the emissions systems monitor how efficiently everything is working. But the systems didn’t change a whole lot until about 2006.
While these fuel injection systems worked well, we did see carbon deposits build up on the intake valves — a condition that could cause some poor cold starting. To combat the carbon deposits, we bought a walnut blaster. We removed the intake manifold and blasted the deposits away with walnut shells. Those cars gradually disappeared, and it was about seven years ago that I put the walnut blaster into the storage shed, and never thought I would have to use it again.
DIRECT INJECTION
In 2006, we saw the first of the direct-injection cars. VW and Audi located the injectors directly into the combustion chambers for greater efficiency. By this time, we had been seeing variable valve timing for at least six years, and there were a few cars that had variable intake runners. The new A4s and Passats had both and, in addition to the in-tank fuel pump, they had a cam-driven, mechanical high-pressure fuel pump that ran the fuel pressure as high as 120 bar. They are great cars, but began to exhibit a few problems that we started to see after a few years.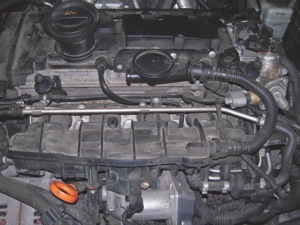
The EGR systems were flowing into the intake and, because the fuel is injected directly into the cylinders and no longer washing away the carbon, deposits began to form on the intake valves and in the intake manifolds. Poor starting and loss of performance were some of the complaints we received. Because carbon deposits were building up in the intakes, and with the intake flap motor position being incorrect, it sometimes prompted the MIL to come on. I think MINI was the first to recommend pulling the intake and walnut blasting the carbon off of the intake valves, and on some of the VWs with binding intake runners we would just replace the intake manifold. So, we had to get our old walnut blaster out of the storage shed (good thing I didn’t give it away).
While this article touches on the carbon deposit issue, it’s mainly about the high-pressure fuel pump and the problem we’ve seen with them.
FUEL-RELATED DTCs
When the first Audis and Passats came out with direct injection in 2006, the hardening of the camshafts was insufficient and excessive wear could occur, causing the MIL to come on and DTC P2293 to be stored in the ECU. The code was for fuel pressure regulator 2 performance. Sometimes, DTCs P0087 (fuel pressure too low) and P1093 (fuel trim bank 1 malfunction) would also be stored.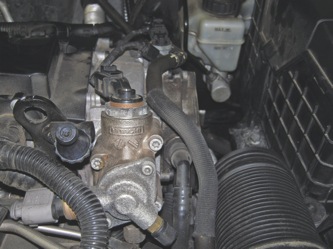
The engines that were affected were the Audi 2.0L turbo (BPG) and the VW 2.0L turbo (BPY) (see Photo 1). The earliest TSB I found addressing the issue was from June 18, 2007. If you suspect the car you’re working on has this issue, the high-pressure pump will need to be removed to determine the extent of the damage to the cam follower, the camshaft or even the pump itself. Remove the pump to inspect the follower only when the engine is cold and be sure to release the high pressure before disconnecting the lines.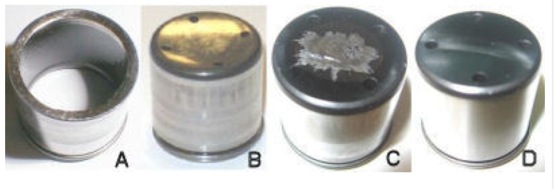
1. Start the car and disconnect the plug to the fuel pressure regulator on top of the pump. Let the car idle for about 10 seconds and the pressure will drop from 120 bar to 6 bar.
2. Shut off the engine and immediately disconnect the fuel lines. Disconnect the low-pressure sensor and remove the three bolts that hold the pump in place (see Photo 2).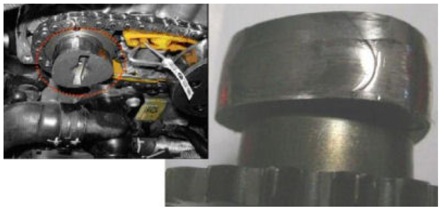
3. Carefully remove the pump. The cam follower may stay in the cylinder head. Take a look at the pump and follower, and determine if there is abnormal wear that needs to be addressed (see Fig. 1). The pump can be reused, unless the follower is completely worn through, causing direct contact with the cam lobe (see Figures 2 and 3). 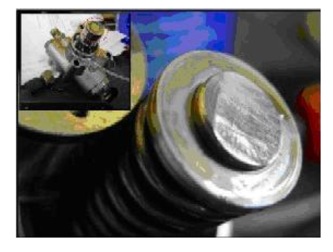
4. If the follower is excessively worn, carefully inspect the cam lobe to determine if the intake camshaft will need to be replaced. If the camshaft needs to be replaced, there is a new camshaft (P/N 06f109101b) that has increased hardening of the camshaft lobe.
5. Unless the car has very low mileage, when replacing the camshaft it would also be a good time to replace the timing belt, water pump and tensioner.
6. When reinstalling the fuel pump, always replace the sealing O-ring. Install the new follower into the cylinder head and rotate the engine until the follower is down as far as it will go.
7. Replace the O-ring for the pump and carefully insert the pump into the follower in the cylinder head. Tighten the three bolts in a diagonal sequence and torque them to 10 Nm.
8. Install the feed and return lines and torque the supply line to 30 Nm and the return line to 25 Nm. Check to make sure there is no stress on the lines.
10. Connect the low-pressure sensor and pressure regulator, and then start the car and double-check for leaks.
Even if the intake camshaft needs to be replaced, the job is not difficult and doesn’t require any special tools other than the ones you would already have when doing a timing belt; it’s just time consuming. Addressing the carbon buildup and stuck flaps in the intake also is not a difficult proposition. Your on-line service information system will have procedures for diagnosing and repairing the issues with the early direct-injection cars.
It seems that whenever a new model is introduced, there are a few unforeseen and unintended issues that need to be addressed, such as those associated with a new type of fuel management system or a new braking system like electric parking brakes.
Many of us view these issues with disbelief, wondering, “What were they thinking when they decided to do that?” I know when I saw the first headlight bulb that had 1.3 hours book time to replace, I was thinking the same thing. It’s time to stop thinking that way and start thinking, “Now there is an opportunity to make some good money!”