The Ford Fusion is based on the Ford CD3 platform that includes the Mercury Milan, Lincoln Zephyr and Mazda 6. Most of these vehicles went on sale as 2006 models. The platform was intended to be a replacement for the then discontinued Ford Taurus.
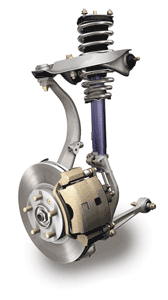
The brakes on these vehicles are straightforward and do not break any new ground. The brake systems on all variants have disc brakes at all corners. The parking brake is part of the rear caliper and has a straightforward adjustment. There are no major changes to the brakes system from 2006 to 2009. For the 2008 model year, ABS became a standard feature, as did a direct tire pressure monitoring system.
On a side note, the Fusion was originally to be called the Ford Futura, but Ford lost a trademark lawsuit to Pep Boys auto parts store, which has a line of tires under the Futura brand. American trademark law generally considers a name abandoned if the owner does not use it for three calendar years, and the long history of the name in the Ford line did not impress the court.
Rotors
Unfortunately, the rotors on the Fusion do not have too much material. It is difficult to get at least one turn out of the rotors before they are under spec. Overall runout and thickness variation should be less than 0.001.”
Front Rotors
New thickness: 25 mm (0.98”)
Min. thickness: 23 mm (0.91”)
Min. thickness to machine: 24.1 mm (0.94”)
Rear Rotors
New thickness: 10 mm (0.39”)
Min thickness: 8 mm (0.31”)
Min thickness to machine: 9.1 mm (0.35”)
Front Brake Pad Removal:
1. Push the caliper pistons back into the bores. Do not pry in the caliper sight holes to retract the pistons, as this can damage the caliper pistons and boots.
2. Remove the brake caliper bolts and position the caliper aside.
3. Remove the brake pad retraction springs from the holes.
4. Remove the brake pads, brake pad shims and stainless steel shims.
5. Inspect the brake pads and shims for wear or contamination. There should be at least 3 mm of material and the pads should not differ from side-to-side by more than 2 mm. The pads should not taper more than 2 mm.
6. Remove the brake pad slides.
Front Brake Pad Installation:
1. Protect the caliper piston and boots when pushing the caliper piston into the bores in order to install the new pads.
2. Install the brake pad slides.
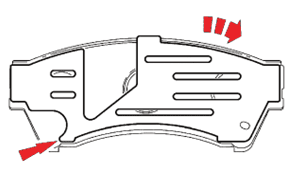
3. Apply grease to the backing plate and shims in the areas indicated.
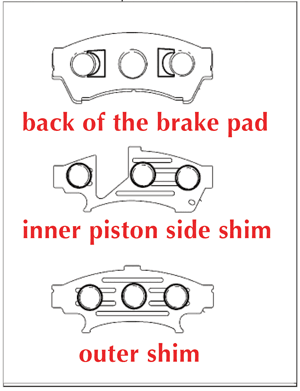
4. Install the brake pad shims and the caliper bracket slides. If you are using an OE-style shim, the cut shim is directional and used on the inboard pad only. The cut is positioned toward the leading side. Correct installation can be verified if the shim hole is positioned on the bottom side.
5. Install the new pads.
6. Install the brake pad retraction springs. New springs should be used. It has been shown the springs increase fuel mileage by 1 percent and decrease incidents of brake noise by 10 percent.
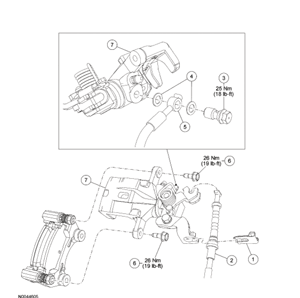
7. Position the brake caliper and install the bolts. Make sure that the caliper guide pin boots are fully seated or damage to the caliper guide pin boots can occur. Tighten to 37 ft.-lbs.
Rear Pad Brake Removal:
1. Disconnect the parking brake cable from the brake caliper.
2. Pull back the parking brake lever.
3. Disconnect the cable from the parking brake lever.
4. Remove the cable conduit-retaining clip.
5. Disconnect the cable from the brake caliper.
6. Retract the piston. Do not pry in the caliper sight hole to retract the pistons, as this can damage the pistons and boots.
7. Remove the brake caliper bolts and position the caliper aside.
8. Remove the pads, shims and slide clips. Inspect the brake pads for wear or contamination.
9. Inspect the brake pads for wear and contamination. There should be at least 3 mm of material and the pads should not differ from side-to-side by more than 2 mm. The pads should not taper more than 2 mm.
10. Remove the brake caliper anchor plate bolts and the anchor plate.
Rear Brake Installation:
1. Install the brake caliper anchor plate and the two brake caliper anchor plate bolts. Tighten to 52 ft.-lbs.
2. Install the two brake pads and slide clips to the brake caliper anchor plate. Position the notch in the caliper piston so that it will correctly align with the pin on the backside of the inboard brake pad. Install the brake caliper.
3. Position the brake caliper on the anchor plate and install the bolts, tighten to 19 ft.-lbs.
4. Install the parking brake cable to the caliper.
5. Pull back the parking brake lever.
6. Connect the cable to the parking brake lever.
7. Install the cable conduit-retaining clip.
8. Cycle the park brake several times to verify normal operation.
9. Test for normal operation.
Parking Brake Adjustment:
1. Remove the access panel behind the center console. Do not pry at the floor console rear access panel with a screwdriver or damage to the panel may occur.
2. Note: The dimension will vary depending on the amount of cable stretch. New cables require cycling the parking brake control 5-10 times to remove the cable slack. Adjust the parking brake adjustment nut as shown below.
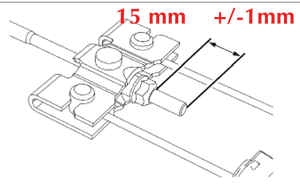
3. Verify correct operation of the parking brake system.
• At two clicks of the parking brake control, slight drag at the rear wheels should be present.
• At five clicks of the parking brake control, no movement at the wheels should be present.
Brake System Bleeding
Anti-Lock System Bleed
Bleeding the Hydraulic Control Unit (HCU) is required only when removing or installing the HCU, master cylinder or opening the lines to the HCU. A scan tool with the ability to interface with the HCU is required for bleeding.
Note: Carrying out the system bleed function drives trapped air from the HCU. Subsequent bleeding removes the air from the brake hydraulic system through the bleeder screws.
Note: Adequate voltage to the HCU module is required during the anti-lock portion of the system bleed.
1. Connect the diagnostic tool.
2. Access the system bleed function.
3. Manually bleed the brake hydraulic system.
4. Repeat the procedure carrying out a total of two diagnostic tool cycles and two manual bleed cycles.
Manual Bleed:
1. Fill the brake master cylinder reservoir with the specified brake fluid.
2. Begin bleeding the system, going in order from the right rear wheel, to the left rear wheel, to the right front wheel and ending with the left front wheel.
3. Attach a rubber drain hose to the rear bleeder screw and submerge the free end in a container partially filled with clean brake fluid.
4. Have an assistant pump the brake pedal 10 times and then hold firm pressure on the brake pedal.
5. Loosen the bleeder screw until the fluid flow stops. Maintain pressure on the brake pedal and tighten the bleeder screw.
6. Repeat steps 3-5 until clear, bubble-free fluid flows.
7. Tighten the bleeder screw to 71 in.-lbs.
8. Refill the brake master cylinder reservoir as necessary.
9. Continue bleeding the brake hydraulic system at each wheel until a firm pedal is achieved.
Gravity Bleed:
1. Begin bleeding the system, going in order from the right rear wheel, to the left rear wheel, to the right front wheel and ending with the left front wheel.
2. Attach a rubber drain hose to the rear bleeder screw and submerge the free end in a container partially filled with clean brake fluid.
3. Loosen the bleeder screw and leave it open until clear, bubble-free brake fluid flows.
4. Tighten the bleeder screw to 71 in.-lbs.
5. Continue bleeding the system at each wheel.
TSB & Recalls:
There are no TSBs or recalls issued by Ford or Mazda for the brake system for this platform. But, there havr been two TSBs issued for the creaks and groans in the front suspension that the customer might perceive as brake noise.
TSB 08-18-4
Front Strut Noise
Vehicles: 2006-’09 Fusion, Zephyr, MKZ and Milan
Issue:
Some vehicles may exhibit a popping, rubbing, grunting, squeaking, crunching or creaking type noise from the front strut mount when going over bumps, while driving at 1-10 mph (1-16 Km/h) and/or during parking lot maneuvers. Typically, the noise is heard in the front outboard wheel while turning at low speeds.
The jounce bumper rubbing against the dry strut plate may cause this noise. Spraying the area with an aerosol lubricant will work only until the lubricant is washed away by road spray. The only way to get rid of the noise is to disassemble the strut and lubricate the pieces.
Action:
1. Remove front shock absorber and spring assembly.
2. Disassemble the shock absorber and spring assembly.
3. Apply only silicone brake grease around the upper and lower contact surfaces of the shock absorber piston bounce bumper. Do not use chassis grease as it will cause the rubber and plastic parts to deform.
4. Repeat the procedure on the other side of the vehicle.
TSB 06-24-7
Front Suspension Noise: Squeak/Creak Over Bumps or When Turning
Vehicles: 2006 Fusion, Zephyr and Milan
Issue: Some 2006 Fusion, Milan and Zephyr vehicles may exhibit a concern of a squeak or creak noise from the front suspension while going over bumps or turning. The noise is caused by corrosion and cracks in the lower control arm brackets.
Action:
1. To isolate the creak / squeak noise, place two chassis ears microphones on each side on the right front and left front, clip one mic to the side member at the front lower control arm pockets.
2. Take the vehicle for a short drive at low speeds.
3. If noise at sub-frame bracket exists, inspect the bracket area very closely for rust/cracks isolated to the area along the welds.
4. If there is rust under or along welds as indication of a cracked weld, the sub-frame may need to be welded or replaced. Also, Ford recommends treating the area with a corrosion resistant coating.


