Every car make has its quirks, and Chrysler and Jeep vehicles are no exception. In researching this article, we found several examples of heater problems in these vehicles that seem to be fairly common.
On 2001 and 2002 Sebring Sedan, Sebring Convertible and Stratus Sedan, plus 1993 to 2002 Chrysler Concorde, LHS, New Yorker and 300M, Eagle Vision and Dodge Intrepid models with V6 engines, customers may complain their engine is overheating, or the heater is putting out little or no heat.
Chrysler Technical Service Bulletin 07-002-02 says the problem can be caused by a low coolant level in the cooling system. On these vehicles, air trapped inside the cooling system can displace coolant when the system is refilled. The radiator and coolant reservoir may appear to be full, but there still may be air inside the heater core and heater hoses. This will create a low coolant level that may lead to overheating and low heater output. The bulletin provides a special fill procedure to eliminate the trapped air so the cooling system can be completely filled.
The procedure goes as follows:
- Obtain Chrysler special tool 8195 (Cooling System Filling Aid). The tool looks like a funnel and attaches onto the filler neck (just as a regular pressure cap does). But it also has a hose clip.
- Attach the filling aid tool to the cooling system filler neck. Use the clip to pinch off the overflow hose attached to the fill neck. Attach a 4-6’ long 1/4” ID clear hose to the bleed valve. Put the end of the hose into a clean container (to prevent coolant from spilling onto the accessory drive belts).
- Open the cooling system air bleed valve before any coolant is added. If you do not do this, air can remain trapped inside the system and you won’t get all the air out. On 1998 and later models with 2.7L engine, the valve is located on the water outlet connector at the front of the engine. On 3.2L and 3.5L engines, the valve is located on the lower intake manifold, left of center under the upper intake manifold. On 1993-’97 models with 3.3L and 3.5L engines, the valve is on the thermostat housing.
- Pour a 50/50 mixture of coolant and water into the large side of the filling aid funnel. Use distilled, deionized or reverse-osmosis purified water, not ordinary tap water, which may contain salt or minerals that could contaminate the coolant.
- Slowly fill the cooling system through the large side of the filling aid. Watch the hose connected to the bleed valve. When a steady stream of coolant comes out of the hose, close the bleed valve and continue filling to the top of the filling aid.
- On 1993-’97 models, place a small, clean container below the end of the overflow hose. Then remove the clip from the overflow hose. Any excess coolant in the filling aid will now drain into the overflow section of the coolant bottle or into the container.
- On 1993-’97 models, remove the reservoir and recycle the excess coolant.
- Remove the filling aid from the fill neck. Make sure the filler neck and cap are clean, then replace the pressure cap on the coolant bottle.
Note: 1998 and later coolant bottles have two chambers. Coolant will normally only be in the inboard (smaller) of the two. The outboard chamber is only to recover coolant in the event of an overheat and should normally be empty — except for the coolant drained from the filling aid. This coolant will be drawn back into the pressurized side of the cooling system over time.
Jeep Grand Cherokee Overheating
Overheating problems on 2003 Jeep Grand Cherokees can be caused by a faulty control module on the cooling fan. Unfortunately, the module is not easy to get at because it is located below the right headlight behind the bumper, and behind a vacuum reservoir. To check the module, you have to pull off the bumper fascia. To do this, cut the plastic rivets on each inner fender well, then remove the seven screws that hold the grill and fog lamps in place. Next, remove the reservoir and the lower bolt from the headlamp. Now you can get at the module to test or replace it.
Jeep Grand Cherokee Cooling Fan Recall
Ever see the blades on an electric cooling fan explode? Hopefully not, but apparently it can happen on some 2000-’02 Jeep Grand Cherokee models. Chrysler has a recall out on these models (recall F25, NHTSA 06V199000) and will replace the defective fan module with a new one free of charge.
Jeep Grand Cherokee Hydraulic Fan Problems
On Grand Cherokees with a hydraulic cooling fan, the fan may quit working if the solenoid that controls the fan module craps out. Chrysler TSB 07-005-02 says the fault may turn on the MIL lamp and set a DTC P1499. The fix is to replace the faulty solenoid with a new one (P/N 08-30-18-91).
Jeep Grand Cherokee HVAC Problems
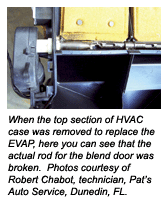
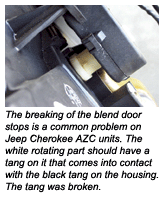
On 1999-2004 Jeep Grand Cherokees, many owners have discovered that their dual zone HVAC system starts to misbehave typically after 50,000 miles (just after it comes out of warranty!). The most common complaint is no heat on the passenger side, or uneven heating or cooling on one or both sides. The operation of the defroster may also be affected. You may also find one or more HVAC codes with a scan tool that indicate a problem with the operation of a blend door, mode door or recirc door.
The problem is most often caused by a failure of a door actuator in the HVAC assembly. The actuator itself may have failed, or a tab that limits door travel may have sheared off, or a door pushrod may have broken, or a door may be jammed. Any of these can upset airflow through the HVAC system and prevent it from heating or cooling normally.
Jeep/Chrysler dealers typically charge $900 to $1,200 or more for this particular repair because they say it usually takes seven to nine hours to tear the dash apart and replace the faulty HVAC components.
The blend door on these applications is moved by an electric actuator. The Automatic Zone Control (AZC) system has two separate actuators to allow the driver and passenger to select individual comfort levels.
 The mode door actuators for Jeeps equipped with the standard manual temperature control system are vacuum controlled. The optional AZC system uses electric motors to actuate the mode doors. See Figure 1.
The recirculation door actuator for vehicles equipped with a standard manual temperature control system is also vacuum controlled. But on the optional AZC system, it uses an electric recirculation door actuator.
Though Chrysler hasn’t issued a technical service bulletin dealing with this particular issue, it has issued a bulletin (TSB 24-001-04) that says new HVAC subassemblies are available to replace blend or recirc door components on these vehicles, and that the “new assemblies improve component reliability.”
Here are some of the recommended repair procedures for the HVAC systems on the 1999-2004 Grand Cherokees (courtesy of ALLDATA). Before doing any of the following, however, you should disable the airbag system. You don’t want to accidentally trip the airbag while working under the dash. Disconnect the battery negative cable, and wait two minutes for the airbag module capacitor to discharge before proceeding.
Replace Vacuum Recirc Door Actuator:
- Disconnect the battery, then remove the instrument panel from the vehicle.
- Unplug the vacuum harness connector from the recirculation door vacuum actuator.
- Disengage the recirculation door pivot connection from the door pivot pin.
- Disengage the recirculation door actuating rod from the recirculation door lever.
- Remove the screws that secure the recirculation door vacuum actuator to the HVAC housing.
- Remove the recirculation door vacuum actuator from the HVAC housing.
To reassemble, install the recirculation door vacuum actuator on the HVAC housing and tighten the mounting screws to 2.2 Nm (20 in.-lbs.). Engage the recirculation door actuating rod with the recirculation door lever. Engage the recirculation door pivot connection with the door pivot pin. Plug in the vacuum harness connector to the recirculation door vacuum actuator, and reinstall the instrument panel back in the vehicle. Wasn’t that easy? Now you know why this is a $900 to $1,200 repair job!
Replace Electronic Door Actuator on AZC Systems:
- 1. Remove the instrument panel from the vehicle.
2. Unplug the wire harness connector from the recirculation door actuator.
3. Remove the two screws securing the recirc door housing to the HVAC unit. Tilt the front of the housing up while reaching around the back releasing two tangs holding the rear of the housing down.
4. Remove the recirculation door housing from the HVAC unit.
5. Remove the screws that secure the recirculation door actuator to the HVAC housing.
- 6. Remove the recirculation door actuator from the HVAC housing.
The installation procedure goes as follows:
- 1. Install the recirculation door actuator on the recirculation door housing and tighten the mounting screws to 2.2 Nm (20 in.-lbs.).
2. Install the recirculation door housing on the HVAC unit and tighten the mounting screws to 2.2 Nm (20 in. lbs.).
3. Plug in the wire harness connector to the recirculation door actuator.
Install the instrument panel in the vehicle.
Replace Heat/Defrost or Panel/Defrost Door Vacuum Actuator:
- Remove the HVAC housing from the vehicle.
- Unplug the vacuum harness connector from the heat/defrost or panel/defrost door vacuum actuator.
- Disengage the heat/defrost or panel/defrost door pivot connection from the heat/defrost door pivot pin.
- Remove the screws that secure the heat/defrost or panel/defrost door vacuum actuator to the HVAC housing.
- Remove the vacuum actuator from the HVAC housing.
Installation is the reverse of the above.
Replace Electronic Panel/Defrost Door Actuator on AZC System:
- Disconnect and isolate the battery negative cable (disabled airbag system).
- Remove the two bolts that secure the center instrument panel support bracket to the left side of the floor panel transmission tunnel.
- Remove the two bolts that secure the center instrument panel support bracket to the instrument panel.
- Remove the center instrument panel support bracket from the vehicle.
- Unplug the wire harness connector from the heat/defrost-panel/defrost door actuator.
- Remove the three screws that secure the heat/ defrost-panel/defrost door motor to the HVAC housing.
- Remove the heat/defrost-panel/defrost door motor from the HVAC housing.
A Simple Short Cut?
If you’re the type who doesn’t relish the idea of tearing the entire dash apart to replace an actuator or the HVAC unit, there may be a short-cut. Depending on which part has failed, some technicians say they use a sharp razor knife to carefully cut an access hole in the HVAC housing. Once they have replaced the door or actuator, they just glue the piece they removed back in place with some silicone adhesive. It saves hours of labor but is not a Chrysler-approved repair method.
Replace Blend Door Actuator:
The blend door actuator on both standard and dual-zone A/C systems is located on the front of the HVAC housing to the right of the floor panel transmission tunnel, and can be removed from the passenger compartment without having to yank the instrument panel or the HVAC unit.
- Disconnect and isolate the battery negative cable.
- Remove the glove box door.
- Remove the lower I/P glove box door surround panel.
- Unplug the wire harness connector from the blend door actuator.
- Remove the two screws that secure the blend door actuator to the HVAC housing.
- Remove the blend door actuator from the HVAC housing.
Working on Water Pumps
Water pumps work hard. As the miles add up, so does the wear and tear on the pump shaft bearing, seal and impeller. Erosion inside the pump can wear away the vanes on the impeller, causing it to pump less efficiently as the impeller is eaten away. This may lead to engine overheating on hot days or when the engine is working hard. If the water pump seal becomes worn, coolant will leak past the pump shaft or out of the small vent hole on the housing. The loss of coolant will eventually cause the engine to overheat. If the pump shaft bearing fails or seizes, the shaft may break. Other symptoms of bearing wear may include pump noise (rumbling, chirping or growling) and fan or pulley wobble.
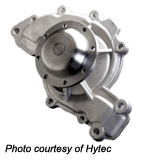 One way to identify a water pump with bad shaft bearings is to check pulley or fan play with the engine off. The pulley or fan should not move when wiggled sideways by hand. Pressure testing the cooling system can also reveal a leaky shaft seal inside the water pump.
Replacing a water pump that is leaking or failing is a repair that can’t be postponed for very long — especially if the pump is leaking coolant. Cooling system sealers usually can’t stop a shaft seal leak. Unless the steady loss of coolant is stopped or constantly replenished by adding more coolant, the engine will overheat. This should be avoided because overheating can damage the head gasket and other engine parts that are expensive to replace. Better to replace a failing water pump as soon as possible than to risk major engine damage.
The labor required to change the pump will vary depending on the pump’s location. On some engines, the pump is relatively easy to change. On others (such as OHC engines where the pump is driven by the timing belt and the pump is located behind the timing belt), pump replacement requires a lot of disassembly. On some OHC applications, it’s probably a good idea to go ahead and replace the timing belt if the pump has failed. If the belt has never been replaced or it has more than 60,000 miles on it, changing the timing belt and water pump at the same time saves the labor of having to do essentially the same job twice.
The condition of the cooling system should be carefully checked when replacing a water pump. Rust and sediment in the coolant can ruin a new pump, so the system should be flushed and refilled with fresh coolant if the old coolant is dirty or is more than a few years old.
Installation Notes
Here’s something to watch out for: On some engines with serpentine belts, the water pump turns in the opposite direction as the same pump does on an engine with conventional V-belts. The pumps may appear to be the same, but the impellers are backwards and are not interchangeable.
Also, on rear-wheel-drive vehicles that have a fan clutch, the lifespan of the clutch and water pump are about the same. Most experts recommend replacing both if either fails. Fan clutches lose their grip as they age and do not cool as efficiently as when they were new. This may lead to overheating on hot days or when pulling a heavier than normal load.
When the water pump is installed, the pump mounting surface must be perfectly clean (no old gasket remnants) and dry to prevent leaks. The water pump gasket (if used) that fits between the pump housing and engine should be coated with sealer on both sides (sealer is not needed with rubber O-rings or molded rubber gaskets). If the pump mounts without a gasket, you will need the specified sealer: either an anaerobic sealer or RTV silicone. Water pump bolt threads that extend into the water jackets must be coated with sealer to prevent leaks. Bolts should be tightened to the recommended specs.


