I like to take full advantage of the codes the manufacturers offer. One of the ways to do that is to understand what all those letters and numbers represent that are in a diagnostic trouble code. Each of the five digits actually has a purpose and can make the job of diagnosing a vehicle’s problem much easier if you understand the breakdown of the code’s letters and numbers. I don’t want to even begin to try and remember each individual code, there are just too many of them, only what section of the car the code is referring too.
Let’s say you’re on the phone with a prospective customer and they mention a code number. While you’re talking to the customer, they are usually looking for some confidence in what you’re telling them. Knowing how to break down the code and explain it to them could make the difference in whether or not they’ll call the next shop on their list or not.
Keep in mind that codes are designed to help identify a particular problem with an area of the vehicle. They are a “guide” not a cure. Codes should be used in conjunction with proper diagnostic procedures, scanner readings and technical information. All circuits and components should be thoroughly tested before replacement of any component.
Breaking Down the Code
The first character of the five-digit code is a letter, it defines the section or system in the vehicle that the rest of the code is referring too. The letter codes are: P, B, C and U. (There are a few older models with an “E” code to. Treat those like a “P” code.)
The letter “P” represents the powertrain (Engine and transmission)
The letter “B” represents the body systems. This is a rather large list of systems, HVAC, interior lighting, exterior lighting, air bag and seat belt systems, wipers, dash and instrument panel, and electric seats. There are more added all the time.
The letter “C” represents the chassis systems. This generally consists of the anti-lock brake system and its numerous speed sensors. You can find steering-related codes and emergency brake codes here as well.
The “U” represents network codes. These are the codes related to the internal communication between different modules in the vehicle. These codes will also lead you to the other major sections of the car by way of the buss line information.
You may also find some codes that will overlap into other areas such as the “P” codes and “C” codes.
The next digit of the code is for OBD II or direct manufacturer codes. You’ll most likely see “P0XXX” or “P1XXX.” However, there are some rarely seen codes with a 2 or a 3 after the letter codes.
The third position is for the sub-system based on the first letter of the code:
1: Fuel and Air Metering
2: Fuel and Air Metering (injector circuit malfunction only)
3: Ignition System or Misfire
4: Auxiliary Emission Control System
5: Vehicle Speed Control and Idle Control System
6: Computer Output Circuits (theft codes)
7: Transmission
8: Transmission
Manufacturers are not required to follow the generic numbering system above but most will follow the same code identifications. The last two numbers refer to the actual component or area the first three digits represent.
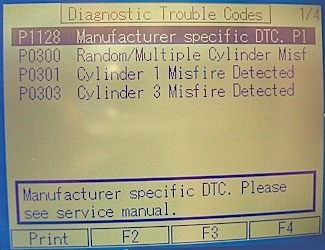
Example: P0301, the “P” would represent the “powertrain,” the “0” represents it’s a generic code (OBD II), the “3” represents it’s an ignition misfire, and the last two digits represent which cylinder it has detected the misfire on. In this example the “01” would represent cylinder #1.
Types of Codes
When we refer to codes, there are two types that are of interest: current codes and history codes.
Current codes are codes that the internal monitoring system of the computer has deemed necessary for attention. History codes are codes that have had a fault that either has been repaired or is no longer considered as important to the overall vehicle condition by the computer.
But, the computer program still feels it is necessary to leave a trace for the technician to follow for any needed evaluations.
History codes are extremely helpful in diagnosing intermittent failures. These history codes become a “bread crumb trail” back to the source of a problem. I would advise not to just clear history codes unless you have written them down and checked them out thoroughly.
Code Reading with a Scanner
As far as reading a code, as long as we are talking about generic codes, any OBD II-compliant scanner will more than likely be able to read those codes. If a scanner does run across a code that it does not understand, a message is displayed across the screen: “Manufacturer Only Code” or “Unreadable Code.” What it’s actually telling you is, it’s a “1” code (second digit of the code, or more to the point, a manufacturer-specific code). You’ll have to step up to a better scanner to read that particular code.
GM and several other manufacturers have added additional information to the five-digit codes. These are not “codes” but are “Symptom categories.” The DTC symptom is made up of an additional two-digit code that is place after the five-digit code (usually a space between the two codes). The first digit following the DTC indicates the symptom category, while the second digit refers to the subsystem or more in-depth information about the symptom. There are 16 possible symptom categories available for 0 to 9 and A to F. Currently, there are only eight categories in use, 0 through 7.
0: General Electrical fault (standard wiring failures)
1: Additional Electrical failures (overflow from the “0” code
2: Frequency/Pulse Width (frequency and pulse modulated inputs and outputs of the PCM.
3: PCM internal failures (memory, software, internal electrical failures of the PCM).
4: PCM programming failures (operational software)
5: Algorithm failures, PCM failures or input comparison failures
6: Mechanical failures (faults detected by inappropriate motion in response to a PCM-controlled output)
7: Bus signal failures (signal integrity or bus hardware failures)
8: Reserved codes (reserved for future use)
The second digit of these “symptom” codes refers to a specific problem area. For example:
01: represents a code for “short to battery”
02: represents a code for “short to ground”
As you can see, the first digit represents the general area of the code while the second digit is more precise with what it wants to tell you to look for. I’ve counted more than 80 subsystem codes in use right now. I’m sure they’ll be more.
Coding and deciphering the code has become a regular part of a technician’s daily job. Knowing how to interrupt and break down the internal structure of the code will help in determining how to make the proper repairs. The more time we can spend doing the correct diagnosis means the less time we’ll spend on the job, and the quicker we can move onto the next.


