Fuel Pump Tech Tip: MIL On With DTC P0463 Or Erratic Fuel Gauge Operation

Fuel Pump Tech Tip: MIL On With DTC P0463 Or Erratic Fuel Gauge Operation

Some 2004-'07 Explorer four door/Mountaineer vehicles may exhibit the malfunction indicator lamp (MIL) on with diagnostic trouble code (DTC) P0463 or an erratic fuel gauge concern. This could be from sulphur contamination in the fuel, causing an open or high resistance on the fuel sender card.

Issue:
Some 2004-’07 Explorer four door/Mountaineer vehicles may exhibit the malfunction indicator lamp (MIL) on with diagnostic trouble code (DTC) P0463 or an erratic fuel gauge concern. This could be from sulphur contamination in the fuel, causing an open or high resistance on the fuel sender card.
 
Service Procedure:
1. For vehicles with a customer symptom of erratic fuel gauge operation (with no MIL on), proceed to Step 1a. For vehicles with a customer symptom including the MIL on, proceed to Step 1b. If unable to verify the concern, do not continue with this TSB. 
 
a. Follow the appropriate pinpoint test (PPT) for “Fuel Gauge Inaccurate” in Workshop Manual (WSM), Section 413-01. If PPT test results lead to fuel pump module replacement, proceed to Step 2. If PPT test results 

figure 2

isolate any problem other than fuel pump module replacement, repair as indicated and do not continue with this TSB. 
 
b. Install a scan tool to retrieve any DTCs. If DTC P0463 is retrieved, proceed to Step 2. If DTC P0463 is not retrieved, this TSB does not apply, follow normal WSM diagnostics. 
 
2. Remove the fuel tank. 
 
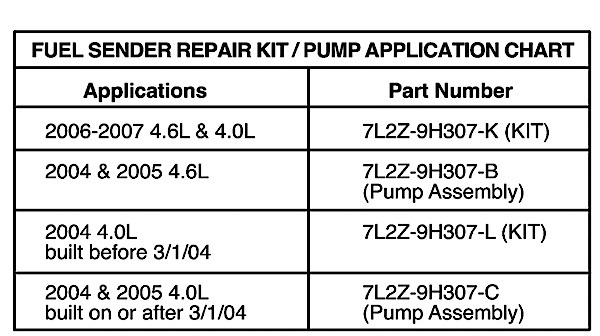
3. Remove the fuel pump assembly from fuel tank. See the chart to determine if a kit ­(contains a fuel level sensor assembly, a wire harness and heat shrink tube) or fuel pump assembly is required for repair. For vehicles that can be serviced with a kit, go to Step 4. For ­vehicles that require fuel pump assembly replacement, go to Step 12. 
 

figure 3

4. Remove the fuel level sensor assembly (sender card/float rod assembly) from the fuel pump assembly. 
 
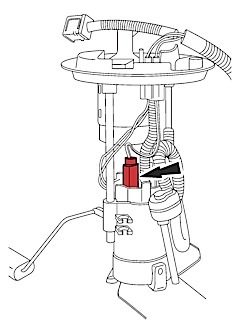
5. Detach the electrical connector from the fuel pump housing (Figure 1)
 
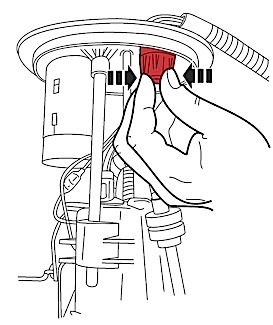
6. Remove the wiring harness from the fuel pump assembly flange by depressing the retaining fingers on the harness connector at bottom of the flange and by pushing upward out of the flange (Figure 2)
 
7. Install the new wiring harness by feeding the wires through the flange hole and inserting the harness connector into the flange until an audible click is heard. Check for proper retention. 
 
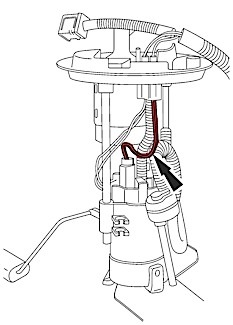
8. Re-attach the electrical connector harness to the fuel pump housing. Prior to making the connection, place one loop in the pump wires away from the convoluted feed tube (Figure 3). 
 

figure 4

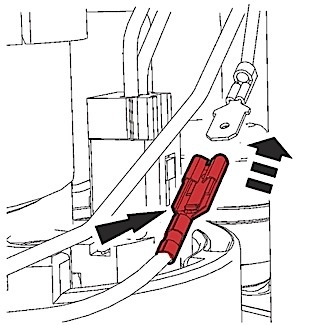
9. Re-attach the signal wire (yellow) on the harness to the signal wire (yellow) on the replacement fuel level sensor assembly (Figure 4). 
 
10. Wrap the ground wire around the signal wire one time and attach the ground wire terminal to the terminal on the fuel level sensor assembly. Check for proper retention. 
Note: The ground wire must be wrapped around the signal wire, as described in Step 10, to prevent potential interference with the float rod arm.
 
11. Re-attach the fuel level sensor assembly to the fuel pump housing, making sure that both the signal wire and the ground wire are routed through the gap between the fuel level sensor assembly and the fuel pump bracket. Torque the fastener at the bottom of the fuel level sensor assembly to 1 Nm (9 lb.-in.). 
 
12. Re-install the fuel pump assembly into the fuel tank. 
Note: Take care not to damage/bend the float rod or sender card during installation of the fuel pump assembly.
 
13. Re-install the fuel tank. 
 

Courtesy of MotoLOGIC® Repair & Diagnostics: www.motoshop.com/motologic

You May Also Like

Mayhew Tools Introduces Screwdriver Product Line

The line, featuring both individual tools and sets, fills a void in the market for screwdrivers entirely made in the USA.

Mayhew Steel Products, Inc. (Mayhew Tools) introduces a new line of screwdrivers that are entirely made in the USA. The line, with products sold both individually and in sets, includes over 100 items to fill the needs of the user.

High-quality attributes extending across the product line include features such as ergonomic acetate tri-lobular handles for maximum strength and torque transfer, ribbed necks for fingertip control and a non-slip grip, and a durable black oxide finish for corrosion resistance. The Micro Screwdrivers set available within the line feature an ergonomic square handle for a comfortable and secure grip and are comprised of Nylon 6 for high tensile strength and abrasion resistance.

Top 5 Tools: Steve Coffell, Auto World, Hazelwood, MO

Steve Coffell, a technician at Auto World in Hazelwood, MO, says his Top 5 Favorite Tools are: Related Articles – Streamlight Launches Stinger Color-Rite Light – Streamlight Adds Two New Work Lights – New Master Series HL1000 and PL 500 from NEBO Lights   OTC Genisys Touch – Quick scan, bidirectional control Snap-on VANTAGE Pro – Easy-to-use

Wheel Bearing Adjustment Tools & Equipment

A wheel bearing that’s out of adjustment can reduce bearing life and can affect more than just the bearing. It’s important to adjust the wheel bearing endplay to the proper specifications. If the bearing set is adjusted too loose or too tight, it can cause the bearing to fail prematurely. There are a few types of assemblies, so using correct procedures and tools will ensure a comeback-free wheel bearing installation.

What R-1234yf Means for Service, Equipment, Safety

For shops, R-1234yf means several new procedures, a certification and new equipment in order to properly handle these new systems. Why the difference in handling and servicing R-1234yf systems versus R-134a? Flammability.

Top 5 Tools: Daniel Sjobeck, Roseville Auto Repair

Daniel Sjobeck, tech Roseville Auto Repair Roseville, MN Related Articles – Snap-on Butane Torches Offer Unmatched Versatility – Milwaukee Provides Improved Performance with Die Grinders – OTC Debuts New Hub Oil Seal Puller Set A good toolbox. You can have the best of everything, but it’s no use if you cannot find it. Power Probe

Other Posts

Ingersoll Rand Belt Sanders Deliver Fast, Smooth Finish

The sanders have an adjustable four-position power regulator that can be set to match the toughness of the material.

The sanders have an adjustable four-position power regulator that technicians set to match the toughness of the material, from heavy weld removal to fine finishing.
Snap-on Spark Plug Socket Sets Help Techs Beat Winter Freeze

These sets allow technicians greater accessibility options with a locking extension providing extra security.

Ortho Voice Assistant Built for Auto Repair Professionals

Housed inside a ruggedized tablet, Ortho offers a hands-free data lookup, delivering accurate answers in seconds.

Milwaukee Tool Introduces M12 FUEL Bandfiles

The new M12 FUEL Bandfiles provide professional users with control and greater mobility on the job.