You can’t argue that Hondas aren’t popular cars that have earned customer loyalty by giving many miles of trouble-free service to their owners. It’s safe to say that Honda has changed the way the world builds cars. And to think they’ve done it in 30 years is truly remarkable.
All machines, even the good ones, require regular maintenance and, eventually, some replacement of consumable parts. Brakes certainly fit that description. What we’ll look at in this article is not so much how to replace worn-out pads, but rather things to be on the lookout for that will ensure a quality job and eliminate comebacks.
BRAKE PAD INSPECTION
Honda and its well-dressed Acura sister line have used the simple and effective squeak-type mechanical brake sensor for years. I’m sure we’re all familiar with the metal tab that makes contact with the rotor when the pads are reaching the end of their useful life. While we find the noise unmistakable, many customers still don’t relate it to a brake warning. That’s why it’s important to inspect the pads on every car that comes in the shop. Give customers the heads up that brake service will soon be needed, and you’ll be much more likely to get the work. Better yet, give them an appointment. It works for the dentist, and it will work for us.
Over the years, Honda has gone from a captured rotor to a knock-off style and back again, trying to overcome warped rotors and the resulting shake while braking. Be sure you know what type you’re dealing with before making your estimate. Rotor warpage is the result of excessive heat and nothing builds heat like a dragging brake. It’s important that the caliper hardware and brackets be restored to like-new operation.
While heat is the most common cause of rotor warpage, not controlling the torque on the lug nuts is probably second – and shouldn’t be. If you’re still tightening wheels with an impact gun, you’re part of the problem. Do us all a favor and stop it.
BASICS FIRST
The most basic and often-overlooked detail is a thorough inspection of the system. While the front pads may be the obvious problem that got the Civic on the lift, it’s our responsibility, and opportunity, to inspect the entire system. Take a good look at the rear shoes; we’ve seen the friction material separate from the shoes on some older cars. The safety consequences of this problem are obvious. Also take a look at the hardware, including the self-adjustment and hand- brake mechanisms. Don’t overlook the wheel cylinders; check them for leakage as well as free movement of the pistons.
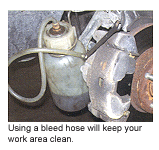
Hopefully you recommended and sold a brake fluid flush along with the service. This is the time to be sure the bleeders will open and aren’t plugged. At the same time, look at the brake hoses and the steel lines to confirm their condition.
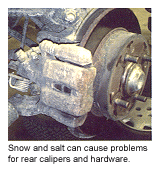
Honda uses the familiar turn back-type caliper with the rear disc brakes. What we’re looking for here is even wear of the pads. Check the hand-brake system to make sure it’s operating freely, and check the condition of the cables. Are the protective rubber boots still intact, or can you see the rust on the inner cable? If the cable looks good, unhook it from the caliper to confirm its condition as well as to check for binding in the mechanical part of the caliper.
When it comes to replacing the pads, the same good habits apply to both the front and rear. By now, I’m sure we’re all aware of the risk involved with simply pushing contaminated brake fluid backward through the ABS system. The risk of creating blockages in the ABS modulator is just too great to overlook. There’s really no reason not to open the bleeders and slowly retract the pistons, catching the bad fluid in your bleeder bottle. You’re going to bleed and flush the system as part of the service anyway, so you might as well get rid of the most abused fluid from the start.
PAD REMOVAL
As the pads are being removed, it’s important to look for anything that isn’t moving freely. As mentioned earlier, we’re also looking for pads that are worn evenly, otherwise the workload isn’t being distributed evenly at best, and there’s a good chance the pads are hanging up and putting the dreaded heat into the rotors. It’s not unusual for the customer not to notice these problems since they tend to come on gradually. But all of them can feel the difference once the system is restored to its original condition.
 The system inspection continues as we start to replace pads. Open the bleeder and push back the pistons on the calipers. On the front, we use a C-clamp between the outer pad and the back of the caliper. It should take little effort to retract the piston and move the caliper away from the outer pad. If excessive effort is required, don’t use force. Instead, look for an indication of what’s binding and remove the caliper to investigate it further.
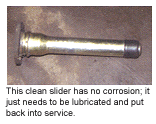
If the slides are frozen, it will become evident when the caliper is removed. On some older models the slides are part of the bolts, while on others the caliper bolts go into the slide. Either way, they should be removed, cleaned and lubricated. Be sure to check the condition of the rubber boots that protect the sliders from the elements.
If you’re working on a model where the boot is located on the inside diameter of the caliper bracket, carefully remove the boot to clean the rust off the housing and the boot to re-establish the proper clearance. Late-model cars use a seal on the slider part of the bolt that is much more effective and easier to service. Now with the caliper removed, the piston should easily return to the bottom of the bore; if not, a rebuilt is certainly in order.
 All of these warnings also apply to rear brakes equipped with discs, except, of course, using the C-clamp. Being equipped with a mechanical hand brake, it’s necessary to turn the pistons as they’re retracted. Again, we should all be familiar with the process and have the tools on hand to make it a simple one. Be careful when turning the piston so that the boot isn’t torn. If the boot feels brittle, or is already torn, it’s a good indication that overheating has taken place. Being equipped to handle both mechanical and hydraulic application, the rear calipers are twice as likely to have a problem.
The last place to look will be the most obvious – the pads themselves being stuck in the bracket. Like the boots that tighten up by the buildup of rust behind them, remove the plated anti-rattle clips from the bracket and clean up the bracket where they sit. The final step is to use a high-quality lube on the slider hardware as well as any areas that make metal-to-metal contact, particularly where the pads mount into the bracket.
TIME-SAVING CALIPERS
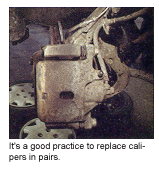
The good news is there is a profitable alternative to the extra time required to restore the performance of a caliper assembly. The availability of affordable loaded or friction-ready calipers for all popular applications are often a better choice for both you and the customer. The customer gets his/her car back, the shop can stay on schedule and you have the piece of mind of installing a quality part with the protection of a warranty for both you and your customer. The question of loaded versus friction-ready goes to the shop’s policy and preferences. While loaded calipers can offer a good value, you want to be sure they include a pad you’re comfortable installing on the car. And, in some cases, like when only the caliper needs to be replaced (although I prefer to replace them in pairs), friction-ready units might be the best choice.
 Many of us made the investment in on-the-car lathes when the captured rotors were popular; it’s still a good option as long as the rotors are in good shape, and they’re not at minimum thickness. Many of the cars that are so equipped are getting older and, more often than not, you’ll find yourself replacing the rotors. It’s not difficult and will be made much easier with the use of a hub removal tool. In a perfect world, wheel bearings would be replaced with every rotor replacement. But with a little care, the bearings can be reused. Be sure the bearings are cleaned, packed with grease and the seal is in good shape.
Another upside to replacement versus resurface is that you’ve restored the mass with a replacement rotor, whereas you remove it with a resurface, making the resurfaced rotor more likely to warp as a result of heat.
 With either type of rotor, it’s critically important that the hub surface where the rotor mounts is clean and free of rust; the rotor should slide onto the hub. If it doesn’t, find out why (don’t pull the rotor home with the bolts).
Like the lug nuts, the rotor bolts should be clean, lightly lubed and tightened evenly to the torque spec. With knock-off-style rotors, don’t overlook the outside diameter of the hub. It’s commonplace to find rust buildup that gets disturbed when the rotor is removed. In some cases, it will prevent the new rotor from sliding home. Either way, a few minutes spent removing the rust now is better than having the car kickback with a noise complaint or, worse yet, a damaged ABS sensor.
OTHER BRAKING PROBLEMS
When faced with the complaint of poor braking performance, ask the customer if the pedal remains hard and solid, or does it fade to the floor? If fading is the problem, suspect that the master cylinder is leaking internally. You can usually duplicate the condition by lightly working the brakes while driving downhill. If the pedal is hard and firm, suspect the calipers or pads are stuck as we just discussed.
The diagnosis of the booster is the same as on any other car. With the engine off, pump the pedal to empty the booster of vacuum, start the engine with your foot and the brake, and look for the pedal to go down as the vacuum builds. There have been some issues with the boosters leaking vacuum, which can be confirmed with some investigation with your stethoscope.
Pedals with excessive stroke that don’t stop well will often go back to what we talked about earlier. If only one of the slider pins is seized, or the pads are flexing in the bracket, the boost-assisted hydraulic system will have no problems forcing things to move. A quick check for this problem is similar to the booster test. With the engine off, stroke the brake pedal to dump the vacuum. If the pedal feels good without boost, but you’re able to get excessive stroke with boost, suspect excessive movement somewhere. You could clamp the brake hoses to pinpoint the corner, but why take the chance? You have to take it apart anyway, and if one corner needs to be serviced, you might as well check them all.
We don’t have the space to get into the ABS system here. But, actually, the system is so reliable on Hondas that the most important thing we can do is to take the precautions with the fluid we talked about earlier. For more details on ABS, check out the www.import-car.com website and search ImportCar back issues for Honda ABS. You’ll get plenty of good information.
I know this article is basic for many of you, but it never hurts to review some of the jobs we do on a routine basis. Hopefully, it also reminds you to include a thorough brake system inspection whenever a Honda or Acura finds its way into your bay. It will pay dividends for both you and your customer.