A parasitic current draw is one of those tests that there are multiple ways of doing, and while none of them are really wrong, there are certain techniques to do a better job, more accurately and faster than others. So I thought I would show you the way I do them.
Which test you use also can depend on the age of the vehicle and the equipment — the way I do the test on my 1998 GTI is going to be different from the way I would test 2015 Touareg. I’m going to show you how to do it on the most modern vehicles. This way is great because you don’t have to open up any circuits, you don’t have to disconnect the battery to get your meter hooked up to it or break out any big test equipment. Pulling fuses and disrupting circuits even with the key off can cause the draw to go away temporarily, and lead to you not finding a problem with the car at that moment when there’s something actually going on.
The tools we’ll be using are a multimeter and a chart showing a relationship between voltage drop and current draw. (I’m using one from Power Probe’s website: info.powerprobe.com/fusechartsdownload.)
Before we get started on this test we want to check our multimeter’s leads. Simply turn your multimeter to Ohms and touch the leads together, you should get about .1 or .2 Ohms. If you get anything higher than that or if you wiggle the leads around and the numbers are jumping all over the place, it’s time to get new meter leads. I can’t tell you how many times I’ve seen people get burned by this, and been burned myself, so now anytime my multimeter gets turned on, the first thing I do is check the leads. If I’m concerned about them being bad at all, I get new leads. There’s no way to rely on accurate readings if you’re not 100% sure your test equipment is good.
I’m going to use my Volkswagen Passat to demonstrate this test. Your fuse panel may be in a different location than my vehicle, but the testing will be the same.
The Test
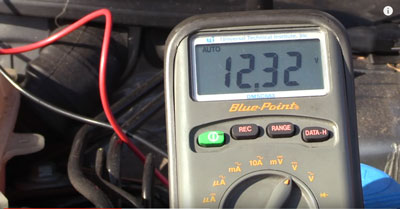
First we’re going to check that the battery is good. Turning the meter to DC volts, we get a 12.32 voltage reading, which is a bit low to accurately do this test, so I’m going to charge the battery to get it closer to 12.6 volts. If the battery has a weak state of charge, it can affect the reading of the current draw test. We also want to load the battery by starting the car and making sure it doesn’t drop below 10 volts. This is also a perfect time to check the charging voltage. You should see a reading in the neighborhood of 14 volts, but be sure all the loads are off (such as the air conditioning, heated seats, defroster, the radio, etc.).
After we’ve confirmed the battery is good, we want to fix any known issues, such as a door latch that’s not locking or any faults stored in any of the vehicle’s computers — we want to make sure we take care of those first. There’s no sense in trying to find a potential problem, while ignoring something we know is wrong. That goes for issues in the starting/charging system as well.
Next we’ll prep the car. Start with latching the hood and all the doors. We don’t want the doors shut, because we’ll need to access the fuse panel. And if the doors are shut, we’ll have to unlock them and that will defeat our current draw test. So it’s better to latch the hood, all the doors and the trunk and then lock the doors and put the car to sleep.
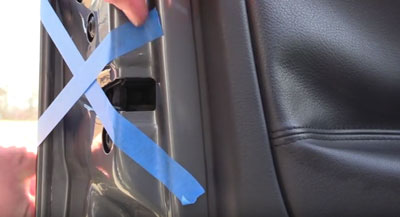
One of my tips is to mark the doors in an obvious way (say with blue painter’s tape) so you don’t walk by one of the doors and slam it shut.
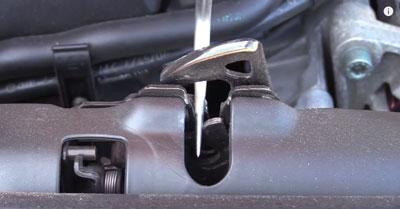
Another thing that I like to do is double check on the instrument cluster to make sure that it doesn’t show that any of the doors, hood or trunk is still open. If it does, you might have a problem with one of the latches and that could be your draw problem.
Next we’re going to lock the car and give it about an hour to two hours for it to fully go to sleep.
Once the car is fully asleep, we’ll take another multimeter, and put it on millivolts. We’ll measure the voltage drop across the fuse. That’s as simple as putting a meter lead on each side of the contact. As you do that, you’re going to get a reading and then it should drop down to zero — if it doesn’t drop to zero, we know we might have a problem. Normally the way I do it is I measure each fuse, and I look at my meter to see the drop. It takes about 3-5 seconds per fuse for it to drop all the way down.
To give you an example of a circuit with a draw versus a circuit without a draw, I’ll test the radio fuse. There’s no volt drop across the fuse. But when I turn the radio on, the multimeter reads 3.4 millivolts. That tells us that we have some current going through the circuit.

Once we know the amount of volt drop across the fuse, we’ll use our fuse chart to see how much amp draw that volt drop is causing. Use the guide at the top to determine the correct fuse you’re measuring. In our example with the radio fuse, it’s a yellow, 20-amp fuse. We then look at the numbers on the left. We had a 3.4 reading, which the chart shows we had a current draw of about 1 amp. That’s about three times more draw than our spec of 35 milliamps. While that’s not going to cause the battery to die in 15 minutes, after an extended period of time that can lead to a dead battery.
Now let’s take a look at the kind of draw that can kill a battery in just a few hours.
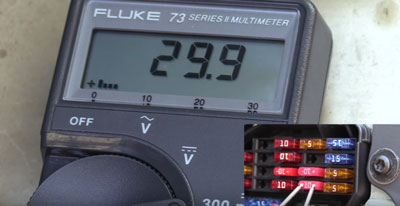
This fuse is for one side of the vehicle’s high beams. As I turn the high beams on, we have a multimeter reading of 29.9 millivolts. Then we’ll check the chart and see how much current that draws. The fuse is a 10-amp mini fuse. We find that we get a reading of over 4 amps. I think it’s pretty safe to say that if we had a high beam on, we would see it, but that gives you an idea of how much current one bulb can draw.
I know you’re thinking that this is going to take forever to do a proper current draw this way, and you’re wondering why can’t you just pull the fuses out and see if the draw on the meter goes away? Well, like I mentioned earlier, that can upset the rest of the car and the computers that are running things on virtual powers, modules powering other modules, so that just may not be the best way.
After you’ve done this a few times, you can run down checking each one of these fuses, and maybe only spend about 10 minutes max. And it goes really fast if you don’t find a problem at all.
Remember, before wrapping it up, you want to unlock the car, open all the doors and remove the tape (or whatever you used to remind you not to slam the doors). Also remember that you’re battery needs to be in good condition as well as your starting and charging system — otherwise you may be wasting your time doing this test and not fixing a known problem.
While finding the circuit that’s causing the draw is really easy, finding the component on that circuit might be a little more challenging.
This article is based on the Humble Mechanic’s video, The BEST Way To Perform a Parasitic Draw Test; view it at youtube.com/watch?v=lRcj1fQcWwU.