maximum capacity in the 60-80 ampere range is required for current-ramping ignition systems, electric fuel pumps, and other low-amperage electrical accessories.
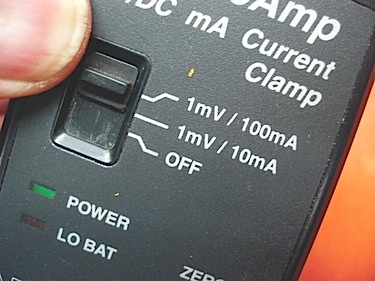 If you’re buying a new amp probe, choose one that has a positive on/off switch detent to prevent the probe from accidentally turning on and draining its battery.
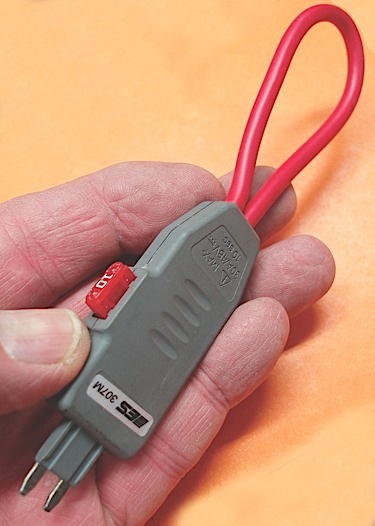
The jaws on the low-amp probe should also be small enough to insert into wiring harnesses or other hard-to-access areas.
Because most lab scopes are equipped with “banana” connectors, a BNC-to-banana adapter might be required to connect the probe to the scope.
These adapters and leads are available from online diagnostic equipment specialists and tool truck suppliers.
As for maintenance, it’s important to keep the probe free of metal filings, dirt and grease, all of which can affect its accuracy.
 Lab Scopes
While just about any lab scope is capable of displaying a current ramp, current ramps are more clearly displayed if the “spike” or “peak” detect mode on the scope can be turned off.
Because the peak detect mode is commonly used for displaying secondary ignition waveforms, some scopes operate only in the peak detect mode.
For that reason, make sure that spike or peak detect mode can be disabled before purchasing a new or used lab scope.
The ability to store current ramp waveforms on compact flash (CF) card or to download current ramps to a PC is another highly desirable feature.
Since many technicians trade their old lab scopes in on more sophisticated versions, it’s possible to find used scopes at reasonable prices. Before buying any used scope, make sure that its manufacturer continues to provide repair and support services.
Evidence of rough handling and prolonged exposure to dirt and grease in any used lab scope usually indicates a shortened service life, so the cleaner the better.
Before buying a new scope, remember that your professional scan tool might offer a basic lab scope attachment or might include a basic lab scope feature into its architecture. Several online automotive test equipment suppliers also offer entry-level lab scopes in the $1,000 range. Tool truck suppliers generally sell basic two-channel lab scopes with many additional features for about $4,000.
 Most advanced technicians are now using PC-based scopes because installation kits are available for a relatively modest investment and include some very advanced scope waveform analysis features. One problem with PC-based scopes is that consumer-grade laptop computers tend to be bulky, hard to handle and somewhat fragile for automotive applications.
For that reason, most techs mount their PCs on mobile tool carts. In ontrast, some higher-end PCs are designed to take the abuse encountered in a shop environment, but be prepared to pay the price.
Keep in mind that advanced training is also required to take full advantage of advanced scope features. Some manufacturers might offer basic training with the purchase of a new lab scope. Because a lab scope is only part of your test equipment inventory, it’s often better to start at the low end of the scope market and advance to the level that you can most profitably use and afford.
 Lab Scope Terminology
While criteria like sample rates and resolution are important, most automotive lab scopes currently on the market are fully capable of performing most current ramping functions. Practice is the key to learning how to operate a lab scope.
For example, learn how to quickly change the time base and amplitude. Also learn how to freeze and store waveforms for future reference. You should also practice stabilizing the waveform by adjusting the slope and amplitude of the trigger point. Some scopes are sophisticated enough to capture waveform movies, which are very useful for detecting and storing electrical glitches for future reference.
Not to be confused with the trigger point, select the “automatic” display trigger feature for observing current ramp waveforms. The “normal” display trigger is used only to freeze momentary glitches in an otherwise repeatable waveform pattern. In any case, studying the paper or DVD instruction manual included with your lab scope will greatly reduce the set-up time required for current ramping.
Low-Amp Probe Testing
A low-amp probe is designed to measure the intensity of the magnetic field that’s created when an electric current flows through a copper wire. This magnetic field creates a voltage potential in the current probe, which is rated in millivolts (mV).
 The probe’s output in mV can then be vertically displayed on the scope’s screen. The probe’s zero calibration is designed to compensate for the effects of local magnetic fields. For that reason, always hold the probe next to the wire to be measured before zeroing the probe.
To familiarize yourself with low-amp current probes, connect a 12-volt headlamp or large bulb to a battery with jumper wires. Next, use the 10-amp direct read circuit in your digital multimeter (DMM) to measure the actual amperage flowing through the bulb. Let’s say that the bulb draws 2.08 amps. Next, connect your low-amp probe to your digital multimeter, turn on the probe, zero it by holding it next to the source wire, and see if you get the same reading.
Do the Math
To understand how to convert mV into amperes, remember that 1,000 mV equals 1.0 volt. When your current probe is clamped to the wire, it might display, for example, 20.80 on the 100x scale and 208.0 on the 10x scale. The 100x scale is more sensitive to amperage variations than the 10x scale.
To convert the reading into mV on the 100x scale, multiply 20.80 by 100. This equals 2,080 mV or 2.08 volts. Multiplying 208.0 times 10 on the 10x scale equals 2,080 mV or 2.08 volts. Since the scope display uses volts to represent amps, 2.08 volts = 2.08 amps of current flowing through the lamp.
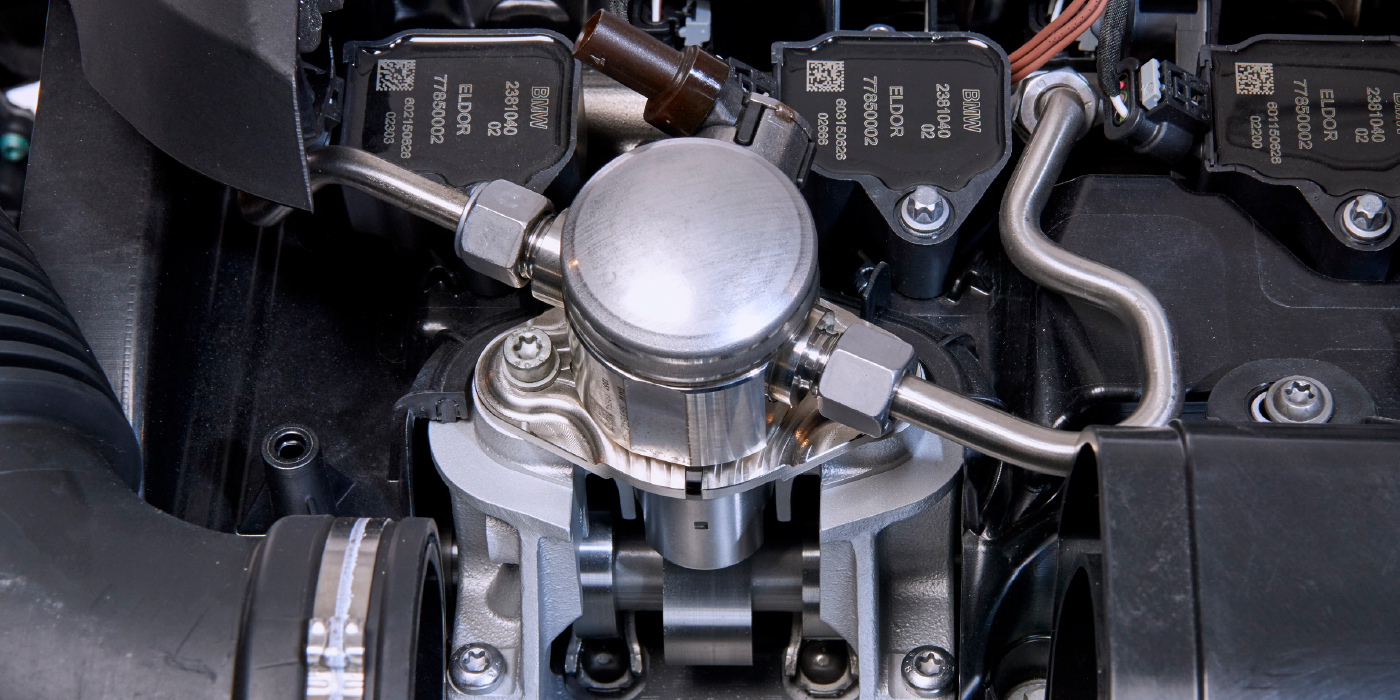
Most circuits can be accessed through the fuse box or through individual wires. In some cases, a jumper wire must be used to provide enough wire length to connect the amp probe. In any case, fuse taps like the one below are very handy for tapping into the fuse box to current ramp primary ignition and fuel pump amperage.
 Current Ramping Ignition Systems
Current ramping is a definitive test that accurately indicates switching functions in the primary ignition circuit, shorting in the primary coil windings, and the total amperage being drawn through the primary coil circuit.
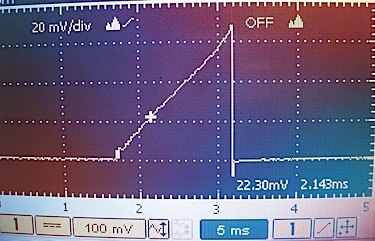
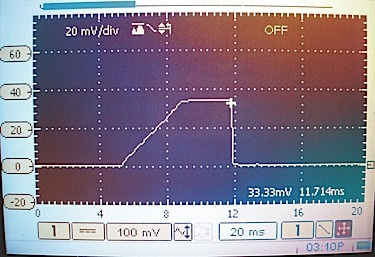
The current ramp below is a known-good display of an individual, non current-limited, coil-on-plug (COP) assembly. Keep in mind that, on most COP ignition systems, the PCM’s coil drivers are protected by the PCM disabling the individual coil if excess primary current flow is detected.
Notice that, because each vertical division represents 20 mV, 3.4 divisions equal 68 mV. If your amp probe is set on the 100 mV scale, multiply 68 mV times 100, which equals 6,800 mV or 6.8 volts or 6.8 amps on the screen.
Critical areas are, from the left, the small oscillation where current begins to flow through the primary winding and the small downward spike at the right, both of which are normal in this display. Most important, if the current ramp curves sharply upward, current is flowing into the primary coil winding too rapidly due to shorted windings. Because ignition coils can fail in multiple ways, it’s always best to current ramp the suspect coil against a known-good companion coil.
Most electronic distributor ignitions use a current-limited primary circuit to prevent shorted primary coil windings from overloading the power transistor in the ignition control module (ICM). This effect creates a flat-topped current ramp waveform. It’s also important to note that the current flow in Photo 5 is limited to about 3.8 amps at idle speed on this distributor ignition system. The ICM reduces coil saturation or “dwell” time at idle speeds to prevent overheating the coil. If the ICM is operating correctly, amperage draw will increase with engine speed.
Current Ramping Fuel Pumps
Right off the top, some technicians believe that current ramping is a definitive method of testing fuel pumps. By definitive, we mean a fool-proof test. Conversely, many technicians believe that current ramping is more of an indicative method of testing fuel pumps. By indicative, we mean that the test might indicate, rather than define, a problem in the fuel pump’s motor circuit.
A current ramp will display the total current or amperage draw of the fuel pump motor. If the amperage is too high (let’s say 10 amps), the rotating friction of the armature might be too high or, in other instances, the fuel pressure regulator might be stuck closed or the in-line fuel filter clogged, both of which cause the fuel pump to develop higher than normal pressures. Conversely, if the amperage draw is too low, the fuel pump relay or electrical ground might have excessive resistance, the mechanical portion of the fuel pump might be worn, the pump filter sock restricted or the fuel level too low.
Most conventional electric fuel pumps incorporate a motor armature equipped with carbon brushes riding on a segmented commutator. The current ramp displays the relative amperage flowing through each commutator segment. If a segment is short-circuited, the amperage will spike higher than the companion segments. If a segment is open-circuited, the amperage will spike lower than companion segments. So current ramping is obviously an extremely valuable method of evaluating the condition of the motor commutator.
But, to the contrary, I’ve had pumps intermittently fail that displayed a textbook-perfect current ramp. In these cases, the mechanical pump mechanism was likely jamming with debris. And I’ve had pumps run forever that displayed a very rough, but even, current ramp. Here again, a key point is to look for irregularities in amperage draw between different commutator segments.
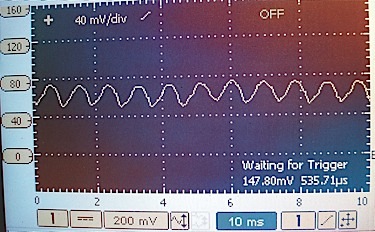
The ultimate amperage draw depends, of course, upon the fuel pressure required by the fuel delivery system. Fuel pumps supplying 13 psi for low-pressure throttle-body systems can draw as little as 3.0 amps. High-pressure systems supplying, let’s say, 60 psi of fuel pressure can draw as high as 8 amps. The above known-good current ramp is for a system supplying about 50-60 psi of fuel pressure.
Fuel Pump Speed
Although fuel pump speed varies among applications, it can be an important indicator of fuel pump performance. If the number of segments in the fuel pump commutator is known, the fuel pump speed can be calculated.
To illustrate, 11 commutator segment current ramps are displayed during 10 milliseconds (ms) in the above fuel pump current ramp. To convert milliseconds into seconds, multiply the time base and number of ramps by 100. In this case, 1,100 segment ramps occur each second. To convert seconds into one minute, multiply ramps and seconds by 60. The result is that 66,000 segment ramps occur each minute.
To calculate fuel pump speed, divide 66,000 by the number of commutator segments. Eight segments = 8,250 rpm, while 10 segments = 6,600 rpm. Most pumps operate around 6,000 rpm at normal pressures and amperage draws.
When you begin to assemble a database of known-good and bad current ramps, you’ll begin to understand the value of current ramping ignition coils and fuel pumps.