 by Gary Goms
When I lived in Southern California during the early 1960s, I became part of what I call the “car culture.” Most of us ended our week by cleaning up our cars on Thursday nights so we could cruise on Friday nights through famous drive-ins like Harvey’s Broiler on Firestone Boulevard and Bob’s Big Boy on Sepulveda Boulevard.
Of course, Saturday night was reserved for drag racing at night on the old Lions drag strip near Long Beach, or on the old San Fernando strip at the north end of the Valley on Sundays.
But what I call the “car culture” still exists today as many large, organized “cruises” held in many metro areas during the summer and in small car shows attracting vehicles from within a 100-mile radius that are held in smaller towns like mine. Typically, these car shows include a Saturday night cruise, a Sunday “Show ’n Shine” and perhaps a street dance afterward.
But this year was special because my body and paint (B&P) man and I had just finished putting the finishing touches on my old 1st-series 1955 Chevrolet 3100 pickup, which I inherited from my dad in 1973. Some vandals stole the truck in 1991, blew up the transplanted small-block V8 engine, and vandalized the vehicle. It later rested peacefully in my back yard until 2008, when I aired the tires, pulled it into my shop, and began disassembling the body and chassis. 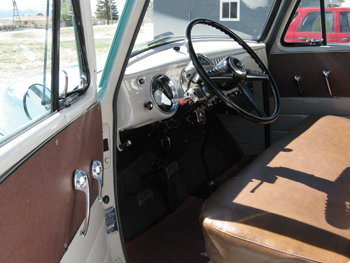
Thus began the trials and tribulations of rebuilding a half-century-old truck. Because rebuilding and restoring from the frame up is such a lengthy process, I’ll cover the high points of the body restoration in this story and the mechanical restoration in a later, second installment.
Old School
During my days in California, the racer’s standard was to keep a car clean and uncluttered. Standard paint and interior was the preferred option, with most of our money going into the performance-elated parts of the vehicle. In other words, the car should look as good from the bottom up as from the top down. Sloppy wiring harnesses and cobbled engine transplants were frowned upon, as were gaudy aftermarket trim parts. This was the basic pproach I took to restoring Dad’s truck.
Unfortunately, the truck was parked for nearly 20 years while I was busy racing in the desert and on Colorado’s hill-climb circuit, causing it to deteriorate even further. As with other ’50s-era vehicles, the 1955 General Motors body technology is all-steel construction held together with bolts and sheet metal screws of many different configurations and lengths, the most famous of which is the old General Motors clutch-head screw.
Fortunately, clutch-head screwdrivers are available from restoration specialists and clutch-head screwdriver bits from commercial suppliers. In addition, don’t forget to order the applicable body, mechanical repair, wiring and bed assembly manuals from your restoration parts source. These manuals are inexpensive and also invaluable when doing a frame-up rebuild or restoration.
Because each interior part is fastened with a different length and gauge of screw, we stored and labeled each set of screws or small parts in sandwich bags. Larger parts like vent windows were carefully boxed and stored as assemblies. 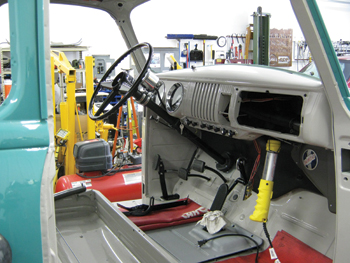
It’s also important to keep a digital camera on hand to take photos of the vehicle as it was originally assembled. The importance of parts organization and photo documentation is vital and can’t be over-emphasized.
Clean-Up
Dad’s truck spent its first 20 years being driven on rough construction roads and its whole life being parked outdoors. The frame was heavily caked with mud and hardened grease, all of which had to be scraped clean before sand blasting. Media blasting is hard, dirty work and, if it can be subcontracted, so much the better, because it’s worth every penny.
In my case, I rented a commercial air compressor and sand blasting equipment and bought a trailerload of sand to remove 57 years of accumulated rust and paint. Always plan the cleaning process very carefully because, immediately after sand-blasting, the residual sand has to be blown out of the cracks and crannies on body and frame and each bare-metal part put into primer before it begins to rust.
Unfortunately, media blasting exposes rust-through on any sheet metal surface. Although I live in an arid climate, rain and snow had rusted the joining surfaces between the front fenders and body and had penetrated the inside metal kick panels.
 Rust-through on the bottoms of the lower cab corners and door panels was also exposed by media blasting, so we had to repair the mounting flanges, kick panels and lower door panels and replace the lower rear cab corners. Repair panels are available from restoration suppliers for nearly every section of the cab so, while difficult, it’s not impossible to repair badly rusted cabs.
Since Dad had to chain up all four front tires to descend steep, icy construction slopes in winter, the two right-side fenders had been badly beaten from the inside out by broken tire chain links. The left-rear fender and spare tire mount had also been badly damaged in a wintertime collision and the running boards were beyond repair. We used the original left-front fender, but later discovered it had problems revealed only when the primered fender was sanded for paint.
Because so many defects show up during the final paint prep, I recommend replacing all the fenders, running boards, bed assembly and perhaps even the doors with new. To avoid mismatches, I also recommend buying all of your exterior sheet metal from one supplier.
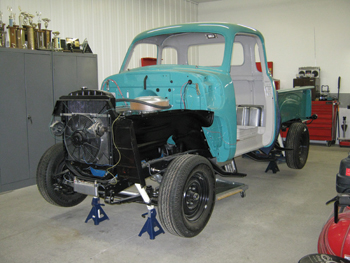
 The Reassembly Process
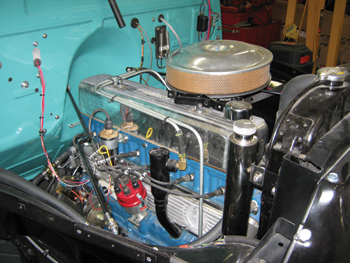
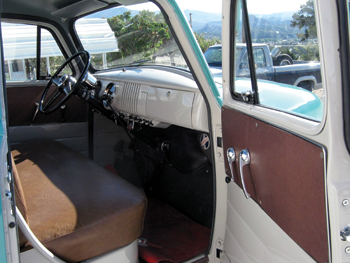
The first rule of reassembly is to do all of the chassis, powertrain and interior body restoration first. Because the insulation on old wiring is inherently fragile, I recommend installing a new wiring harness.
In my case, I created a custom wiring harness and made sure all lighting, instruments and under-dash accessories were functional before installing the firewall mat, floor mat, seating and upholstery. Because re-dos are difficult to do without scratching fresh paint, make sure everything works before installing the upholstery and doors.
If you can’t do the body and paint yourself, you need to find a body and paint man who is experienced in the restoration process. To prevent over-spray and keep the paint lines crisp, the individual parts should be painted off the vehicle. This is a lot of extra work, but on round-fender Chevy truck bodies, the result is crisp paint lines and exacting detail.
Early body technology uses anti-squeak gaskets and webbing installed between the front fender sheet metal and body. Consequently, the body must be disassembled to do these necessary repairs. My B&P man repaired and painted the bare cab and, once the cab was mounted on the frame, I began restoring the instrument panel, heater, steering column and other mechanicals.
 I had to add a modified wiring harness to the original wiring configuration to accommodate the single-wire, 12-volt Delco alternator, starter solenoid, electric fan, electric fuel pump and integral turn signal flashers.
Since I converted from six to 12 volts, I also had to attach a small aftermarket fuse box to the bottom of the cardboard glove box. I’ll cover more details about wiring and mechanical in my second installment in an upcoming issue.
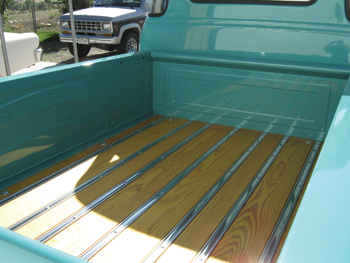
The Not-Simple Truck Bed
As with most trucks of the era, Dad’s old ’55 Chevy was equipped with a bed floor made of 3/4” by 6” yellow pine boards cut and grooved for the metal hold-down strips bolted to the bed crossmembers. While the
original boards were finished with a thin, utilitarian coat of black paint, I decided that finishing the boards in deck stain and holding them in place with stainless steel replacement strips would look better and be more practical for the long term.
 We carefully numbered each board so that each would remain in place during fitting and reassembly. Although my supplier had grooved the boards to accommodate the hold-down strips, I still had to hand-plane the boards to fit the strips. Once in place, we squared the bed to the chassis, which is an extremely important step. Because the second bed support truss isn’t bolted directly to the frame, it’s important to carefully lay out the parts and determine their function before drilling hold-down holes in the boards or frame.
Much of the required information was missing from my bed assembly manual, which made early photo documentation even more important. Once the bed was squared and all parts were in place, the holes for the bed mounting bolts and hold-down strips were carefully drilled and the bed bolted in place. Before tightening the hold-down bolts, always make sure that the tailgate will close easily. In our case, the floor boards had pushed the sides of the bed outward, making tail gate closure difficult.
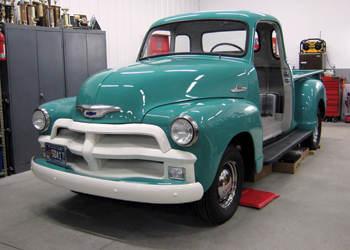
Although I envisioned the appearance of this truck as being nearly the same as when Dad drove it home in 1955, I also envisioned it as a retro or old-school type of street rod. So I left the badly damaged, bed-mounted spare tire carrier off and installed a cleaner-looking aftermarket fender that didn’t have the spare tire indentation. I inserted small plastic plugs into the spare tire carrier locating holes to allow for installing the spare tire carrier at a future date.
Last, the original tires were tube-type, 6:00/16” six-ply tires. Dad got rid of those years ago due to the hard ride and the replacement expense. I wanted 15” tubeless tires, but couldn’t immediately locate an undamaged, matched set of 15”, six-hole Chevy wheels with the inside retainer clips for the stock hubcaps.
So I ordered a set of 15”, “generic” truck wheels with chrome hubcaps and trim rings, all of which had been recently introduced by Jim Carter Truck. Although the hubcaps have the 1953 Chevrolet design and logo, they gave the truck the “retro” look that I wanted.
The Front Clip
Installing and aligning the front fenders, grille and hood wasn’t nearly as simple as it looked. Following 1950s architecture, the front fenders are suspended from the radiator core support, which is bolted to the frame with only two 3/8” carriage bolts. With the fenders hung loosely in place, it was obvious that the hood wasn’t going to close over the fenders.
And when all else fails, read the instructions. According to my original Chevrolet repair manual, the fender support braces extending from the firewall to the front fenders must be adjusted to exact lengths. After adjusting the fender brace rods, the hood practically fell into place. Although the reassembly process might look simple, reading the factory assembly-line manual and mechanical repair manual will help prevent expensive and time-consuming mistakes.
Having cared for this truck since I began my career in 1957 working at our local gas station and garage, I always knew that the old Chevy had problems with body panel fit. In addition, this truck series was the very last of the old round-fender Chevys and it’s highly likely that the body stamping dies were becoming worn, which contributed to the hood, fenders and doors lacking conformity with the body. In addition, tight panel fit simply wasn’t an engineering priority for early trucks designed to work in agriculture, ranching and commerce.
The other issue was that the hood is made in two halves connected by a heavy two-piece brace at the rear. We discovered during primary sanding that the top sheet metal had formed itself around the hood brace, which left an unsightly bulge that was revealed only when sanding the initial coat of primer. So we had to disassemble the hood for sheet metal repair. This was a very difficult process and I’m guessing that the hood had originally been assembled on a jig to maintain its side-to-side dimensions. We got it close, but not perfect. The slight misalignment at the rear is something I decided to live with because I didn’t want to disassemble, clean and repaint the hood. Once the hood was installed, the grille and front bumper fell into place. But the final adjusting process was finicky and time-consuming, to say the least.
The Running Boards
For durability’s sake, I had our local bed liner shop coat the running boards with bed liner to produce a grainy, long-lasting black finish. Another issue was that the running boards and fenders lacked about 1/4” of mating. Since the running boards were designed to support and protect the rear fenders from vibration damage, we fabricated rubber spacers to connect the running boards with the rear fenders. I could have left the spacers out, but repairing this practically unnoticeable fault would have cost several thousand dollars and extra weeks of time. So I accepted the lesser of the two evils.
 Parts Sourcing
For your reference only, I’ve listed my specialty suppliers on page 64. Many other sources for reproduction and used parts can be located on the Internet. Most of the repro parts are manufactured in Asia. I will say that a few repro parts I bought were poorly made or outright didn’t fit. In other cases, I simply found better. Parts sourcing is expensive because a parcel delivery fee is added to each parts order. The least I paid was $7.50 for minor parts and the most was $180 for the delivery of a front fender, while large orders are often delivered free.
To save freight, I initially placed a huge $5,000 order and was disappointed because I found that, although the invoices were accurate, many parts were back-ordered and the order left incomplete. To simplify parts management and storage, buy only the parts needed to complete a particular portion of the vehicle such as the body, bed, front fender clip and doors. Rubber goods and fasteners are very cheap and should be replaced simply because many original bolts were only grade-two and are usually badly rusted and metal fatigued. I used stainless steel bolts throughout because Dad’s truck is a kind of hot rod and I wanted to be able to remove and replace parts.
I’m estimating that I spent about $15,000 on body restoration and nearly the same amount on mechanical restoration. Keep in mind that plenty of time was spent on details. For example, restoring and installing the Chevrolet Fresh-Air heater took at least a week and required an expensive hand-made heater core replacement. Because they can be easily ruined, cleaning the instrument clusters took over a week. Removing and replacing parts multiple times to check form, fit and function is the rule of the rebuild/restoration game.
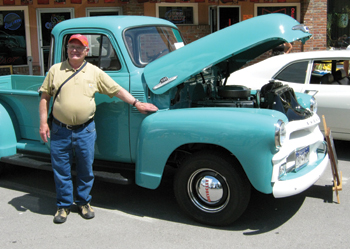
With that said, my ’55 Chevy truck project took four years of spare time and was finished two days before our local car show on July 1, 2012. The show attracts about 100-120 cars each year. In the end, I was awarded (to my complete surprise) the Club Choice award and the Top Ten People’s Choice Award. Not bad for an old ’55 Chevy 3100-series pickup that had spent its better days working heavy construction.
My Restoration Suppliers:
Classic Parts: 1-800-741-1678
LMC Truck: 1-800-LMC-TRUCK
Jim Carter Truck Parts: 1-800-872-1913