When any engine swap is done using a larger displacement engine, you have to look at the big picture. Everything around it must be addressed to handle the added horsepower. This includes the braking system, front and rear suspension, and the structure of the frame.
When I did my first Volvo V8 engine swap, it was a 1983 760 four-door sedan that had an anemic six-cylinder engine. I selected the 1992 LT1 Corvette FI engine, linked to a 700R4 automatic transmission and one-piece driveshaft. The stock rear differential held up over the years without problems, even though it had twice the horsepower and torque. It looked like a real sleeper, even with retaining the stock wheels but with larger profile tires. The climate control even worked but not as good as I wanted, considering the mounting of the compressor and V-belt drive. I drove the 1983 760 Volvo V8 for six years and perfected new ways to build the next killer Volvo. That’s why I chose the 780 Bertone for my second engine swap (the focus of this article); it had style and was meant for V8 power.
Finding a used, red 780 Volvo with a black interior was tough since only six were made for the U.S. (Many 780s had a two-tone tan interior, which I didn’t like.) I finally came across a mint 780 with only 90,000 miles, a turbocharged B230 engine, and a very clean body and interior. The powerplant of choice was a 1998 Corvette LS1 5.7L, SFI, OBD II, all-aluminum engine. The reason I chose this engine over the LT1 was the power-to-weight ratio and the all-new design with increased horsepower and efficiency. The LS1 engine generates 345 hp at 5,600 rpm and 350 ft.-lbs. of torque at 4,400 rpm.
The ‘97/’98 LS1 engine fuel system utilizes a two-line fuel delivery system as does the Volvo, so it made the installation look factory. I opted for the 1999 Camaro 4L60E automatic transmission because it’s compact and rugged, yet has a quality shift feel. A Tremic six-speed was a thought, though.
The one-piece driveshaft from the Camaro was installed using the factory Volvo multilink rear suspension, fitted with special anti-roll bars and urethane bushings that I designed. In this article, I will go into some detail about how I designed the mounting of the driveline, down to the electrical system modifications. This meticulous conversion was well worth the effort, as the result looks so much like a factory installation.
ENGINE BAY PREPARATION
As I removed the four-cylinder engine and transmission, I sold it to a waiting customer for the same amount for which I purchased the LS1 engine. That was a first! And the shop profited from the installation of the unit.
- I removed the front crossmember and placed it under the new engine for motor mount fitting on a strong stand. I had to remove the Corvette oil pan and use a Camaro unit instead, since the pan was shaped in a wing pattern that was too wide.
- I used the factory aluminum motor mount brackets and the hydraulic mounts that the LS1 engine came with because of their strength and simple design. I had to cut off one inch to bring up the bracket and move it one inch forward. I like the engine as close to the firewall as possible and low to the crossmember for better handling.
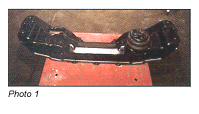
- The crossmember was modified into a cup shape to fit the mounts and to drop down the engine even more for stability (see Photo 1). I also notched the member for manifold collector clearance.
- The fire wall and transmission tunnel were hammered up for bellhousing clearance. No cutting was required.
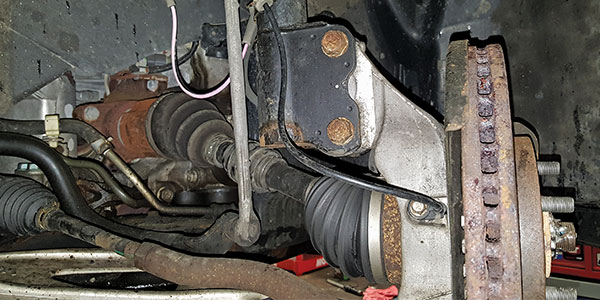
- The ABS control unit was moved over one inch for alternator clearance.
ENGINE/EXHAUST MANIFOLD MODIFICATIONS
- I used the factory manifolds because of their small size and large ports. I had to cut under the manifolds to bring them closer to the block, and then weld them. I also repositioned the left oxygen sensor for steering shaft clearance. I sent the manifolds out after the mods were done for a ceramic coating that helps keep their new look for years to come. Keep in mind that the manifolds are of a two-wall design that works like a catalytic converter, so remove the small balls before the welding is done.
- I had to use the Corvette head pipe flanges since they’re a very different design than any other arrangement.
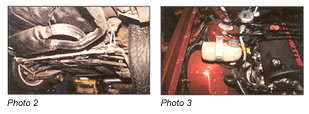
- I used two free-flow catalytic converters with 2-1/2-inch pipe running in a Y pattern, then 3-inch pipe going over the rear axle. I welded in a free-flow Camaro muffler transverse, with two stainless tips. It was necessary to cut the rear spare tire well four inches to provide muffler clearance (see Photo 2).
TRANSMISSION/DIFFERENTIAL
- I installed and mounted the 4L60E (sporting an aftermarket oil cooler using Aircraft hose and fittings) from a 1999 Camaro.
- A Camaro crossmember was used along with the stock mount. It was cut and welded to mate with the Volvo mounting areas.
- There was no need for a speedo cable, as the rear Volvo axle was retained using the built-in stock pickup unit. The 4L60E has no speedo provision anyway.
- The Volvo floor shifter was modified to work with the new transmission. It took me many hours to get the exact detent synchronizing so it would work smoothly.
- The chosen Camaro driveshaft was of a one-shaft design. The drive angles were checked with a bubble protractor and set in perfect form. I had to change the rear differential angle one degree to offset the transmission angle. This step is overlooked most of the time on even the best engine swaps.
- It was necessary to drop the rear differential to install the one-piece driveshaft. When it was down, I constructed a urethane bushing on top of the case for more strength since, with the added power, it wouldn’t stand up under high-torque conditions.
- The 373 gear ratio was the stock Volvo gear set, but I installed a centrifugal locking unit out of a 1991 Bertone since it came stock in all of those models that year.
COOLING SYSTEM
- I selected a Volvo diesel radiator from a 740, as the mountings were the same for the four-cylinder engine. I just had to move over the top hold-down bracket. Even the expansion tank was retained. The radiator hose connections were in the perfect location and the right size.
- The use of a 760 two-speed cooling fan and shroud worked very well, as I wired in the factory relay using a Saab two-speed cool fan radiator sensor. I located the sensor just below the upper radiator hose connection.
- As I mentioned before, I piped the expansion tank to the V8 intake hose directly behind the throttle housing and to the radiator with a factory Volvo hose (see Photo 3).
- The heater hoses were routed around the back of the intake manifold, and connected to the stock Volvo heater control valve to retain the stock climate control system.
FUEL SYSTEM
- The stock Volvo fuel pump and filter were retained; they gave adequate fuel delivery even under hard acceleration with no starvation.
- All of the hoses I used were braided Aircraft lines with special anodized fittings. They provided durability and looked good, too.
- The stock fuel tank was used with no modifications; even when the larger diameter driveshaft, which runs in the center of the tank, was installed.
BRAKES AND SUSPENSION
- On the front brakes, I used jumbo metallic pads and cross-drilled rotors from a 960 Volvo. The rear pads, however, were metallic replacements.
- The front sway bar was retained, and I just replaced the mount bushings with a urethane compound.
- The rear multilink suspension that Volvo used on the Bertone did not offer a sway bar, so I had to design my own. I used a series of brackets and hardware to come up with a special arrangement that worked very well (see Photo 2 again).
- To achieve better road feel, I installed some urethane strut rod bushings and replaced both lower ball joints because of some minor play that resulted from the aging process.
- The front springs were not changed or cut in any way since the LS1 engine’s weight is only 60 lbs. more than the cast-iron B230 engine.
ELECTRICAL SYSTEM
- When I purchased the used LS1 engine, the harness that was going in the firewall was cut and had to be spliced, as too many connections were missing. I thought this job was best left to a company that specializes in that particular area, so I sent the wire harness and the engine management control unit off to them. A GM design, the engine and transmission control box is built into one unit.
- The wires were marked clearly for their particular locations and were a snap to install. I removed the Volvo control unit and used some of the wire connections from that harness. I mounted the LS1 control unit in the same location and positioned the OBD II connector under the passenger side of the dash.
- All of the dash gauges functioned in a normal manner, as I installed the Volvo coolant temperature sender, oil pressure sender and the tachometer to the engine.
- The tachometer was a tricky one since the ignition signal from the LS1 engine is taken from the engine control unit. It generates only a 4-cylinder signal, but the Volvo tachometer uses a different signal because of the EZK system. I gutted out the Volvo tachometer and used an early version that didn’t have EZK.
- The fuel control unit was sent out for further programming, to accommodate modifications for this particular conversion, including tire size, gear ratio, and the removal of the EGR system, the electronic throttle housing and the traction control. All of the shift points were then changed for crisp, firm engagement.
- The charging system was a simple change, as I used the 115-amp Bosch alternator from a 1992 Saab 9000, and modified the mounting bracket and pulley. The Volvo engine used a lower amperage unit, but the wiring was the same.
OTHER BELT DRIVE ACCESSORIES
The LS1 power steering pump was piped to the Volvo steering rack with ease and also had a reservoir tank mounted on top. The A/C compressor was also from the LS1’s unit and was routed to mate with the factory Volvo hoses and converted to R-134a. The climate control operated exceptionally.
Some other builders use the Ford 5.0L engine and clutch fan arrangement. I really didn’t care for that swap because of the oil pan design: It prevents you from mounting the engine close to the rear of the chassis and lowering it close to the crossmember. Having done many engine conversions over the years, I’ve learned to make the car look stock and keep performance in mind. What more could a customer want?
With that said, this project was the best ever. But Volvo should have built a V8 from the beginning; its 740 = 4-cylinder; its 760 = 6-cylinder, and its 780 should have equaled 8-cylinder. But, then, this conversion wouldn’t have been necessary!
|