When Saab first introduced the 9000-model lineup in 1986, the gearbox was mounted transversely in the car. It was designed in this way for effective cooling and to provide the shortest possible path for the power flow to the wheels. All Saab transmissions have five forward speeds and reverse – all of which are synchronized. When the new, redesigned 900 Series came out in 1994, the transmission was quite similar and required the same factory tools for repairs.
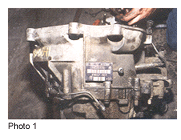 Because of the similarities, it’s very important to check the factory tag located on top of the gearbox during any repair of the gearbox (see Photo 1). Different gear ratios and model years have to be distinguished to be certain that the correct parts are installed.
This article will cover transmission configurations for the 900 and 9000 models ranging from 1994 to 1998, as well as clutch replacement. The removal of the gearbox on both models is basically the same, especially as it relates to the engine-lifting beam used to adjust height for removal.
A hydraulic clutch system is used on the 9000 models. The system consists of a master cylinder located under the dash close to the pedal, and a slave cylinder mounted on the gearbox casing. The hydraulic pressure is transferred to the release bearing and no adjustments are needed.
The 900 models, on the other hand, utilize a self-adjusting cable routed through the firewall to the gearbox, which then links up to a lever to activate the linkage to be transferred to the release bearing. Over the years, this cable was updated for stronger and longer-lasting positive clutch release and smoother shifting.
Any clutch hydraulic or cable system failure could result in very extensive repairs. Some customers don’t realize that low pedal pressure could result in damage to the reverse gears and/or forward synchromesh. Do a road test before any work on the car is done, following the gearshift lever adjustment for proper alignment.
Gearshift lever adjustments are carried out using a 4 mm drill bit or a long Allen tool. To adjust, lock the external selector shaft mechanism in reverse with the 4 mm tool.
Loosen the pinch bolt clamp at the end of the rubber-bonded joint located next to the gearbox. Then pull off the rubber shift boot at the console and locate the 4 mm hole. Line it up with the shift shaft tube (reverse), then retighten the pinch bolt and check for shift feel. This makes for not only a very precise fitting adjustment, but also an easy-to-service linkage between the external selector mechanism and the gearbox. (Note: On the 900 model, use third gear.)
To prevent engine noise and vibration being transmitted through the gear selector rod, the linkage between the selector shafts in the gearbox and the external selector mechanism incorporates a rubber joint. When this joint fails on the 9000, it causes difficult shifting and possible clutch burnout as the gears cannot be determined. If you receive any customer complaints about tough shifting, you should check this joint. I’ve found that the reason for the rubber joint failure is a leaking seal on the internal selector shaft, which causes oil to break down, tear and destroy the rubber. I suggest replacing the seal and joint together, then checking the fluid level.
There are three oil plugs in the transmission – the top is for filling, the side is for checking the proper level (the gearbox holds 2.5 quarts) and the bottom is the drain. Saab recommends using 10W-30 or 10W-40 engine oil, or 75W gear oil for smooth shifting in colder climates.
TRANSMISSION AND CLUTCH REMOVAL PROCEDURES
Jack up the car and support it on jack stands or on a lift.
Disconnect the battery leads and remove the battery from the tray.
Detach the air intake duct from the turbocharger and side frame, and pull out the center section.
Remove the battery shelf and positive cables from the terminal block.
Remove the turbo pressure pipe and disconnect the battery ground lead from the gearbox, as well as the reverse light switch wires.
Fit a clamp on the hose going to the slave cylinder pressure line and tightly pinch the flex hose together to stop leakage during removal.
Undo the lower transmission mount.
Attach the engine-lifting beam and make sure that the beam has some tension and is properly seated on the edges of the fenders.
Pull off the left front wheel and remove the plastic front inner fender section.
Remove the two bolts attaching the strut to the spindle and remove the axle nut from the shaft.
Remove the inner clamp and draw out the axle. Place it in a clean area (not on the floor).
Remove the ABS cable wire. If it’s frozen in place, trace it up to the cowl area and disconnect it from there.
Remove the speedometer wires and shift lever tapered pin.
Take off both starter bolts (you can leave the wires on).
Remove the bolts securing the left subframe and both bolts holding the sway bar. Drop the subframe down on the pivot mountings (let it swing down).
Remove all bellhousing bolts and remove the transmission. Sometimes the dowels freeze up, so you might have to pry out the unit.
CLUTCH INSPECTION AND REPLACEMENT
Inspect the mating surface on the flywheel for signs of bluing and small hairline cracks. Since these cracks are fairly normal, there is no cause for concern. However, if the surface is deeply scored, the flywheel must be skimmed on a lathe with a grinder to achieve a smooth surface.
When replacing the clutch, thoroughly wash off the pressure plate surface to remove any preservatives.
Fit an old gearbox input shaft from a Saab 900 or a mandrel into the clutch disc and line it up in the crankshaft pilot.
Then, lift up the assembly into position and sparingly apply moly lube on the input shaft splines so that the disc will not stick and cause hard shifting.
Replace the slave cylinder onto the gearbox and remember to tightly install the pressure line in the slave unit (see sidebar).
GEARBOX OVERHAUL
Start by thoroughly cleaning the external surfaces and make a clean area for parts inspection.
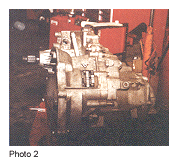
Mount the gearbox on a stand, if possible, and drain the unit (see Photo 2).
Remove the inner driveshaft housing and place it with the shims.
Unbolt and remove the end cover, then engage first gear to lock the gearbox to prevent the selector balls from falling out.
Tap out the dowel for the fifth gear speed selector fork.
Remove the circlip from the hub and use tool #7841158 to pull off the hub from the shaft. Take care of the rollers and springs.
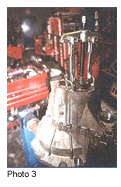
Remove the lock nut from fifth gear and install puller #8791287 and arms #8791303 to the main case. Screw in the brackets #8791438 onto the case (see Photo 3).
Loosen and remove the bolts in the main case. Don’t forget the bolt for the bearing, for the reverse gear idler shaft.
Drive down the two dowels in the joint between the main housing.
Carefully pull off the casing, while at that same time gently tapping on the mating flange with a plastic face mallet.
Lift off the gearbox casing and remove the special tools.
Remove the reverse gear selector fork and gear set.
Disengage the first speed gear and remove the shift shaft lock bolt, then slide out the shaft.
Remove the bolts holding in the selector assembly and lift it off out of the way.
Fit puller #8791287 with arms #8791295 on the first speed gear and pull out the cluster about 15 mm along the shaft.
Lift out the input shaft and gears and place them off to the side for inspection.
Lift out the first gear and cluster, and then remove the puller.
Loosen the four Torx screws and remove the output shaft bearing bracket.
Lift out the pinion gear and inspect the bearing for worn areas. Replace it if necessary.
Lift out the differential assembly and remove the magnet from its slot inside the housing.
Check all bearings and replace worn synchros with the updated style from Saab. Lube all shafts and bearings before installation, keeping an area clean. Assemble the gearbox using reverse procedures and use Saab sealant #0943544 between the main case. After the case is assembled, blow out the breather on top of the case to ensure that the sealant doesn’t clog the vent hole. It’s called a labyrinth filter (it incorporates a screen to keep out dirt and moisture).
When fifth gear is assembled on the shaft, tighten the lock nut until you have some preload collapsing the crush sleeve. It’s important to have the correct clearance for the end float of the gear set.
Install the rear cover and hand shift the gearbox through the gears for smoothness. Add 2.5 quarts of fluid and install the gearbox in the car using reverse installation procedures.
| Before pressure-bleeding the slave cylinder, remove all the brake fluid from the container and replace it with fresh fluid. This will prevent early hydraulic pedal failure caused by swelling of the seals with contaminated fluid.
Also, if the clutch assembly is being replaced, the master cylinder should also be replaced. Don’t forget to inspect the pressure hose for cracks and weak clamps. The increased spring pressure from the pressure plate will blow out any weak seals, causing massive leaks and creating unhappy customers. |
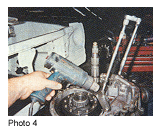 When removing the four Torx bolts (#40), secure the pinion/fourth gear retaining plate. The factory uses a thread-locker compound that makes it very hard to remove the bolts without stripping them out. I use a heat gun to pre-heat the bolts for removal (see Photo 4). When removing the four Torx bolts (#40), secure the pinion/fourth gear retaining plate. The factory uses a thread-locker compound that makes it very hard to remove the bolts without stripping them out. I use a heat gun to pre-heat the bolts for removal (see Photo 4). |