Toyota’s 22R series four-cylinder SOHC engine has survived and thrived in its cars and trucks for nearly 30 years, and is a desired powerplant for its power, torque and reliability. The basic design is a continuation of the engine that preceded it, the 20R, which was used in cars and trucks in the mid 1970s. Last month, we highlighted servicing head gasket issues on the 20/22R series 4-cyl SOHC engine. This month, we’ll take a look at timing chain and oil sludge issues for the 22R.
A Series of Unfortunate Events
The incidence of timing chain failure on this series of engines seems to have increased over the last few years. We seldom saw a failure until 175,000 to 200,000 miles. Now, we often see failures under 150,000 miles. We’ve concluded that the use of lower viscosity oil has had a detrimental effect on timing chain life.
Although there is still some disagreement on what is the ideal oil for all conditions, the fact remains that, on this engine, viscosity and oil pressure have a significant impact on timing chain life (more on this later).
There are, however, a couple of other problems that can significantly shorten chain life and cause other failures. Oil sludging, due to lack of maintenance and overheating, can damage any engine over time. Unfortunately, there is one other cause that is usually the direct result of an improper repair for a common oil leak.
A common sequence of events in the failure of a timing chain on this engine often goes like this. The engine has a serious oil leak at the front pulley area. The leak is partially at the front crank seal, but the thin, odd shaped O-ring that seals the oil pump to the front cover is also leaking.
The oil pump is removed, the seal is replaced (a repair sleeve is sometimes needed on the pulley), and everything is cleaned and reassembled. The engine starts, runs fine, oil pressure is normal and no warning lights are on. But, there is a light “ticking” noise from the front cover area. The noise doesn’t change significantly with engine speed, so the vehicle is returned to the customer, only to return in a short time with serious noises from the front cover and water in the oil — lots of water in the oil.
So what happened?
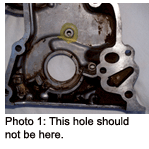 The top center retaining bolt for the oil pump housing was replaced with one of the other retaining bolts that is less than a quarter of an inch longer. That blew the bottom out of a blind hole (see Photo 1) in the front cover, allowing the bolt to rest on the plunger pad of the chain tensioner. The oil pressure couldn’t move the plunger, and the chain ran loose and beat on the guide until it broke. Then the noise got worse, mostly upon acceleration.
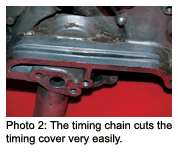
Within a few hundred miles, the timing chain destroyed the long, straight guide on the distributor side of the engine, the chain chewed a groove in the front cover (see Photo 2) and coolant started disappearing in great amounts, winding up in the crankcase.
 The front cover is still available from a number of sources. The timing chain components are sold in kit form and the replacement can be performed with the engine in the vehicle and without pulling the cylinder head. If the head is off, a close inspection of the timing components, as noted above, is advisable.
Teardown and Replacement
Timing chain replacement without head removal goes like this. The less bending and prying you do, the better the repair will come out. Depending on accessories, the repair will take more or less time, due to the mounting brackets.
Remove the fan, shroud, drive belts and any bracket attached to the front engine cover. You will also need to remove the valve cover. Set the engine on TDC, disconnect the battery and hide the keys to the ignition.
Remove the lower engine shield, then drain the radiator and crankcase. Remove the lower radiator hose from the water pump. You don’t need to remove the radiator, but it’s usually easier to see what you’re doing with it out of the way; it’s your call.
Remove the crank pulley, oil pump housing and drive gear.
Remove the oil pan bolts that screw into the front cover. Loosen, but don’t remove, the oil pan bolts on both sides of the crankcase.
Use a sharp, stiff putty knife to separate the oil pan gasket from the bottom of the front cover. Try to keep the gasket as intact as possible to prevent small pieces from falling into the oil pan.
Remove the ignition distributor, drive gear and fuel pump eccentric, and separate the camshaft sprocket from the camshaft. Remove the sprocket and let the chain settle into the chain guides.
Remove the small bolt that goes into the top of the front cover (remember, it’s probably in a pool of oil so you can’t easily see it).
Remove the bolts holding the front cover to the block, and the water tubes to the back of the front cover. Organize the bolts in a way that it will be obvious where they go on reassembly.
Use the putty knife again to separate the front cover from the front part of the head gasket. Use great care here. Unless you want to pull the head later, try to not separate the head gasket from the bottom of the head.
Carefully pry the cover away from the front of the block, making note of the alignment sleeves and their positions.
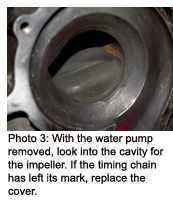
Remove the rest of the timing components, guides, tensioner and crankshaft gear. Carefully inspect the front cover. If the chain has started to chew only on the cover, it may be reusable. The best determining point is to look into the water pump cavity (see Photo 3) with the pump removed to see if the grooves have been imprinted there. Once there is a failure in this area, coolant, under pressure, is just redirected into the crankcase by the water pump.
Reassembly involves carefully cleaning the front of the block, mounting the new timing components and installing per the service manual. I use RTV on the mating surfaces of the pan and head gasket. Some of the timing kits come with a replacement piece of pan gasket that requires trimming off the front of the old gasket. If the original gasket survived the separation process, it may be better left intact. As a final check before putting the valve cover on, look down the chain at the tensioner plunger and make sure there isn’t a bolt pressing on it!
Oil Issues
As noted earlier, we have come to the conclusion that a lot of the timing chain failures on this engine can be eliminated by a different mindset on oil. It’s very obvious that engine noise is greater with thinner oil, the oil pressure indicated is lower and the benefits of thinner oil are negligible. So we have as a shop policy suggested stepping up to 15W/40 or 20W/50, depending on vehicle use. Since we don’t generally have the temperature extremes here in the Northwest that some of you see, you’ll need to educate yourself on the various properties of motor oil, and then determine what would be best for your part of the country.
Although there are different qualities for various viscosities of motor oil, there are also some anomalies where viscosity, thermal breakdown and low temperature pour ability are more dependent on additives than a particular weight rating.
The single most important factor in motor oil failure remains the lack of preventive maintenance. Remember that it isn’t the “oil” that usually breaks down in motor oil. It’s the failure of the additives that control oxidation, foaming and maintain viscosity that causes the oil to become ineffective. I suggest you get technical information from your lubricant supplier, and make your own determination as to the best compromise for a particular vehicle, based on the normal use it will see. We keep a photo record of various engine failures in a three-ring binder. It’s become a great tool for explaining the merits of maintenance, since a picture is better than thousands of words to some customers.

