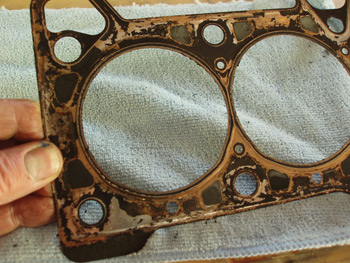
cooling system.”/>The most common method of detecting head gasket leakage is to remove the radiator cap, warm up the engine to open the thermostat and look for gas bubbles circulating with the coolant. A combustion gas detection tool can also be used to detect traces of combustion gas in the cooling system. See Photo 1.
The tool is filled with a blue-colored fluid to the specified level and, being careful not to inhale coolant, the rubber bulb is used to draw air from the radiator head tank or coolant reservoir through the fluid in the tool. The presence of combustion gas in the coolant is confirmed when the fluid turns from blue to yellow. An exhaust gas analyzer can also be used, but care must similarly be taken to prevent damaging the equipment by letting it inhale liquid coolant.
Compression tests can also detect a head gasket that is leaking combustion gases between two adjacent cylinders. Although combustion leakage between two cylinders doesn’t cause a coolant consumption problem, it will create misfire trouble codes on the adjacent cylinders and cause similarly low compression values in each cylinder. Cylinder leakage tests are similarly useful in detecting head gasket leaks because injecting compressed air into a cylinder will normally generate air bubbles in the radiator head tank or coolant reservoir.
CYLINDER HEAD REMOVAL
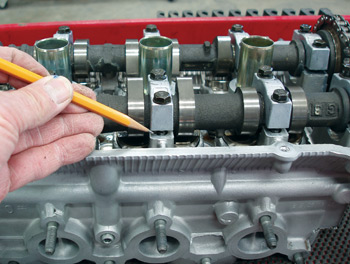
 Always allow the engine to cool to room temperature before removing the cylinder head. In the case of our Hyundai example, the head bolts must also be removed in reverse order to the normal torquing sequence to prevent the cylinder head from becoming distorted as it is removed. See Photo 2.
ENGINE BLOCK AND CYLINDER HEAD CLEANING
Because aluminum is a soft material, great care must be taken to clean the gasket surface without gouging or scratching the base metal. In most cases, the old gasket can be removed by applying a chemical gasket remover and carefully scraping the old gasket material away with a razor scraper or, in some cases, with an inexpensive hard plastic putty knife available through your local hardware store.
Rotary abrasives or wire wheels are not recommended for cleaning aluminum gasket surfaces. Not only can they gouge low spots in the cylinder head gasket surface, they can also contaminate the engine with highly damaging abrasive and wire filaments. Once lodged in the crankshaft bearings, these abrasive or hardened filaments will quickly ruin an engine’s crankshaft.
CYLINDER HEAD AND BLOCK INSPECTION
 When the cylinder head is removed, make sure that the camshaft turns freely in the cylinder head. If the cam turns against valve spring tension only when the cam bearing caps are loosened, the cylinder head probably requires straightening or replacement. See Photo 3.
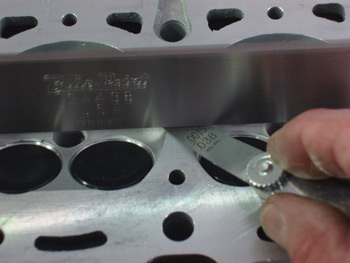 Next, a straight edge and feeler gauge must be used to test the cylinder head and engine block for straightness. As a rule of thumb, an aluminum cylinder head should show no more than 0.001” warping per cylinder along its length and 0.002” at several points across its width. In addition, the gasket seal may be adversely affected if low spots exceeding 0.0015” to 0.002” and more than 0.750” in length are measured at the cylinder or water jacket sealing rings. The cylinder block gasket surface should meet the same specifications. See Photo 4.
Last, the aluminum cylinder head surface should be resurfaced to the cylinder head gasket manufacturer’s specifications. In short, the head gasket surface should appear polished rather than rough, with composite gaskets requiring a finish of no more than 45 roughness average (RA) and MLS gaskets a finish of 20-30 RA. The rougher the surface on an aluminum cylinder head, the shorter the cylinder head gasket life.
Many cylinder head specialists routinely refinish a cylinder head a few thousandths of an inch to remove gasket etching and other surface blemishes. If the head must be cut more than a few thousandths of an inch, head gasket shims and thicker head gaskets can be used to prevent retarding camshaft timing and increasing compression ratios by changing the center-to-center distance between the camshaft and crankshaft. Most cylinder head services also routinely include valve, valve guide, and valve seat service or replacement.
HEAD GASKET INSTALLATION
Before installing a new cylinder head gasket, always read the manufacturer’s installation instructions. Never, for example, use a sealant on head gaskets unless otherwise specified. Similarly, always determine beforehand if the manufacturer recommends replacing the cylinder head bolts. If the bolts are the torque-to-yield type, they are stretched past their limit of elasticity and must be replaced.
To ensure accurate torque values and to avoid cracking the cylinder block, clean any dirt, oil and fluid from the cylinder block head bolt holes before installing the new head gasket and head bolts. Never lubricate the head bolts with a friction-modified oil. Unless otherwise specified, lightly lubricate the bolt threads with 30w non-detergent motor oil. Make sure that the head and block surfaces are free of dust, dirt, oil and lint before placing the gasket on the cylinder block.
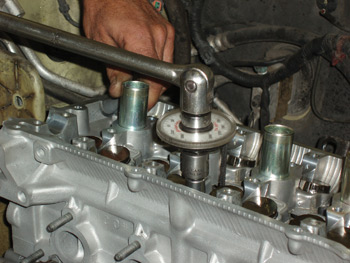 With our 2002 Hyundai 1.6-liter engine, the manufacturer recommends initially torquing the head bolts in sequence to 26 ft.-lbs., then torquing 75 degrees. Hyundai then recommends loosening the bolts to relax the gasket, and then repeating this sequence for the final torque value. See Photo 5.
After warming the engine to full operating temperature and checking for oil and coolant leaks, connect your scan tool to check for pending oxygen sensor and other diagnostic trouble codes. If the system checks clear, your customer’s vehicle is ready for many more years of reliable service.


