Certain 1988-2000 Civics may exhibit a clunk or squeak from the rear suspension when driven over rough or bumpy roads. The probable cause is a broken rear trailing arm bushing(s).
CORRECTIVE ACTION:
Replace the rear trailing arm bushing(s) — p/n 52385-SR3-000.
REPAIR PROCEDURE:
1. Remove the rear trailing arm. Refer to section 18 of the appropriate service manual.
2. Mark the trailing arm at the arrow on the bottom of the bushing. See Fig. 1.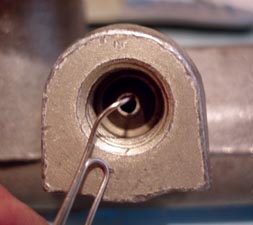 < Figure 1
3. Place the arm on a hydraulic press, supported by the hub base (t/n 07GAF-SE00401), with the spindle facing up. See Fig. 2.
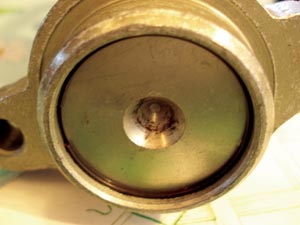 < Figure 2
4. With the hub driver (t/n 07965-6920201), press the old bushing out of the trailing arm.
5. Install the new bushing with the short end toward the outside of the vehicle. Align the arrow with the mark you made on the trailing arm.
6. Press the new bushing into the trailing arm until its edge is 10 to 12 mm above the surface of the arm.
7. Reinstall the trailing arm.
8. If necessary, repeat steps 1 through 7 to install a new bushing in the other rear trailing arm.
9. Bleed the brake system. Refer to section 19 of the service manual.
10. Check the wheel alignment, and adjust it if necessary. Refer to section 18 of the service manual.
ABS PUMP RUNS ALL THE TIME
The ABS pump may run all the time on a 1999 Passport, and the ABS light may be on with one or more ABS DTC(s) set. The brakes remain fully functional, except for the ABS.
PROBABLE CAUSE: The ABS coil integrated module (CIM) doesn’t turn off the pump.
CORRECTIVE ACTION:
Inspect the hydraulic valve assembly and replace the ABS CIM.
PARTS INFORMATION:
• Coil Integrated Module (2WD):P/N 8-97202-408-0; and
• Coil Integrated Module (4WD):P/N 8-97214-704-0.
REPAIR PROCEDURE:
1. Inspect the white plastic gasket between the pump and the hydraulic valve housing for signs of melting. See Fig. 3. The gasket usually starts to melt where the wires come out of the housing. If the gasket shows any signs of melting, disregard this service bulletin and replace the hydraulic valve assembly and the CIM.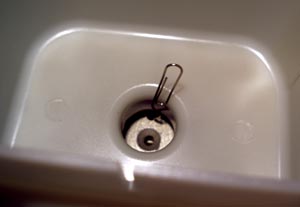 < Figure 3
Note: If you replace the hydraulic valve assembly, you must bleed the brake system. Refer to Service Bulletin 01-016, Service Manual Update: Revised Brake Bleeding Procedure.
2. Write down the customer’s radio station presets and mode settings.
3. Disconnect the negative cable from the battery.
4. Remove the CIM from the hydraulic valve assembly.
5. Clean the CIM mounting surface on the hydraulic valve assembly with a clean shop towel.
6. Install the new CIM in the reverse order of removal, and torque the Torx screws to 4.4 Nm (39 lb.-in.) (Fig. 4). Note: The CIMs are not interchangeable between 2WD and 4WD vehicles. Never install a 2WD CIM in a 4WD vehicle or vice versa; if you do, an ABS DTC will set and the ABS indicator will come on.
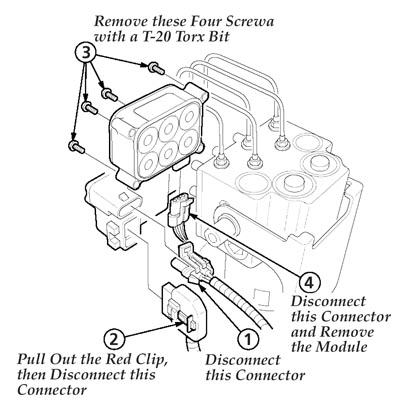 < Figure 4
7. Reconnect the negative cable to the battery.
8. Reset the clock, and enter the radio station presets and mode settings.
Technical service bulletins courtesy of Honda Parts Express.