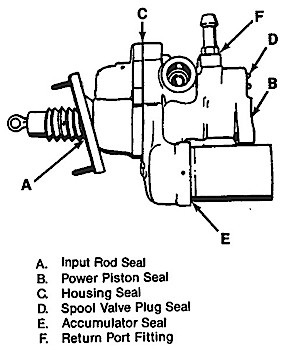
Vehicles: All power steering pump operated power brake boosters.
Problem: Improper operation, noisy system.
Installation Tip: Hydro-boost brake systems are self-bleeding if there is no other problem in the system. Use this initial bleeding procedure whenever replacing or servicing any component in a hydro-boost system. Normal driving conditions will remove air that remains trapped within the system when components are properly installed and there are no flow restrictions in the system. Always refer to the vehicle service manual for specific installation and testing procedures.
1. Replace any hydraulic line showing external damage. Rubber hoses more than 4 years old should be replaced. Install new seals for all disconnected fittings (as required) and install an in-line power steering filter. Tighten all hose fittings to OE specifications.
2. Flush the entire power steering system using the vehicle manufacturer’s recommended fluid. Fill pump reservoir to the proper level.
3. Disable engine to allow cranking without starting. Block wheels, put transmission in neutral or park and set parking brake, then crank engine 5 to 10 seconds (avoid overheating starter motor).
4. Refill pump reservoir as necessary. Repeat step 3 until level is correct.
5. Enable the engine to allow starting. Start engine and let idle. Slowly turn steering wheel from lock to lock a number of times.
6. Turn engine off and inspect fluid level and condition. Add or remove fluid as necessary. If fluid is foaming, wait one hour then recheck level.
Repeat step 5 and 6 until fluid level is correct and shows no sign of air. If the problem persists, recheck installation and connections.
1. With engine off, apply and release brake pedal 5 to 10 applications to deplete accumulator reserve pressure. With foot slightly pressing brake pedal, start engine. Pedal should drop and then push back against your foot.
2. With engine running, turn steering wheel until lightly against steering stop. After five seconds, return wheels to the straight ahead position and turn engine off. Apply and release brake pedal. There should be at least one power assisted brake application. Start engine and allow accumulator to recharge before moving vehicle.
3. Test drive vehicle. WARNING: Do not operate vehicle until brake and booster systems are functioning properly. There should be one power assisted application.
Condition and Causes
Hard pedal: Slipping belt, low pump pressure, restricted system.
Pedal stays down: Contamination in booster.
Long pedal/no pedal: Possible brake hydraulic problem. Block master cylinder ports, recheck pedal action. If pedal is firm, the problem is beyond the master cylinder.