By Eric Seifert
Automotive Technical Editor
Kathy enjoys hiking with her dogs. Recently, she traded in her old SUV for a 2005 Jeep Liberty that could comfortably carry the three of them. On a recent drive home from hiking in the mountains, Kathy noticed that the ABS lamp was on. She stopped by my shop a few days later, and after testing, we determined that the rear wheel speed sensor had failed.
Customers may experience a brake/ABS warning light or a Malfunction Indicator Lamp (MIL) illumination. On vehicles equipped with an Anti-Lock Brake System (ABS), a red brake light and/or an amber ABS light may illuminate and remain on. On vehicles NOT equipped with ABS, the MIL may illuminate. The MIL may be due to DTC P0501 – Vehicle Speed Signal Performance/Vehicle Speed Sensor Plausibility.
The condition may be due to a rear differential-mounted wheel speed sensor that is contaminated by the rear axle fluid. If using the Diagnostic Trouble Code Tests available in ALLDATA determines that the sensor requires replacement, perform the Repair Procedure.
Replacement of the rear wheel speed sensor and axle fluid will require the following parts:
• (1) 56041393AA Rear Wheel Speed Sensor;
• (1) 05086373AA Speed Sensor O-Ring;
• 05013477AA Axle RTV;
• 04897151AB Brake Parts Cleaner;
• (3) 05010320AA Mopar Synthetic Gear Lubricant 75W-90OR (3) 04874469 Mopar Synthetic Gear & Axle Lubricant 75W-140 (if towing); and
• (1) 04318060AB Limited Slip Additive (if Trac-Loc equipped).
Applicable Vehicles: 2005 (KJ) Liberty/Cherokee
Repair Procedure:
(Review safety procedures in the ALLDATA system before beginning)
1. Disconnect and isolate the negative battery cable from the battery.
2. Raise the vehicle on a suitable lift.
3. Remove the rear axle differential housing cover.
4. Thoroughly clean the axle, differential and differential cover of old oil, debris and RTV.
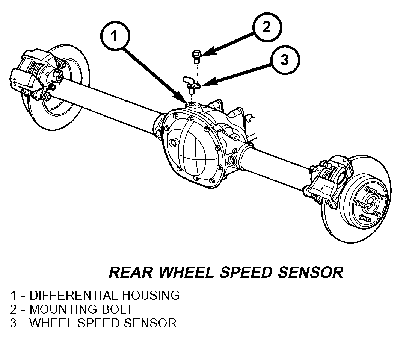 5. Remove the rear wheel speed sensor electrical connector. Remove the sensor from the axle.
6. Install the new 0-ring, P/N 05086373AA, to the new rear wheel speed sensor.
7. Lubricate the new rear wheel speed sensor and 0-ring.
8. Install the new rear wheel speed sensor, P/N 56041393AA, to the axle. Tighten the attaching bolt to 9 Nm (80 in. lbs.).
9. Verify that the seal is securely in place between the sensor and wiring connector. Install the sensor electrical connector to the sensor.
10. Apply a bead of Axle RTV sealant, p/n 05013477AA, to the differential housing cover.
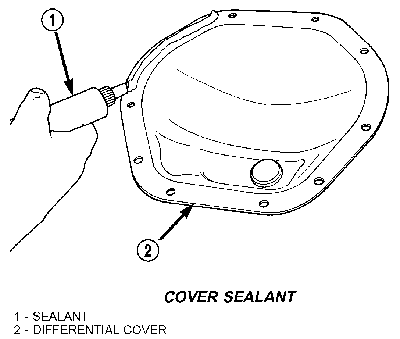 CAUTION: If cover is not installed within 3 to 5 minutes of new RTV sealant application, the cover must be cleaned and new RTV sealant applied. Failure to follow instructions will cause a leak.
11. Install the cover and identification tag. Tighten cover bolts in a criss-cross pattern to 41 Nm (30 ft. lbs.).
12. If not already removed, remove the fill plug.
13. If axle is equipped with a Trac-Lok differential, install 4 oz. of Limited Slip Additive to the differential.
14. Fill the axle differential with the correct axle lubricant.
15. Install the fill plug.
16. Verify that the rear wheel speed sensor and differential housing cover is correctly installed.
17. Lower vehicle.
18. Connect the negative battery cable to the battery. Set the clock to the correct time.
Written by ALLDATA Technical Editor, Eric Seifert. Eric is an ASE certified Master Technician and Engine Machinist. He is a graduate of the De Anza College Automotive Technology Program, with 20 years of independent shop and parts store experience.
For additional information, visit www.alldata.com.