By Bob Dowie
Import Specialist
While you may be very familiar with brake repair and service, it’s never a bad idea to look at even the most routine job, since ABS has certainly redefined the problems we encounter as well as the changed the way in which we maintain this important system.
While we’ll be taking a look at the brake systems on the Nissan line of cars and trucks in this article, the good brake maintenance and service practices that will be outlined can apply to any vehicle. You can’t argue with the success that Nissan has had in this country. With a well-deserved reputation for building good, reliable vehicles, underlined with an eye toward performance, the car maker has been able to maintain a strong position in the marketplace, giving us plenty of vehicles to service.
Like any repair job, brake work starts with the customer’s call to make an appointment. My first reaction to a request for brake service is to ask “why.” With the brakes being the most important safety system on the car, it’s important to know the type of problem the customer is experiencing for two reasons. You need to figure out where this job can fit into your schedule, but you don’t want your customer to drive an unsafe vehicle. What is obvious to us is often a surprise for the car owner. They look to us for advice.
Brake problems will present themselves in a couple of ways. The most common complaints are noise-related. Nissan, like many other manufacturers, makes use of the simple and effective tab-type sensor that will contact the rotor when the pads need to be replaced. The resulting, high-pitched squeaking noise has proven to be very effective in getting the driver’s attention. That’s not to say that people won’t ignore it and drive until the brakes are making that distinctive grinding noise that indicates the friction material is gone and metal-to-metal contact is taking place. Of course, in that case, the car should be parked until repairs are made.
Many of the occasional, annoying noises that disc brakes make are a small trade-off for the braking performance delivered by the system. Oftentimes, just explaining that to a customer goes a long way toward settling their concerns that something is wrong with their brakes.
But, any noise that is more than occasional should be investigated. Some noise will be the result of rust on the rotors, calipers, hardware or even the brake pads themselves. Use only the best parts, replace questionable units and make sure that the brake hardware is in good condition or new. Also make sure that all the metal-to-metal contact areas are being lubed with the proper grease that’s designed to do this tough job in a harsh environment.
CURING VIBRATION PROBLEMS
The rotors come into play again if you’re faced with a brake-related vibration. The most common is a vibration while braking that’s caused by warped rotors. Ask your customer a couple of questions that could help ensure a quality job. When did you notice the problem, and what happened to cause the problem? Did you have any tire work done lately? If so, it’s likely you’ll find that the lug nuts are unevenly tightened. To confirm this condition, loosen the lug nuts by hand. More often than not, the overtightened nuts will be obvious.
The biggest enemy of the rotor is heat. The rotor has a tough job on a system that’s in good shape, but it doesn’t have a chance on a system that has excessive heat-causing drag. Take a good look at the rotors as they’re removed for signs of overheating. It makes little sense to install fresh parts only to subject them to the same conditions. It could be that the last tech who did the brakes missed one of the steps we just talked about or, more likely, the increased mileage has caused a problem. Either way, if it’s not corrected, your new rotors will soon be in the same shape as the ones you just took off.
With high-mileage vehicles, you could be faced with a “brake pedal sometimes fades to the floor” complaint. Although it’s not a common complaint on Nissans, a little detective work is required in such cases. If the pedal fades as the vehicle comes to a stop, often in a situation where the pedal is being partially applied in anticipation of coming to a full stop, it’s a safe bet the master cylinder is the culprit.
If, on the other hand, the condition results from a long ride at highway speeds, it’s likely that excessive drag is causing the fluid in the calipers to overheat, resulting in brake fade. When the brakes cool, the pedal often will return to what feels like normal to the customer. Many times, the customer will report a burning smell and the worse cases will cause a severe vibration. It takes a stuck caliper to generate the degree of heat needed to cause these problems, and they certainly should be checked closely.
You should be able to find the problem wheels by inspecting the rotors. If that much heat was generated, the rotors will show the signs. If you can duplicate the tight wheel, don’t be too quick to condemn the caliper without cracking open the bleeder to be sure there’s no pressure in the line. If pressure exists, backtrack through the hydraulic system until the restriction is found. We’ll talk more about this when we discuss ABS and how it’s changed the way we do brake service.
Nissan uses a hand-brake that is incorporated into the rear caliper. We know everyone doesn’t use his or her hand-brake on a regular basis, and we also know that a mechanical device doesn’t like to sit around not being used only to suddenly be forced into service. The same thing can be said for the cables. If the hand-brake levers aren’t returning on the caliper, be sure that the cables aren’t binding. The complexity of the hand-brake does make the rear calipers a little pricier, but I still like to replace them in pairs to maintain the balance of the brake system.
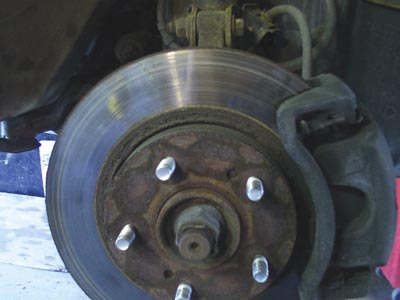 |
| Inspecting the rotors will give you an indication of how the brake system has been operating. |
DRUM BRAKE SERVICE
We’ve been talking about disc brakes, but many Nissans you’ll encounter will be equipped with rear drum brakes. More than adequate to perform the job, they’ll give many miles of service, requiring little attention other than periodic cleaning to remove the dust, and shoe replacement.
The same good brake service habits apply here. Clean, inspect and lube all components, check the hardware and replace what’s necessary with high-quality parts. Be sure that the self-adjusting hardware is working properly, and that the hand-brake cables and associated parts are operating smoothly and are well lubricated.Don’t overlook the wheel cylinders. Be sure that the pistons are free with no sign of leakage. Be careful not to over-adjust the rear brakes. On the Quest minivan, for example, there is a service bulletin advising that the rear brakes not be adjusted at all. In such cases, let the self-adjusting system handle the task. If they are manually adjusted, they’ll be too tight, causing drag and overheating, and producing all the negative results we’ve been talking about.
 |
|
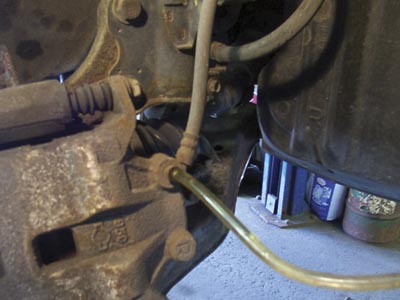
| Install the bleeder hose and open the bleeder before pushing back the pistons to ensure that debris isn’t pushed into the ABS actuator. |
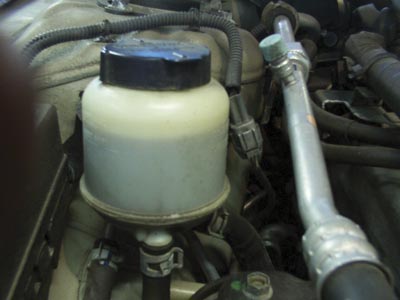 |
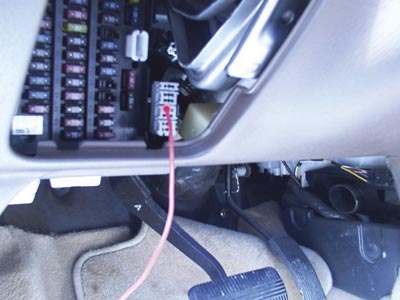
| The right front wheel speed sensor can be checked at the two-wire connector under the hood. |
ANTI-LOCK BRAKES
Nissan has done such a good job with its anti-lock brake systems that problems could be considered rare. I’m sure we’re all familiar with ABS operation, and Nissan doesn’t do it any differently. Wheel speed sensors send an AC voltage signal to the underdash ABS control unit, while the brake light signal tells the unit the brakes are applied. If the wheel speed sensor signals brake lockup, the control unit activates solenoid valves in the underhood ABS actuator, controlling the pressure to the locking wheel, preventing a loss of traction and keeping the driver in control. Since the system spends most of its time waiting to be called into service, we want to be sure it’s ready when the driver needs it. It monitors itself for faults and will keep the on-dash ABS lamp illuminated if any problems are found.
If you’re faced with an illuminated ABS lamp, no special tools are required to access codes. Before retrieving codes, drive the car over 20 mph for at least a minute. I’d even suggest a slightly longer ride that will let you assess overall brake operation.
To retrieve codes on 2000 and newer cars, ground terminal nine in the OBD II diagnostic connector. On earlier models, ground terminal 4 in the Nissan diagnostic connector that’s located next to the fuse box. Codes are counted out on the ABS lamp. They’re two-digit codes with long flashes being tens, followed by short flashes for the ones. For example, one long flash followed by two shorts is 12. When you access the system, the first code you’ll get will be a 12, followed by fault codes if they are stored. Up to three codes will be saved, with the most recent fault being the first displayed. A code 12 will follow the faults. If only a code 12 is found, the system sees no faults.
 |
| On pre-2000 Nissan models, codes are accessed using terminal four of the vehicle’s diagnostic connector. |
The earliest versions have no memory and will only display a code while the ABS lamp is lit. In this case, after the car is driven, don’t turn the key off until the code is retrieved. Using your service information, locate the ABS control unit (in the trunk on the Maximas). Count out the code from the LED in the control unit. This system will save only one code. Deal with the code displayed and road-test the car to check for others. There are too many code definitions to list here, so it will be necessary for you to consult your service information system. As always, the code will send you in the right direction, but it’s up to you to perform the final diagnostic steps to confirm that the problem is a bad part or a circuit-related issue.
On early cars, the codes are self-clearing, so no ABS lamp means no codes. Later models require that the codes be cleared. To do this, turn on the key and use the jumper wire we grounded to get the codes. Ground the jumper for one second and disconnect it, then repeat the process twice more in a 12-second period, grounding the jumper for at least one second each time. The ABS lamp will be illuminated during the process, but should go out when completed. Confirm that the codes have been cleared by checking for codes and getting only the system’s normal code 12.
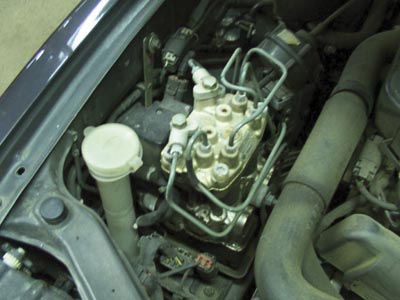 |
| An ABS control unit on an early-model Maxima. |
I’ve mentioned a couple of times that ABS has changed the way we service brake systems. The most important change is that the quality of the fluid in the system is critical. It’s no longer acceptable to pull fluid out of the reservoir and simply push in the caliper pistons, moving all that dirty fluid back though the ABS actuator.
We also talked earlier about the brakes dragging as result of pressure buildup in the system. With the small orifices in the ABS unit, it doesn’t take much debris to cause a restriction in the valves that would prevent fluid from returning to the master cylinder when the brakes are released. As the temperature of the fluid increases, the pressure will increase applying the brake, causing the problems we talked about.
I’ve never heard of anyone who has had any success flushing an ABS unit that has been contaminated. Replacement of this expensive unit is the only alternative. It’s an unfortunate situation for the customer, and an even worse one for the shop that did the job. The way to avoid this problem is to always open the bleeders while the pistons are retracted, using a bleeder bottle to catch the fluid. There’s no reason not to get into this habit.
At this point, I wouldn’t think you would consider a brake job complete without bleeding and flushing the system. Although brake fluid changes have always been a recommended service that was often overlooked, it shouldn’t have been. With the widespread use of ABS and the longevity that these vehicles enjoy, it’s foolish not to at least flush the system when brake service is performed.
We also talked about the importance of good work habits to get the maximum out of the ABS. These procedures are more important than ever. The system works by releasing the brakes to prevent wheel lock-up. It requires that the basic brake system be in top condition to function at its best.
I hope this quick look at Nissan brake systems has convinced you that there is no reason you shouldn’t be willing to tackle one of these vehicles when it finds its way to your shop.
At the same time, hopefully you took a minute to think about the way brake work is performed at your shop. If you haven’t been recommending brake fluid changes to your customers, now is an ideal time to start. Pressure or vacuum bleeders that speed up the job aren’t very expensive and have a good return on investment. Most importantly, it’s a good service for your customer that will prevent expensive repairs in the future.