Tech Tip: Oil Leak by Crankshaft Seal on Porsche Boxter Engines

Tech Tip: Oil Leak by Crankshaft Seal on Porsche Boxter Engines

Engine oil leaks in area of crankshaft sealing ring on flywheel side may be coming from the crankcase and intermediate-shaft flange bolts.

Models Affected: 97-’04 Boxter/Boxter S M96.23, M96.24 Engines

Examination of engines that were the subject of complaints revealed other oil leaks in addition to those found in the crankshaft sealing ring on the flywheel side. These engine oil leak areas included:

• Crankcase bolt threads
• Intermediateshaft flange area.

Since March 10, 2004, bolts with a sealant coating on the thread and head have been used during assembly to fasten the crankcase halves in the area of the flywheel.

On vehicles manufactured prior to the above-mentioned date, the four crankcase bolts and the three intermediate shaft flange bolts must be replaced in addition to the crankshaft sealing ring in the event of an oil leak in the area.

Parts Information
999 85 004 09    New/Coated crankcase bolt, M6 x 35 (4 ea. required per vehicle)
900 385 275 09  New/Coated bolt for intermediate shaft, M6 x 20 (3 ea. required per vehicle)
999 113 490 40  Shaft seal

Repair Procedure
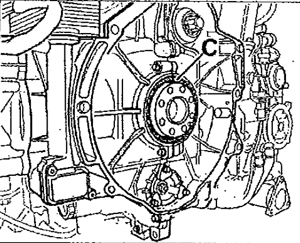
1. Replace crankshaft sealing ring (Figure 1, Item C). (see Technical Manual, Group 1, Repair, 13 59 19 – Removing and installing crankshaft sealing ring – flywheel side.)

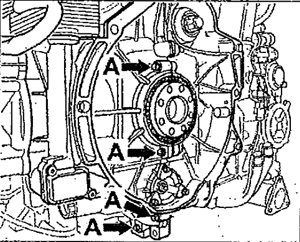
2. Replace four bolts on the crankcase (Figure 2, Item A).

2.1 Unscrew and remove the four bolts (Figure 2, Item A) and clean oil residues out of the threaded holes using a suitable cleaning agent (e.g., brake cleaner).

2.2 Screw the new bolts, Part No. 999 385 004 09, completely into the threaded holes. Tightening torque: 9.5 ft.lbs. (13 Nm)

3. Replace fastening bolts on the intermediate shaft flange (Figure 3, Item B). Since the intermediate shaft flange is loaded by the chain tensioners, the fastening bolts must be replaced only one at a time.

3.1 Unscrew and remove one fastening bolt and clean oil residues out of the threaded hole using a suitable cleaning agent (e.g., brake cleaner).

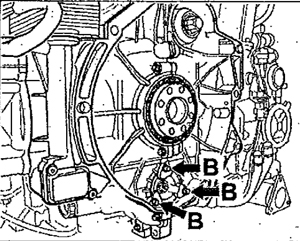
3.2 Fully screw the new bolt, Part No. 900 385 275 09, into the threaded holes. Tightening torque: 7.5 ft.lbs. (10 Nm)

3.3 Repeat steps 3.1 to 3.2 for the second and third fastening bolts.

Some or all of this information was provided by the Automotive Parts Remanufacturers Association (APRA). For more information on technical bulletins available through APRA call (703) 968-2772 or visit www.AutoBulletins.com.

You May Also Like

Maximize Your Scan Tool

Are you maximizing your scan tools to their full potential? Don’t let them be just an expensive code reader.

Scan Tool

If there’s a truth that extends across all computerized devices, it’s that we likely utilize only a fraction of the things they have the ability to do. Mobile phones are a great example. How many people do you know who only use them for calls, voicemail and text messages? We all know they do so much more.The scan tools we use every day fall into the same category. Are you maximizing yours to their full potential? Don’t let them be just an expensive code reader. That may be easier said than done, because it takes a lot of time to understand both the scan tool and how well it interacts with the vehicles you’re working on, but there are a few factors that can help you dive a little deeper into the functions at your fingertips.

Brake Lathe Basics

Resurfacing drums and rotors is a machining process with its own specific guidelines.

Refrigerant Oil Has to Be Right

Oil type is just as important as oil capacity.

Three bottles of refrigerant oil
Top 5 Tools: Steve Coffell, Auto World, Hazelwood, MO

Steve Coffell, a technician at Auto World in Hazelwood, MO, says his Top 5 Favorite Tools are: Related Articles – Lisle Low Profile Fuel Line Disconnect – Dent Fix Soft-Shock Mallet DF-SM76 Reduces Damage – New ProMAXX Diesel Fuel Injector Seal Puller/Saver ProKits   OTC Genisys Touch – Quick scan, bidirectional control Snap-on VANTAGE Pro

Wheel Bearing Adjustment Tools & Equipment

A wheel bearing that’s out of adjustment can reduce bearing life and can affect more than just the bearing. It’s important to adjust the wheel bearing endplay to the proper specifications. If the bearing set is adjusted too loose or too tight, it can cause the bearing to fail prematurely. There are a few types of assemblies, so using correct procedures and tools will ensure a comeback-free wheel bearing installation.

Other Posts

New Snap-on Limited Edition Speed Demon Roll Cab

Features include next-level organization, durability, security, mobility and exclusive Speed Demon emblem.

Upgrade Your Air System: It’s Easier Than You Think

Improving your shop airflow is only a benefit, unless you like to spend more time, work harder and make less money.

air flow tubes
2024 Is Your Year to Be the Technician You Always Wanted to Be

As we enter 2024, strategic career planning is essential for success in the automotive repair industry.

happy new year 2024
Impact Wrench Technology

Interchangeable anvils are a feature on some new impacts.