 Timing chains and gears are engine parts that are usually replaced when an engine is rebuilt or when it has reached a high mileage total. Over time, gear teeth wear and chains stretch. This can cause noise, retarded valve timing (and ignition timing if the engine also has a cam-driven distributor), and a noticeable loss of performance and fuel economy. A new timing chain, cam sprocket and crank sprocket will restore the cam drive and take the “slop out of the system.”
One thing you never want to do is to replace the timing chain without also replacing both sprockets. All three components wear, so installing a new chain on worn sprockets will shorten the life of the new chain. And depending on how much wear is on the gear teeth, you may still have noise and/or play in the system.
Cam sprockets with nylon teeth often fail at high mileage when the plastic becomes brittle and cracks or flakes off the gear. Most of the debris ends up in the oil pan where it can clog the oil pump pickup screen. This, in turn, may have caused the engine to fail because it blocked the flow of oil to the bearings.
Consequently, if you are rebuilding an engine that has experienced this kind of failure, it’s a good idea to replace both the oil pump and pickup. You can’t count on cleaning to remove all of the debris from the pickup. Also, be sure to thoroughly flush out all of the oil galleries as debris has probably scattered throughout the engine.
Performance Upgrades
If you’re building a performance engine, using a stock silent tooth timing chain and nylon gear set is asking for trouble. Stock parts are designed to run quiet, not to handle the higher loads imposed by a performance camshaft and valvetrain. Stiffer valve springs, higher lift lobes and rockers, and higher engine speeds all increase the strain on the timing chain and gears. A performance engine needs a heavy-duty cam drive with increased strength and reliability.
For your typical pushrod V8 engine, this usually means upgrading to a single- or double-roller timing chain and steel gear set. The higher end timing sets typically use billet steel sprockets that may be slightly oversized to take any slack out of the timing chain. The sprockets are heat treated and/or coated to improve wear resistance and durability. Less expensive sets more often use ductile iron or induction-hardened cast iron sprockets.
One of the most important features of any performance timing chain and gear set is adjustability. Most have multiple keyways cut into the crank sprocket that allow you to advance or retard valve timing. Others have adjustments on the cam gear that allow the camshaft to be easily advanced or retarded without having to pull the harmonic balancer and crank sprocket.
When you are fitting a three-piece timing set to a particular engine, you should measure the “center distance” from the crankshaft to the camshaft to determine the best fit. The center distance can be determined by measuring the diameter of the crankshaft, then the diameter of the nose on the camshaft, then the distance from the top of the cam to the bottom of the crank, then subtracting half the diameter of each shaft. Yeah, it takes some math and careful measurement, but if you want a chain that fits right and is not too tight or too loose, you need to match the parts to the block.
If you are building an aftermarket stroker motor with a raised cam, then you’ll obviously need a timing set with a longer chain. A timing set with stock dimensions won’t fit.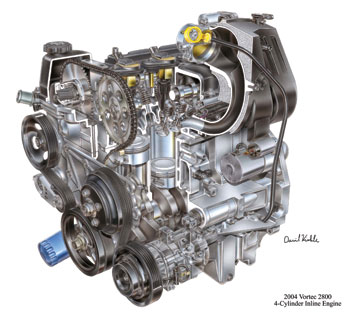
Other Cam Drive Options
Another option is to replace the timing chain altogether with a double gear drive or a belt drive setup.
Double gear drives provide extremely accurate timing, but are not usually recommended for engines that will rev beyond 7,000 rpm. Even so, they are extremely rugged and eliminate any risk of chain breakage or stretch. Most of the gear drives that are available are bolt-on installations that don’t require any special machining.
The only drawback with a gear drive is that they may be considered somewhat noisy, producing a whine similar to a blower drive. This obviously isn’t an issue in a race car, but it may be a consideration in a street/strip or street performance application.
Belt drives use a cogged rubber belt that is similar to an overhead cam rubber timing belt to turn the cam. Belts are quiet and tend to soak up crankshaft and valvetrain harmonics, which helps valve timing accuracy at higher engine speeds.
Belt drives can also handle high loads but may not have the longevity of a chain or gear drive.
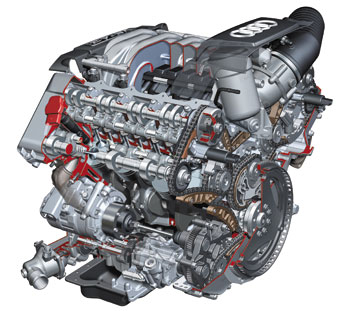
OHC Cam Drives
On overhead cam engines like the Ford 4.6L V8 and similar engines, the cam drive setup is similar to an OHC engine with a timing belt. The only difference is that this engine (as well as many other engines) uses two chains rather than a single chain.
A replacement timing set for an application like this includes a lot more parts than a three-piece timing set for a pushrod V8. In addition to two chains, a double-row crank sprocket and separate gears for the right and left cams, the kit also includes a pair of chain tensioners (right and left), as well as two tensioner arms and two chain guides.
One of the advantages of using a chain drive in an OHC application is that chain tension can be maintained by spring-loaded or hydraulic tensioners. This prolongs the life of the chain, improves timing accuracy and reduces noise. The plastic chain guides also help dampen chain vibrations and harmonics to improve valvetrain performance.
It is very important to replace the tensioners and slides on these kinds of engines because the original parts are usually worn by the time the chain needs to be replaced. Aftermarket upgrades for OHC timing sets may include heat-treated steel crank and/or cam sprockets with built-in adjustments that allow you to advance or retard valve timing.
Installing an OHC timing set can be tricky because of the numerous and often confusing timing marks on some engines. Make sure you know which marks are the correct ones to use, and how they are supposed to line up. Also, on many engines with dual overhead cams, a special clamping or locking tool is required to hold and position the cams while you install and adjust the chains. The spring-loaded hydraulic tensioners may also have a release pin that needs to be removed after these parts have been installed.
Whether the engine has OHC or is a conventional pushrod engine, always rotate the crankshaft twice after a timing chain has been installed to make sure the timing marks line up correctly. Better to catch a mistake now when it can be easily corrected.
If you are rebuilding a stock OHC engine, watch out for worn chain tensioners. A case in point is grinding noise coming from the timing chain cover area in 2000-’03 Ford Crown Victoria and Mercury Grand Marquis with the 4.6L V8.
According to Ford Technical Service Bulletin 03-15-7, excessive wear in the timing chain tensioner arms can cause a noisy condition. The tension arm has an aluminum base with a nylon surface. So if you discover nylon and/or aluminum particles in the engine oil, it means the tensioner and tensioner arms also need to be replaced.
The Ford part numbers for the 2000 model year tensioners are F6AZ-6L266-DA (RH) and F6AZ-6L266-CA (LH). For the 2001-’03 model years, the tensioner part numbers are 1L3Z-6L266-AA (RH) and XL1Z-6L266-AA (LH). The tension arms are 1L2Z-6L253-AA (RH) 1L2Z-6L253-AA (LH).
You should always check a database of technical service bulletins for any engine you are rebuilding to see if there are any known issues with the cam drive. Ford TSB 97-2-8, for example, describes a clattering noise at engine start-up after the engine has sat overnight, which may be heard on 1995 Ford Contour and Mercury Mystique models with a DOHC 2.5L V6. Oil leaking out of the chain tensioners causes the timing chain to momentarily rub against the tensioner ratchet when the engine is first started. The noise only lasts a couple of seconds and goes away as soon as the engine builds up oil pressure.
The cure, says Ford, is to replace the original chain tensioner components with redesigned parts. These include two timing chain tensioners F5RZ-6L266-CA, the left-hand tensioner adapter F5RZ-6C275-BA, the right-hand tensioner adapter F5RZ-6C275-AA, the left-hand chain tensioner arm F6RZ-6L253-AA and the right-hand chain tensioner arm F6RZ-6L253-BA. The two DOHC timing chains and guide assemblies should also be replaced at the same time.
Advancing Valve Timing
Advancing valve timing usually improves throttle response, low-end torque and off-the-line acceleration — up to a point. This is especially beneficial in heavier vehicles with automatic transmissions. Because of this, most street performance and street/strip hydraulic cams have about 4° of advance already built into the grind. On many applications, you can realize performance gains by bumping up the valve timing an additional 2-4°.
Another reason for advancing cam timing is to offset chain stretch as the engine accumulates miles. When the chain stretches, it changes the relationship between the cam and crank sprockets that retard valve timing.
On a stock engine with stock timing components, there are no adjustments that can be made and you just assemble the parts the only way they will go on. There is one keyway cut in the crank sprocket, and one pin hole in the cam sprocket.
The assumption here is that all of the parts have been accurately machined and that the keyway slot in the crank is accurate, the pin location on the cam is accurate, and the corresponding notch in the crank sprocket and hole in the cam sprocket are also in the correct location. Usually they are, but sometimes they are not. This means the cam timing may be dead on, or it may be advanced or it may be retarded. Without checking cam timing, you have no way to know.
Manufacturing tolerances can sometimes stack up causing undesirable changes that will hurt engine performance.
“Degreeing” a cam is a technique that allows you to determine when the valves open and close in relation to the top dead center (TDC) position of piston #1. This is done by attaching a degree wheel to the crankshaft sprocket that reads in 360° increments, and using a dial indicator to check the top dead center position of the #1 piston, then to check a pushrod to determine when the valve starts to open.
The first step is to make sure the piston is at TDC when the crank pulley or harmonic balancer reads 0° or TDC. It’s not unusual to find a stock crank with a keyway that has been cut as much as 5-8° off from TDC! On a stock engine, it might not make too much difference. But on a performance engine, it’s not acceptable.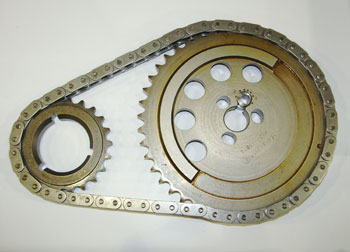
If the crankshaft keyway and sprocket are in proper alignment, the next step is to measure when the #1 intake valve starts to open. This can be done with the cylinder head on by positioning the dial indicator over the end of the #1 pushrod, or with the head off by positioning the dial indicator over the #1 valve lifter.
Rotate the crankshaft in the normal direction with the lifter on the camshaft base circle. The dial indicator should read zero until the lobe starts to move the lifter and/or pushrod. When the dial indictor shows 0.050” of lift, note the reading on the degree wheel as the opening point of the valve. Continue to turn the crank until the dial indictor shows the maximum lift of the cam lobe.
Again, note the reading on the degree wheel. Continue to rotate the cam until the dial indicator shows 0.050” again. Note the reading on the degree wheel as the point where the valve closes. Repeat this same procedure for the #1 exhaust valve lobe on the cam.
You can now compare the opening and closing points of the cam against the timing specs that came with the cam. If the intake valve is opening several degrees later than the spec indicated on the spec sheet, the cam is retarded and you should correct it by adding that many additional degrees of advance. Or, if the cam is right on the specifications but you want to try a couple of additional degrees of advance, then you can make the adjustments as needed.
Determining how much advance gives the best results in any given engine is a process of trial and error. You usually have to pick a setting that experience tells you works well with a particular cam and set of cylinder heads. Then you have to confirm it on a dyno or a test track (or wait for feedback from your customer as to whether he’s happy with the way the engine runs or not). If you aren’t seeing the results you hoped for, then you need to go back and start tweaking the timing a little this way or that until the engine performs the best.
It’s also a good idea to use the degree wheel or a computerized cam checker such as the Cam Doctor to check the accuracy of the camshaft itself. Most cam suppliers do an excellent job of machining their products, but sometimes mistakes happen. Better to catch a bad cam before it goes into a finished engine than later.
Something else you need to keep in mind when advancing cam timing is the amount of piston to valve clearance in the engine, and how cam timing will affect that. If the clearances are tight and the reliefs in the tops of the pistons are not deep enough to clear the valves if the cam is advanced too much, you can create an interference problem with too much advance. Minimum clearance should be 0.010” to 0.015” to allow for valve float at high rpm and thermal expansion when the engine gets hot.
Timing Tech Tip:
Upper Timing Chain Noise on VR6 Volkswagen Engines
To help silence the upper timing chain noise, try bleeding the tensioner.
Start by removing the tensioner from the engine. Next, submerge the tensioner in oil.
Note: Make sure the oil feed hole is facing upwards.
Then, use a large pair of non-marring pliers to actuate the piston several times until no air is noticed escaping the bleed hole.
Finally, install the tensioner immediately by hand and take care not to damage the chain ramp.