Models:
2004-’05 (RG) Chrysler Voyager (International Markets)
2003-’05 (RS) Town & Country/Voyager/Caravan
Note: This bulletin applies to 2003 RS vehicles equipped with a 3.8L engine, as well as 2004 and 2005 RS/RG vehicles equipped with a 3.3L or 3.8L engine built before July 9, 2004 (MDH 0709XX).
Diagnosis:
Using a scan tool (DRBIII), access the event data screen and look at the “TRS Code” reading.
1. If the TRS Code displays “TR2,” it is an indication that the manual valve was not fully in the OD position at the time the DTC was set. Check the shifter cable adjustment and adjust if necessary. Also check the shift control system for excessive friction and/or routing issues.
2. If the TRS Code displays “OD,” then a sticky solenoid switch valve is the primary cause. Perform the proper diagnosis for the valve body. Inspect for foreign material in the solenoid switch valve and plugs.
3. Perform the appropriate Repair Procedure after steps 1 and 2 from above are verified.
Note: An updated J1962 cable has been released. This cable has a red connector at the DRBIII connection. Use this cable whenever a flash is being performed.
2004 and 2005 Repair Procedure:
1. Before beginning the reprogramming procedure, remove any old flash reprogramming files from the DRBIII memory. To clear the memory from the MAIN MENU:
a. Simultaneously press the “MORE” and “YES” keys.
b. A screen will appear requesting a “COLD BOOT.”
c. Follow the on-screen instructions by selecting the F4 key.
d. When the DRBIII reboots to the MAIN MENU, proceed to step 2.
2. With the ignition switch in the Run position, determine the original part number of the PCM currently in the vehicle. Using the DRBIII, select: “DRBIII Standalone” > “1998-2005 Diagnostics” > “All (Except Below)” > “Engine” > “Module Display.”
Record the PCM P/N on the repair order for later reference.
3. Connect the DRBIII to TechCONNECT. Open TechTOOLS and verify that the “DRBIII Status: Connected” message is in the upper right corner of the TechTOOLS screen.
4. Enter the PCM P/N recorded in step 2 in the Parts Criteria area and select “Show Updates.” TechTOOLS will populate the appropriate calibration.
5. Select the calibration.
6. Select the DRBIII radio button, which is next to the “Download/Update” button.
7. Select the “Download/Update” button.
8. Monitor the “Flash Download/Update Progress” window on the TechCONNECT and follow the instructions on TechCONNECT. When the flash process is complete, proceed to step 9.
9. Disconnect the DRBIII from TechCONNECT.
10. Open the hood, install a battery charger and verify that charging rate provides approximately 13.5 volts.
11. Connect the DRBIII to the vehicle.
12. Download the flash from the DRBIII to the vehicle. Using the DRBIII select: “Vehicle Flash.”
Follow the directions on the DRBIII screen. When the flash process is complete, proceed to step 14.
Note: Due to the PCM programming procedure, a DTC may be set in other modules (TCM, BCM, MIC, SKIM, etc.) within the vehicle, if so equipped. Some DTCs may cause the MIL to illuminate. Check all modules using “Module Scan,” record the DTCs, and erase them prior to returning the vehicle to the customer. Erase any DTCs in the PCM only after all other modules have had their DTCs erased.
Note: The following step is required by law.
13. With the DRBIII, perform the TCM Quicklearn procedure.
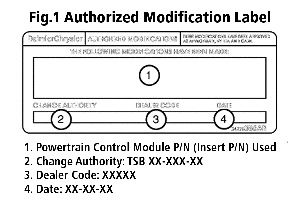
14. Type the necessary information on the “Authorized Modification Label” (P/N 04275086AB) and attach near the VECI label (Figure 1).
2003 Repair Procedure:
Note: Whenever a controller is programmed, the software in the DRBIII must be programmed with the latest revision level available.
Note: If this flash process is interrupted/aborted, the flash should be restarted and then follow the directions on the DRBIII.
1. Before beginning the TCM reprogramming procedure, remove any old flash reprogramming files from the DRBIII memory. To clear the memory from the MAIN MENU:
a. Simultaneously press the “MORE” and “YES” keys.
b. A screen will appear requesting a “COLD BOOT.”
c. Follow the on-screen instructions by selecting the F4 key.
d. When the DRBIII reboots to the MAIN MENU, proceed to step 2.
2. With the ignition switch in the Run position, determine the original part number of the TCM currently in the vehicle. Using the DRBIII select: “DRBIII Standalone” > “1998-2004 Diagnostics” > “All (Except Below)” > “Transmission” > “Module Display.”
Record the TCM P/N on the repair order for later reference.
3. Connect the DRBIII to TechCONNECT. Open TechTOOLS and verify that the “DRBIII Status: Connected” message is in the upper right corner of the TechTOOLS screen.
4. Enter the TCM P/N recorded in step 2 in the Parts Criteria area and select “Show Updates.” TechTOOLS will populate the appropriate calibration.
5.-11. Follow steps 5 through 11 under the 2004 and 2005 Repair Procedure.
12. Download the flash from the DRBIII to the vehicle. Using the DRBIII select: “Vehicle Flash.”
Follow the directions on the DRBIII screen. When the flash process is complete, proceed to step 13.
Note: Due to the TCM programming procedure, a DTC may be set in other modules (PCM, BCM, MIC, SKIM, etc.) within the vehicle, if so equipped. Some DTCs may cause the MIL to illuminate. Check all modules using “Module Scan,” record the DTCs, and erase them prior to returning the vehicle to the customer. Erase any DTCs in the PCM only after all other modules have had their DTCs erased.
13. With the DRBIII, perform the TCM Quicklearn procedure.
Courtesy of ALLDATA.