Toyota Tech Tip: Front Brake Rattle Noise

Toyota Tech Tip: Front Brake Rattle Noise

Some Corolla and Matrix owners may experience a front brake rattle type of noise when the car is traveling over bumps. Updated front disc brake cylinder (caliper) mountings and disc brake pad support plates are available to eliminate this condition. Conduct a road test to verify the noise condition. Front brake rattle noise will occur when the front tire runs over a depression in the road.

Models: Corolla, Matrix
Years: 2003-‘08
Some customers may experience a front brake rattle type of noise when the car is traveling over bumps. Updated front disc brake cylinder (caliper) mountings and disc brake pad support plates are available to eliminate this condition.
Repair Procedure:
1. Conduct a road test to verify the noise condition. Front brake rattle noise will occur when the front tire runs over a depression in the road.
2. Remove and replace the front disc brake pad support plates (two per each caliper). 
 

fig. 1: front disc brake components

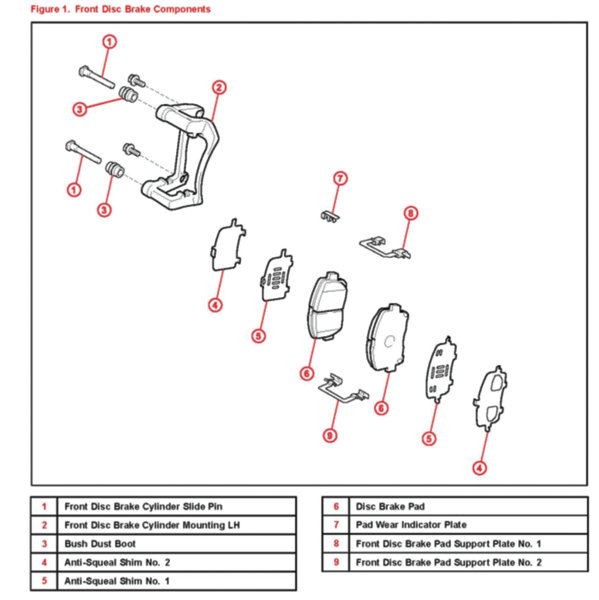
Note: The procedures listed below are for one side and should be used for both the right and left side. Refer to Fig. 1 for full diagram of front disc brake components.
 
a. Remove the front wheel.
b. Remove the caliper by holding the front disc brake slide pin and removing the two bolts.
c. Remove the two front brake pads from the front disc brake cylinder mounting.
d. Remove the anti-squeal shims and the pad wear indicator plates from each pad.
e. Remove the two front disc brake pad support plates from the cylinder mounting.
f. Remove the front disc brake cylinder mounting by removing the two bolts.
g. Install the new disc brake cylinder mounting with the two bolts. Torque: 107 N.m (1089 kg.cm, 79 ft.-lb).
h. Install the 2 new disc brake pad support plates. Apply disc brake grease to the back of the brake pad support plate.
i. Install the front anti-squeal shims. Apply disc brake grease to the anti-squeal shims.

Fig. 2: Front Disc Brake Grease Application

Notes regarding the anti-squeal shims:
• When replacing worn pads, the anti-squeal shims must be replaced along with the pads.
• Make sure to install the shims in the correct positions and directions.
• Apply a thin layer of disc brake grease to the area that contacts the anti-squeal shim.
• Disc brake grease can come out slightly from the area where the anti-squeal shim is installed. Be sure to wipe off any excessive grease to avoid pad contamination. Make sure that disc brake grease is not applied onto the lining surface.
j. Install the anti-squeal shims and the pad wear indicators to each pad. Make sure to install the pad wear indicators in the correct positions and directions.
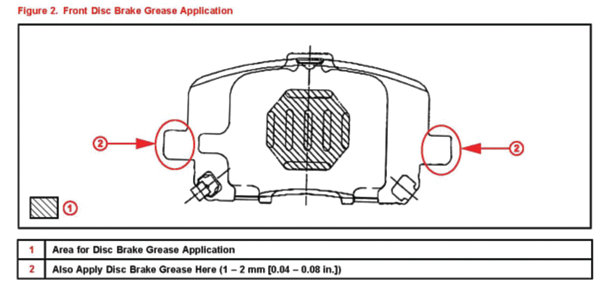
k. Install the two front brake pads with anti-squeal shims to the disc brake cylinder mounting. Apply a small amount of the disc brake grease (1 to 2 mm [0.04 – 0.08 in.] thick) to the areas shown in Fig. 2.
 
Note: Do not apply grease to the friction surfaces of the brake pads or the disc rotor.
 
l. Install the caliper with the 2 bolts. Torque: 34 N.m (350 kg.cm, 25 ft.-lb)
m. Install the front wheel. Torque: 103 N.m (1050 kg.cm, 76 ft.-lb)
 
3. Road-test the vehicle to confirm the front brake rattle noise is no longer present.
 
This information supersedes TSB No. BROO4-07 and was originally titled “Front Brake Squeak” to “Front Brake Rattle Noise.”
Courtesy of ALLDATA.

You May Also Like

TEXA Releases IDC5 CAR 76.5.0 Update

IDC5 CAR 76.5.0 is characterized by over 2600 new possible selections for the major makes on the market worldwide.

TEXA has released a major update IDC5 CAR 76.5.0 which enhances Car, Supercar and Light Commercial IDC5 diagnostic features & coverage. This latest software update enables more efficient troubleshooting, enhances existing special functions and topology module mapping features, while increasing technical information accessibility that is essential for accurately completing complex workshop operations. IDC5 CAR 76.5.0 includes the update of 37 makes, including electric and hybrid vehicles, while increasing the coverage of ADAS calibration, enhancing the visual live data "DASHBOARD" screens and other interactive technical information features like wiring diagrams, maintenance guides and component location diagrams.

Brake Lathe Basics

Resurfacing drums and rotors is a machining process with its own specific guidelines.

Refrigerant Oil Has to Be Right

Oil type is just as important as oil capacity.

Three bottles of refrigerant oil
Top 5 Tools: Steve Coffell, Auto World, Hazelwood, MO

Steve Coffell, a technician at Auto World in Hazelwood, MO, says his Top 5 Favorite Tools are: Related Articles – Lisle Low Profile Fuel Line Disconnect – Dent Fix Soft-Shock Mallet DF-SM76 Reduces Damage – New ProMAXX Diesel Fuel Injector Seal Puller/Saver ProKits   OTC Genisys Touch – Quick scan, bidirectional control Snap-on VANTAGE Pro

Wheel Bearing Adjustment Tools & Equipment

A wheel bearing that’s out of adjustment can reduce bearing life and can affect more than just the bearing. It’s important to adjust the wheel bearing endplay to the proper specifications. If the bearing set is adjusted too loose or too tight, it can cause the bearing to fail prematurely. There are a few types of assemblies, so using correct procedures and tools will ensure a comeback-free wheel bearing installation.

Other Posts

#2 Calipers & Micrometers

Calipers and Micrometers are essential measuring tools when exact precision is required.

ISN Expands Freedom Program for Mobile Tool Dealers

ISN’s Freedom Program is designed to provide experienced, successful mobile tool dealers with support to become an independent mobile dealer and expand their growth.

Snap-on Continues to Offer Free Weekly Product Training Sessions

The online training and question and answer sessions are free of charge.

TechShop, ShopOwner Offer $50 For Good Guesses

Guess the Tool for a chance at cold hard cash!