Tech Tip: Durango Brake Shudder or Vibration

Tech Tip: Durango Brake Shudder or Vibration

2003 Dodge Durango vehicles may exhibit pulsation or vibration in the brake pedal and/or steering wheels when the brakes are applied. The condition is most noticeable over 50 mph, but can occur at lower speeds.


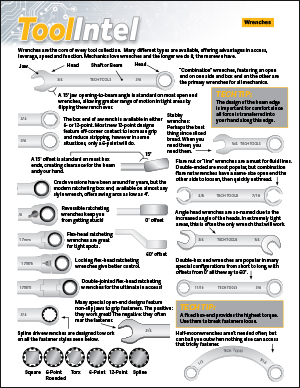
Models:
2003 Dodge Durango.

Symptom/Condition:
The vehicle may exhibit pulsation or vibration in the brake pedal and/or steering wheels when the brakes are applied. The condition is most noticeable over 50 mph, but can occur at lower speeds.

Diagnosis:
If the customers indicate that the condition is present, perform the Repair Procedure.

Repair Procedure:
1. Inspect the front brakes for any signs of abnormal wear or damage. Repair as necessary.

2. Resurface the front brake rotors with DaimlerChrylser-approved on-car brake lathe.

3. Remove the calipers.

4. Replace the front linings with new brake pads (part number 05093796AB).

5. Mark one wheel stud on each side with a dab of paint or suitable marker.
Note: Wheel stud torque is critical to the success of the repair. The following procedure is intended to identify excessive rotor distortion which could be caused by improper wheel stud torque.

6. Install the wheel and pre-tighten the lug nuts in a cross pattern to 70 Nm (50 ft.lbs.) then final tighten the lug nuts in a cross pattern to 135 Nm (100 ft.lbs.) and mark the wheel at the same location as the marked wheel stud.

7. Set up a dial indicator to measure mounted rotor runout. Place the dial indicator plunger against the inner machined rotor face, visible between the brake caliper and the front splash shield. Rotate the wheel and tire assembly two turns and take runout measurement. If the measurement is less than .050 mm (.002 in.), no further action is required. If the measurement is greater than .050 mm (.002 in.) remove the lug nuts and relocate the wheel one stud clockwise, tighten the lug nuts as described in step 6 and check the runout again. Do not remove any brake parts. Repeat step 7 for each wheel location until you achieve the lowest mounted runout. Minimum mounted rotor runout will be achieved by moving the wheel, not the rotor.

For additional information, visit www.mitchell1.com.

Technical service bulletin courtesy of Mitchell 1.

You May Also Like

Tool Time Podcast: CTA Tools

In this episode, Nadine Battah and Eric Garbe sit down with CTA Tools’ Alex Borghard and Alberto Roland to discuss the specialty tools their company offers.

TechShop’s Tool Time Podcast Series highlights tool and equipment trends, combined with an educational focus on technology that brings solutions to shop owners and techs as they address the growing complexity of vehicle repair. In this episode, Nadine Battah and Eric Garbe sit down with CTA Tools' Alex Borghard and Alberto Roldan to discuss the specialty tools their company offers.

#8 Shop Air Systems

An aging air system can affect the output of air tools and equipment.

Shop Aire Systems
Mobis Starts Construction of EV Battery System Plant in Spain

The new EV battery system plant will supply Volkswagen and is aiming for mass production by 2026.

#7 Wrenches

Wrenches are the core of every tool collection.

Wrenches
Maverick Tire Changer: Bead Massage

The bead massage feature on the Maverick tire changer helps with better tire and wheel fitment for balancing.

Other Posts

Navistar Surpasses 100 Authorized EV Dealers

Navistar will have more than 30% of its dealer locations ready to support the sale and service of both International and IC Bus EVs.

ADAS: Coming of Age

ADAS are categorized into levels, determined by the amount of automation for any given system.

Hunter Maverick Tire Changer: 19.5-inch Tire Service

Learn to handle 19.5-inch wheels, which are common on some delivery vehicles, with Hunter’s Maverick tire changer.

#6 Multimeter DC Voltage Testing

Diagnosing electrical system problems isn’t always easy, and guessing is never an option.