The nuts and bolts of measuring cylinder leakage
In OBD II diagnostics, most of us know that an external component like a faulty fuel injector, ignition coil, spark plug or spark plug wire is usually responsible for a P0300-series cylinder misfire trouble code. Nevertheless, even with more sophisticated onboard diagnostic strategies, the PCM usually can’t pinpoint the failure that is causing the P0300 DTC. After conventional fuel, ignition and vacuum leak problems are eliminated, we’re usually left with a valve train or cylinder sealing problem as a likely cause for the P0300 DTC.
Although fuel and ignition systems have dramatically changed during the past several decades, the internal components sealing cylinder compression have retained the same basic configuration. In many modern engines, cylinder-to-wall clearances have been reduced by using hypereutectic pistons and rotating friction has been reduced by using low-tension piston rings. In some cases, cylinder concentricity on assembled engines has also been improved by finish-honing the cylinder with a torque plate bolted in place. Hardened valve seats and better valve alloys have virtually eliminated burned valves. Nevertheless, a failed valve train component; a stuck, bent or burned poppet valve; a broken piston ring; or a leaking cylinder head gasket can still cause a sometimes elusive P0300 misfire problem.
Compression Testing
The traditional cranking compression test is perhaps the most popular and, at the same time, most misunderstood, cylinder leakage test in use today. The cranking compression test is least useful on engines where spark plug accessibility is poor. The cranking compression test is most useful on vertical, inline engines where spark plug accessibility is good.
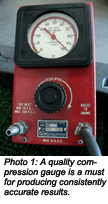 Before performing any compression test, the ignition system should be disabled by either disconnecting the primary circuit or by grounding the coil secondary output with a test lead. This procedure will prevent secondary spark from damaging the ignition control module. Next, it’s important to use a high-quality gauge that won’t be affected by carbon debris being ingested from the cylinder (Photo 1).
The accuracy of a cranking compression test can be affected by several issues. First, it’s important to understand that cranking compression can be drastically affected by engine temperature. While it’s permissible to use a cold-engine test to spot-check cylinder compression for a cranking, no-start condition, a compression test is accurate only when the engine is hot and the piston rings and valves are seated in their normal positions.
Second, to ensure a maximum cylinder fill, each cylinder must have an ample supply of intake air available at its intake port. In most cases, simply blocking the throttle half-open will allow enough air to enter the cylinders to develop maximum compression pressure.
Third, it’s very important that a comparative cranking compression test be performed with a fully charged battery and fully functional starter. Without these two elements in place, it’s possible that a slower cranking speed may cause a lower compression reading in the last few cylinders to be tested.
Last, it’s important to remember that small particles of carbon are dislodged into the cylinder when the spark plug is removed. Th e best procedure is to loosen all the spark plugs one-quarter turn and briefly start the engine to purge carbon particles before proceeding with the compression test. If a cylinder tests low, the technician should reinstall the spark plug, warm up the engine and re-test compression before condemning the cylinder.
Dry and Wet Testing
Next, let’s consider the dry and wet cranking compression test in which the initial readings are taken with the cylinders “running dry.” A dry compression test is taken first to provide a basis for comparison. A wet compression test is taken next to presumably determine if the cylinder leakage is through the valves or piston rings.
In the wet test, a single squirt of oil is used to wet down the cylinder walls. Theoretically, if the engine’s piston rings are worn, the compression will be increased because the oil seals the piston rings against the cylinder wall. If the valves are leaking, the oil will presumably make little difference in the compression readings.
The reality of the wet test is that, on a V-type or slanted engine block, most of the oil will run to the lower side of the cylinder. If too much oil is added, the compression ratio is increased due to the excess oil reducing the combustion chamber volume. The result will often be an unusually high and completely misleading compression reading.
Cylinder Sealing
Let’s go back to the beginning to understand what we’re really trying to measure when using a dry-and-wet compression test. The two top compression rings are actually slightly dished, resembling a ring cut from the edge of a saucer. The dished configuration of a new piston ring causes the lower outer edge to contact the cylinder wall. This lower-edge contact helps scrape excess oil from the cylinder wall during the intake stroke.
During the power stroke, combustion pressure flattens the dished-piston ring configuration and causes a full-width contact between the compression ring and cylinder wall. This full-width contact seals the combustion gases within the cylinder and reduces blowby past the piston ring into the crankcase.
In addition, a plateau-style honing technique is often used on modern cylinders to expedite quick seating and optimum cylinder wall lubrication and sealing. The first step of a plateau honing technique consists of using a coarse hone to create a deep cross-hatch pattern in the cylinder. This deep cross-hatch helps retain a thin film of lubrication between the piston assembly and the cylinder wall. On the second step, a much finer hone is used to smooth the cylinder wall and create “plateaus” that minimize wear as the piston rings seat into the wall.
Piston Ring End Gap
In most cases, the cylinder wear we’re actually trying to measure is the increased end gap measurement on the top two compression rings. To illustrate, a brand-new engine equipped with conventional cast-aluminum pistons should have about 0.004” of end gap per inch of bore on its top compression ring. A cold engine with a 4” bore would therefore be assembled with at least 0.016” of end gap on the top ring to allow the piston ring to expand as the piston reaches maximum operating temperature.
Since the top compression ring runs with a minimum of lubrication, most top rings are coated with hard, scuff-resistant coatings like chromium or filled with a softer, spongy, oil-absorbent material like molybdenum. Because top rings are directly exposed to combustion heat, they expand more and therefore require more end gap to prevent binding inside the cylinder.
During break-in, the end gap will slightly increase as the piston rings seat to the cylinder wall. Depending upon cylinder wall finish, the thoroughness of hone grit removal and break-in time, the 0.016” end gap could increase to 0.018” or 0.020” or on the top ring. On a higher-mileage engine, this 0.020” end gap may increase to at least 0.060” of piston ring end gap.
Because the second piston ring runs cooler, it requires much less end gap. In addition, it is usually made of softer materials, such as steel or cast iron, which will conform to the cylinder wall much more quickly during break-in. Let’s say that the installed gap on the second ring after break-in would be about 0.016.” Because it’s shielded from the flame front and seats quicker, the narrower gap on the second piston ring seals compression more effectively than does the top ring. Clearly, most piston ring wear reveals itself as an increased piston ring gap. The fact that the piston ring hasn’t sufficiently expanded inside the cylinder on a cold engine generally explains why compression pressure is lower on a cold engine. In addition, wide piston ring end gaps generally produce much more piston ring blowby through the PCV inlet when the engine is operated under a loaded condition.
Cylinder Leak Testing
A cylinder leak tester (Photo 2) uses compressed air to measure cylinder wear. To do this, the leak tester allows compressed air to flow through an orifice into an air line equipped with an air 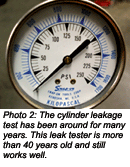 pressure gauge. The first step is to adjust the leak tester gauge to read “zero” leak with no air flowing through the outlet hose. Next, the air hose from the leak tester is connected to a cylinder with the piston exactly at top dead center with the intake and exhaust valves closed.
When connected to the cylinder, the leak tester will show the difference between the gauge pressure at zero air flow and the gauge pressure with air flowing through the cylinder. Instead of the gauge showing pounds per square inch, it will show the pressure difference as a percentage of cylinder leakage. In other words, the lower the line pressure of the air passing through the cylinder, the higher the percentage of cylinder leakage.
A new engine with the piston rings seated may show about 5-6% leakage. A higher mileage engine will generally pass at a “maximum” 20% leak. Leakages as high as 50% don’t necessarily indicate a defective engine or high oil consumption, but do indicate higher than normal wear in the piston rings or valves. As a quick visual check, remove the spark plug and insert a stem light into the cylinder. If the edges of the piston are washed clean, oil is passing through the piston rings. As for the specifics of cylinder leak testing, large piston ring end gaps will leak air into the crankcase and out the PCV inlet hose. A leaking intake valve, on the other hand, will vent compressed air into the intake manifold. A leaking exhaust valve will most often be heard venting compressed air through the exhaust system. All of the above leaks can be detected by careful listening.
Of course, if the cylinder is suffering from a leaking cylinder head gasket, compressed air will escape through the radiator pressure cap into the coolant reservoir. In this case, the compressed air usually takes the form of bubbles in the radiator header tank or coolant reservoir.
Using The Running Compression Test
Because a running compression test is a relatively unorthodox method, few printed standards exist. Running compression test data is therefore comparative rather than absolute. Valve timing and intake tuning most often affect cylinder fill rates on a running compression test, with tuned intake or variable valve timing engines producing different results than conventionally configured engines.
Leaving the Schrader valve in the compression tester adapter hose allows peak compression pressure to be recorded. A running compression test is usually conducted on a fully warmed-up, running engine. A hot cranking compression test is done first. I’ll use some numbers taken from a ’92 Geo Prizm, a ’94 Ford Explorer and an ’85 Ford Ranger to illustrate the relationship between the readings. Although none of these vehicles are OBD II-compliant, they do show some interesting differences in running compression.
Keep in mind too that, because I’ve added 25% to mathematically compensate for the 8,000’ altitude of my shop, these numbers may not track the readings of similar vehicles tested at lower altitudes. Nevertheless, the results are instructive. The peak cranking compression on all of the Geo’s cylinders shows 169 psi. Next, peak running compression taken at idle speed shows 87 psi for all cylinders. Generally, the peak running compression at idle will only amount to a fraction of cranking compression because the throttle valve is restricting air flow into the cylinders. The peak compression during a snap throttle test shows 188 psi because the increased volumetric efficiency of the tuned intake tends to increase the compression inside the cylinder.
A ’94 Ford Ranger with the 4.0L tuned-intake engine shows similar readings of 138 psi cranking, 100 psi at idle speed and 175 psi on a snap throttle test. An ’85 2.8L Ford Ranger with conventional carburetor and manifold shows 125 psi cranking, 63 psi at idle and 100 psi on a snap-throttle test.
The virtue of the running compression test is that it tests the fill rate or volumetric efficiency of each cylinder. If the readings are equal for all cylinders, then cylinder fill rate or volumetric efficiency is equal among all cylinders. If the running compression reading on one cylinder is less than approximately 80% of cranking compression, the test may indicate an intake problem like a broken valve spring or a worn camshaft lobe. If the running compression reading on all cylinders is higher than approximately 80% of cranking compression, the exhaust may be restricted. With a little practice, the running compression test will help locate many mechanical issues that create the P0300 series of misfire codes.
Relative Compression Testing
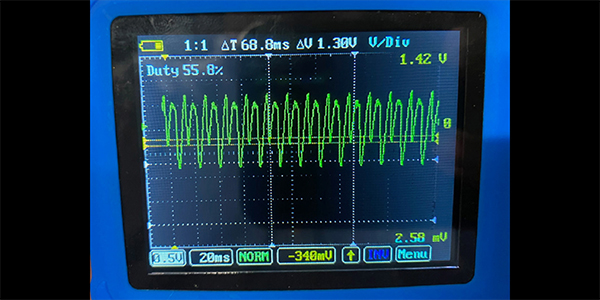
The idea of using a high-current amp probe coupled to a lab scope to measure cranking compression is relatively new to many technicians. The relative compression test requires some experience with lab scope set-ups and measurements, but it’s the most practical cranking compression test for any engine that has poor spark plug accessibility.
The concept is very simple because we’re using a conventional cranking compression test to measure compression on the readily accessible cylinders first.
First, disable the ignition system by disconnecting the primary circuit or grounding the coil wire. Second, test the compression on an easily accessible cylinder so that result can be compared with the scope readings. Third, attach the current probe to the positive cable of a fully charged battery.
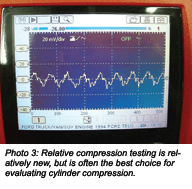 When the results are displayed on a lab scope, we can easily see the amperages required to compress the air in each cylinder. To identify which cylinder lacks compression, we should trigger our lab scope on the #1 cylinder in the firing order. The peak amperage depends upon the type of starter that’s cranking the engine. A permanent magnet, reduction-gear (PMGR) starter will draw much less current than a conventional starter, so the scope settings will be different for each.
Nevertheless, comparing the amplitudes of current draw on each cylinder as it cranks through the compression stroke will provide accurate cylinder compression test results (Photo 3).