Timing belts have been around long enough that most of our customers are well aware that they need to be replaced at a scheduled interval. Most are also aware of the catastrophic consequences should they be overlooked and left in service until they fail.
Honda has used timing belts since it started selling four-cylinder cars in the U.S., only recently having gone to a chain drive. With the longevity these cars enjoy, it’s safe to say we’ll continue to replace these belts for many years to come. In this article, we’ll take a look at replacing a belt on a four-cylinder Accord, pointing out some details that may make the next job go easier for you.
The first step in timing belt replacement is selling the job. While most customers know that timing belts need to be replaced before they fail, some will still have to be reminded of this important service. For many years, the industry standard for belt replacement was 60,000 miles. Those of us with more experience can even remember when 30,000 was the norm.
Recent developments in the materials and processes used in timing belt manufacturing have allowed Honda to move that interval to 90,000 and 105,000. I use the 90,000-mile mark as my signal. As a customers’ vehicle nears this indicator, remind him or her that the belt needs to be replaced. They bring their car to you for your expertise and a big part of your job is letting them know when required maintenance is due.
When pricing the job, don’t overlook additional and necessary related sales. On most Honda models, the timing belt drives the water pump. Although very reliable, I would consider it a bad bet to think the pump will last 180,000 miles. The same thing goes for the drive belts, and the engine oil seals for that matter. With the timing belt removed, it takes only a little extra time to replace these inexpensive seals to ensure a quality job.
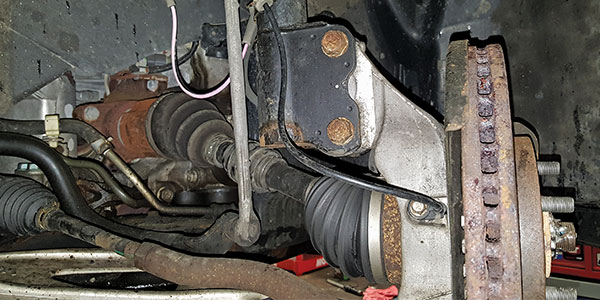
While on the subject of engine seals, in the early ‘90s, the 2.2-liter engine used in the Accord had a balance shaft seal that had a tendency to come out of its bore, resulting in a severe oil leak. The affected models were recalled and a retainer plate was installed to hold the seal in place. This simple fix was quite effective and the problem seems to have been solved. To be safe, we continue to install this retainer during all of our timing belt jobs (See Photo 1). Last, but not least, include the price of the valve cover gasket and spark plug seals.
PERFORMING THE JOB
In preparation, remove the spark plugs and negative battery cable, and remember to turn the crankshaft only in the direction of rotation – counterclockwise in the case of the Honda – using only the crankshaft bolt. Next, working from the under the hood as well as the left-side wheel well, remove the drive belt splash guards and wiring as needed. Supporting the engine, remove the left-side motor mount, dipstick tube, valve cover and upper timing belt cover. Using the crank nut, turn the engine counterclockwise, putting the number 1 cylinder on TDC of the compression stroke. Consult your service information to confirm that the timing marks are aligned, with the "up" at the top of the cam pulley.
The next step is to remove the crankshaft bolt and pulley. This can be the most challenging part of the job since the bolt is usually too tight (181 ft.-lbs.) to be removed with a conventional impact gun. We use a special tool that fits inside the hex on the crankshaft damper and a long breaker bar to remove this bolt (See Photo 2). In extreme cases, it may be necessary to heat the bolt. Do so with caution so as not to damage the crank pulley or surrounding parts.
This is also a good time to look closely at the crank damper and pulley for separation. Although not very common, there have been instances of these pulleys coming apart. If you think you hear a loose belt, yet all the belts are tight, or if the timing marks didn’t line up on the pulley when the engine was at TDC, suspect slippage between the pulley and hub of the damper.
Once the crank pulley and lower belt cover are removed, you’ll notice this engine has what appears to be two timing belts. Actually, the first, narrower belt drives the balance shafts that cancel the inherent vibrations that come with a large displacement (more than 2-liter) four cylinder. Before removing the balance shaft belt, confirm that the crankshaft and timing mark on the forward shaft or pulley are aligned. The rear shaft doesn’t use marks, but rather an access hole on the firewall side of the block that is sealed with an 8 mm bolt.
When reinstalling the belt, remove the bolt and insert a 6 x 100 mm bolt through the hole and into the balance shaft. With the belt removed, turn the shaft until the hole in the shaft lines up with the hole in the block. You’ll know it’s in place when the bolt is about three inches into the block.
To save some time, after confirming that the crankshaft and front balance shaft are timed correctly, we make reference marks that will allow us to reinstall the belt with the shafts in the proper position (See Photo 3). Make the marks so that they’re visible when working in the wheel well to ease the process. Of course, if the belt is broken or removed before the mark is made, you’ll have to go through the entire procedure.
This engine uses a double-tensioner system where both the balance shaft and timing belt tensioner are mounted on the same stud. Before you loosen the adjustment nut that will relieve the tension off both belts, install and tighten a short 6 mm bolt in the adjustment slot (the dipstick tube bolt works well) to maintain tension on the timing belt while you remove the balance belt (See Photo 4). With the balance belt out of the way, loosen the just-installed bolt. Move the tensioner to release tension and snug the bolt. With the belt removed, check or replace the seals and water pump, and install a seal retainer.
INSTALLING THE BELTS
When installing the timing belt, start at the crank pulley and work counterclockwise, keeping the belt taut on the straight run between the cam and crank pulley. Loosen the adjustment nut and the temporarily installed 6 mm bolt to allow the tensioner spring to apply tension. Install the crank pulley and bolt to allow you to turn the engine over using the crank bolt without bottoming.
Turn the engine over in the direction of rotation (counterclockwise) for six crankshaft revolutions. Confirm that the marks are aligned and that the belt is taut between the crank and cam. Loosen the tensioner adjustment nut to allow the spring to make its final adjustment. Retighten the temporary 6 mm bolt so tension will be maintained while installing the balance belt.
The balance belt installation is more of the same. Loosen the tensioner adjustment nut to allow the tensioner pulley to be moved out of the way. Install the belt using your marks or the alignment pin. Loosen the adjuster to allow the tensioner to work, rotate the crank one turn and tighten the adjustment nut. Don’t forget to remove the temporary 6 mm bolt. Reinstall the belt covers, drive belts and pulleys. Lightly lubricate the threads and contact surface of the crank bolt and torque it to 180 ft.-lbs. Take care when reinstalling the left-side motor mount; there is a flat plate designed to limit movement should the mount fail. If not installed properly, the resulting vibration will have you thinking the balance belt is out of time.

Finish the job by checking and adjusting the valve clearance (See photo 5). With the cover removed, it’s the perfect time to perform the task. With the engine set at number 1 TDC, check the intake and exhaust on cylinder one, the intakes on two and the exhaust on three. Turn the crank one revolution to number four TDC (the "up" mark on the cam pulley will now be down) and do the others. The most common mistake we see is that technicians will misread the underhood emissions sticker, thinking the metric spec is inches. In our case, the spec is intake 0.009-0.011 (0.24-0.28 mm), exhaust 0.011-0.013 (0.28-0.32 mm). With the small, lightweight valves and springs that are used in these multi-valve engines, it’s not uncommon for most of the clearances to be in spec, but there’s no better time to check them. Lastly, when refilling the cooling system, don’t forget to bleed the air out through the valve located by the thermostat housing.
That outlines the belt replacement for the popular 2.2- and 2.3-liter Accord engines. The other Honda engines are similar, but don’t require the balance belt. They shouldn’t present any challenge to the experienced tech, but there are some things to keep in mind as you tackle these jobs. The 3.0-liter V6 models use a hydraulic tensioner that has to be mechanically reset and require a special tool to hold the tensioner in place while it’s installed. The tool is necessary, but is inexpensive.
On the twin-cam engines, the thoughtful engineers at Honda have provided alignment holes in the bearing caps and camshafts to maintain the shaft’s position while the belt is replaced (See Photo 6). It’s no wonder we like working on these cars. Another thing that has given some techs problems is the cam timing mark on the 1.5- and 1.6-liter Civic engines. Different models use different marks. Be sure to carefully check your service information. Like the balance belt on the previously discussed engine, using some reference marks during disassembly will save time and avoid confusion.
The last thing to keep in mind is don’t be tempted to "help" the spring-loaded tensioners. Get the belt taut on the side without the tensioner and let the spring set the tension. There have been reported cases where an over-tensioned timing belt resulted in the nose of the crankshaft breaking off. Needless to say, that’s a situation you want to avoid.
Keep in mind that when we recommend routine maintenance, it’s a win-win situation for everyone involved. We keep our bays busy and our customers’ Hondas in top condition. What can be better?
WEB-EXCLUSIVEPERFORMANCE UPGRADE OPPORTUNITIES
Like everything else Honda and Acura, the specialty tuners haven’t overlooked the timing and drivebelt system as a place to upgrade the performance of these cars. Both adjustable cam and underdrive accessory pulleys are popular upgrades. The underdrive pulleys claim more horsepower as a result of turning the accessories at lower speeds. The adjustable cam pulleys give you the opportunity to tailor the valve timing to suit the particular engine or camshafts. They are also helpful to restore the cam timing after the cylinder head or block has been resurfaced. Using a two-piece design, the relationship between the hub and the belt teeth can be altered to degree the cam. It’s a process that requires experience and is one that is best left to techs that are familiar with it. But that doesn’t mean you should turn this work away. Like a lot of performance parts, the appearance of these items is just as, or more important than, the power gains. It’s hard to argue that those nice anodized parts don’t look good under the hood. The underdrive pulleys should present no problem to install. If adjustable cam pulleys are going to be installed in the center or stock setting, installation is simple. |