This bulletin from Foley Engines can be used to assist you in timing a Perkins diesel 4.108, 4.236, 4.248 and 6.354 engine. Certain measures need to be taken when removing the fuel injection pump as well installing it.
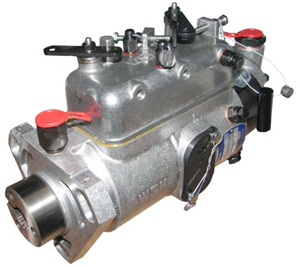
Removal: First, before removing the injection pump make sure you can still see the scribe mark that Perkins put on the engine block. This can be found on the engine block just under the injection pump flange. Having a hard time finding this mark? Locate the other scribe mark on the ear of the injection pump (there are three mounting ears; the mark should be on the one facing away from the engine). If you do not find this scribe mark on the block than make your own using a knife or other sharp object. The two lines or scribe marks should be in line with each other. This will truly save you a huge headache later on when installing the new or remanufactured injection pump.
Next, unbolt the three mounting bolts that hold the pump on to the block. If you’re working with the Perkins 4.108 marine, 6.354.0 or 6.354.4 marine or industrial the pump will slide straight back and the removal will take no time at all. If you are working with a later Perkins 4.108 industrial or a 4.107 or 4.108 Westerbeke marine engine one extra step will be necessary (these engines use a Lucas mechanical pump). See note below if you have one of the later engines mentioned above.
Note: If you’re working with one of the above engines; you must remove the inspection cover located on the face of the timing cover. Inside you will find a three bolt hub that connects the injection pump to the drive gear. You must remove the three bolts before you proceed with the removal. One extra thing: stuff a rag in the cavity between the drive gear and the timing cover. It’s easy to drop one of these bolts into the crankcase.
Installation: Once you have your remanufactured pump from you’re ready to install. Locate the splined input shaft on the replacement pump. This splined shaft will have two splines on it which are either Siamese together or in some case one of the splines will be missing. This makes the pump shaft go into the drive hub (mounted on the injection pump drive gear) one way only.
Next, once the pump is in hand tighten the three bolts that mount the pump to the engine. Here comes the most important part. The two scribe marks (one on the pump flange, the other on the block) have to be lined up to look like one line (perfectly inline with each other). This times the engine. Finally, tighten the three bolts to lock the pump in position.
If you have one the engines in the note located in the removal section: this is the time to re-install the three bolts in the drive hub (make sure you keep that rag in timing cover!).
At this point, the pump is back on, the scribe marks are lined up to time the engine and you are ready to put the fuel lines back on and bleed the system.
For more information on how to bleed the fuel system, check out these other tech bulletins from Foley Engines: Tech Tip #29: Bleeding Lucas, Stanadyne and Diesel Kiki Fuel Systems and also Tech Tip #41: Bleeding Perkins, Deutz and Deere Fuel Systems, Part 2.
–Courtesy of Foley Engines.