Tech Tip: Taming a Growling Buick Lucerne

Tech Tip: Taming a Growling Buick Lucerne

Some Buick Lucerne owners may comment on a vibration and/or growl type of noise during light throttle drive-aways at approximately 1,800 rpm. This condition may be caused by the front edge of the front engine mount bumper stop grounding out to the inside vertical surface of the restrictor plate. The bumper stop lacks sufficient travel and/or the rubber material to isolate the ground-out.
By Chris Burton, ALLDATA editor, and Jeff Webster,
ALLDATA technical writer

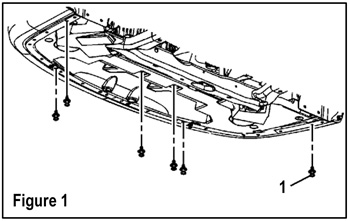
Some Buick Lucerne owners may comment on a vibration and/or growl type of noise during light throttle drive-aways at approximately 1,800 rpm. figure 1

This condition may be caused by the front edge of the front engine mount bumper stop grounding out to the inside vertical surface of the restrictor plate.

The bumper stop lacks sufficient travel and/or the rubber material to isolate the ground-out.

Applicable Models: 2006 Buick Lucerne with 3.8L V6 Engine (VIN 2 – RPO L26)

Repair Procedure
1. Raise and suitably support the vehicle.

2. Remove the front air deflector fasteners (QTY: 17) (1, Figure 1).
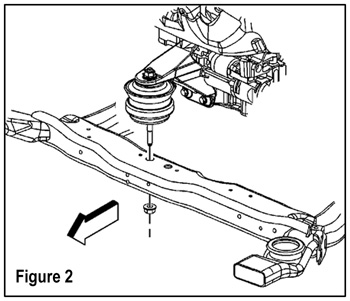
figure 23. Remove the engine front mount to frame nut (Figure 2).

4. Remove the engine mount bracket nut (Figure 3).

5. Remove the engine right rear mount to frame nut (Figure 4).

6. Place a suitable hoist/adjustable jackstand and a block of wood under the oil pan.

7. Lift the engine until the engine front mount lower stud clears the frame.

8. Remove the engine mount bracket bolts (QTY: 3) (Figure 5).

9. Remove the bracket and front engine mount.

10. Replace the front engine mount with P/N 15910501.

Note: Use the correct fastener in the correct location. Replacement fasteners must be the correct part number for that application.
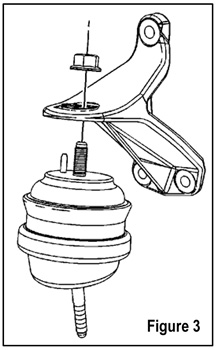
figure 3Fasteners requiring replacement or fasteners requiring the use of thread locking compound or sealant are identified in the service procedure.

Do not use paints, lubricants or corrosion inhibitors on fasteners or fastener joint surfaces unless specified.

These coatings affect fastener torque and joint clamping force and may damage the fastener.

Use the correct tightening sequence and specifications when installing fasteners in order to avoid damage to parts and systems.

11. Install the new engine mount, bracket and bolts (Figure 5). Tighten the bracket bolts to the engine to 52 lb.-ft (70 Nm).

12. Install the engine mount bracket nut and hand-tighten (Figure 3).

13. Lower and align the engine front mount stud back onto the frame and hand-tighten (Figure 2).

14. Install the engine right rear mount to frame nut and hand-tighten (Figure 4).

15. Remove the hoist/adjustable jackstand and block of wood from under the oil pan.

16. Tighten the engine mount fasteners to the following specifications and in this sequence:
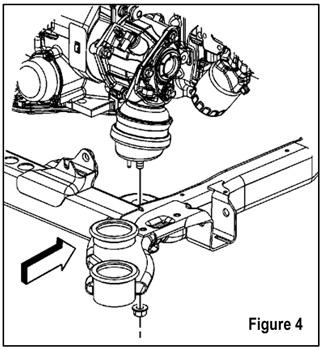
figure 4 a. Tighten the right rear engine mount nut to 59 lb.-ft. (80 Nm).

  b. Tighten the left rear engine mount nut to 59 lb.-ft. (80 Nm).

  c. Tighten the transaxle mount to frame nut (QTY: 2) to 37 lb.-ft. (50 Nm).

  d. Tighten the front engine mount lower nut to 59 lb.-ft. (80 Nm).

  e. Tighten the front engine mount upper nut to 59 lb ft (80 Nm).

  f. Lower the vehicle.

  g. Tighten the front engine mount bracket nut to 59 lb.-ft. (80 Nm).

  h. Install the front air deflector and fasteners (QTY: 17) (Figure 1).

17. Test-drive the vehicle to confirm the repair.


By Chris Burton, ALLDATA editor, and Jeff Webster,
ALLDATA technical writer
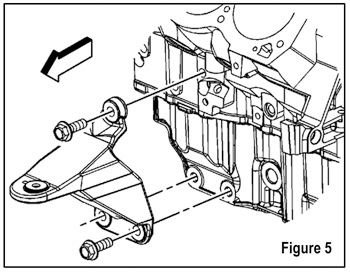
Figure 5Courtesy of ALLDATA.

You May Also Like

Embracing Cutting-Edge Solutions the Industry has to Offer

Embracing cutting-edge solutions is strategic and imperative for technicians navigating the constantly changing landscape of automotive maintenance and repair.

Nadine Battah

Remember last month how I said 2024 was your year to be the technicians you always wanted to be? Remaining stagnant as a technician is simply not an option anymore if you want to be successful in the automotive industry. You must proactively seek out opportunities to embrace new tools, techniques and solutions that promise to enhance efficiency, accuracy and customer satisfaction.Embracing what’s new is strategic and imperative for technicians navigating the constantly changing landscape of automotive maintenance and repair.One of the top reasons I can give you for embracing new technology is the potential for improved diagnostic accuracy and efficiency. With the arrival of advanced diagnostic tools, like the Bosch ADS 625X, the Autel IA900, or the Hunter ADASLink, technicians can pinpoint issues with precision, reducing guesswork and minimizing the risk of a comeback. Whether it’s sophisticated tools or cutting-edge software solutions, the ability to leverage these new tools should empower you to deliver next-level service and drive positive repair experiences for your customers.Another thing to keep in mind is that embracing new technology and equipment opens doors to expanded service offerings. From state-of-the-art lifts and alignment systems, to specialized tools designed for specific makes and models, investing in the latest equipment enables you and other technicians to tackle a larger range of repairs and maintenance with confidence and precision. As the technology in cars continue to evolve, so too must the tools and equipment that technicians rely on to get the job done.Embracing new technology and equipment can also lead to improved productivity in the shop. By leveraging high-quality products that are specifically designed for today’s vehicles, you can streamline workflow, minimize downtime and deliver exceptional results for your customers.At TechShop, we understand the importance of embracing new technology, equipment and products in the automotive repair industry. That’s why we’re excited to announce the debut of our all-new “Tool Time” video podcast series, where guests from brands like Ingersoll Rand, Clore Automotive, SATA Spray Equipment and many more will sit down and join Eric Garbe and myself to discuss education and training on the latest products our industry has to offer.Join us as we embrace the future of automotive tool supply and equipment advancements together. And, be sure to subscribe to the TechShop newsletter to stay tuned!

TPMS: Are Retrofits in Your Future?

Installing a retrofit kit can be performed with the tools and equipment you already own and use on a daily basis.

Tire tread
Maximize Your Scan Tool

Are you maximizing your scan tools to their full potential? Don’t let them be just an expensive code reader.

Scan Tool
2024 Is Your Year to Be the Technician You Always Wanted to Be

As we enter 2024, strategic career planning is essential for success in the automotive repair industry.

happy new year 2024
Impact Wrench Technology

Interchangeable anvils are a feature on some new impacts.

Other Posts

TEXA Releases IDC5 CAR 76.5.0 Update

IDC5 CAR 76.5.0 is characterized by over 2600 new possible selections for the major makes on the market worldwide.

Software Focus: Efficient Diagnostics

Discover how to quickly retrieve codes, access exclusive repair information, and develop a strategic plan for optimal diagnostic results. This video is sponsored by Bosch.

Why ECU Reflashing Needs Certain Power Levels

A reflash power supply is not designed to jumpstart the vehicle.

Tools in the Eye of the Beholder

We’re here to help you see all the tools, so you can invest wisely.