The original Volkswagen Beetle changed a number of things for the maintenance technician. The muffler was part of the engine, the suspension consisted of front and rear torsion bars, and the brakes, though actually large for a car of the Bug’s weight, needed adjustment on a regular basis to make them safe.
Things have changed quite a bit since then. The VW models of the last three decades have come to use the same basic suspension, brakes and exhaust that are standard for makes and models from all over the world. While not different in basic design, VW consistently makes improvements to the designs for application in its line of cars. These improvements have reduced replacement cycles and increased durability.
The focus of this article will be the more common models that you’ll encounter on a regular basis: The Golf, Jetta, New Beetle and Cabrio. A lot of this information is applicable to other VWs as well.
Two series of VWs have been produced since 1993. The A3 and A4 series cars are similar with respect to powertrains, but the suspension and brakes have changed along with the increase in wheelbase, wheel size and horsepower. I’ll mention here that, due to the many different models and equipment levels available during this period, you will need to have the VIN, engine code, wheel size and brake system type (disc/disc, disc/drum, with or without ABS) to order parts.
BRAKES
A3 cars come with disc front brakes and either disc or drum rear brakes, mainly depending on the year of manufacture and powerplant size. All six-cylinder cars have four-wheel disc brakes, front brake wear sensors and ABS. Four-cylinder cars may or may not have ABS, with rear disc or drum systems. Front brake rotors can be vented or non-vented, with different calipers depending on the rotor type. These cars have rear discs or drums integral with the hub, and have replaceable, serviceable bearings.
A4 cars all have four-wheel disc brakes with vented front rotors and slide-off rear discs with sealed wheel bearing/hub units. Two types of front calipers are used. One type, FS III, is for 2.0L and TDI cars. The other, FN III, is for VR6 and 1.8T models. ABS is optional on all models, so you’ll need to look to determine your replacement part needs. The basic difference in the two types is one- or two-piece front calipers. On one-piece calipers, the pad carrier is cast as part of the bearing housing. Brake wear sensors are included on some models as well, and are built into the pads.
FRONT BRAKE SERVICE
Once you’ve determined which system the car has, you’ll find that the front brake systems are very conventional. Pad replacement is the same on all models and is accomplished by removing the slide pins and pulling the “knuckle” off of the pad carrier. On later models, the inner pad is clipped to the caliper. The important points to inspect on either design are the caliper slide pins, which should be coated with a 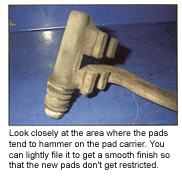 high-temperature silicone grease designed for brake use. On cars where the pins are floating in the pad carrier, always remove them, clean and lubricate them and make sure they are free to move throughout their normal range. Also look closely at the surfaces of the pad carrier where they have been wearing on the carrier. Clean this area and lightly file it if the divots are so deep that new pads may get caught during their service life. On some models, there are still thin metal strips that are replaced with the pads to maintain a smooth surface.
REAR BRAKE SERVICE
Cars with rear drum brakes use a design that is very familiar to longtime VW mechanics. This same design has been in use since the days of the Rabbit. If there is a lip, the easiest way to remove the drums is to use a small screwdriver in one of the lug bolt holes. By pressing up on the adjusting wedge, the shoes will retract and the drum will easily come off. Using an awl, the rear shoes can be adjusted manually in the same way by spearing the end of the wedge and pressing down to give the adjusting spring a little help. There isn’t much more to say about these brakes; they tend to wear very slowly, with many cars going well past 100,000 miles before new shoes are needed. As in the past, if the shoes are worn out, measure the drums and replace them if they’re oversized. Otherwise, you’ll have a low pedal that can’t be adjusted higher.
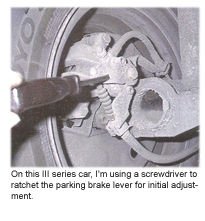 With rear disc brakes, the parking brake is integrated into the caliper. A ratchet mechanism inside the caliper is supposed to automatically adjust the travel of the caliper to maintain the proper clearance between the pad and rotor. In actual operation, the ratchet can sometimes get stuck, frozen or just not work properly, especially after a pad replacement. When replacing the rear pads, you’ll need to turn and compress the piston back into the caliper with care to prevent damage to the ratchet. The best way to do this is with a caliper resetting tool available from many manufacturers.
The caliper pistons turn clockwise to retract, so you’ll need to turn and compress in small steps, being careful not to put too much pressure on the adjusting mechanism.
 After resetting the caliper piston, pad replacement is the same as the front. The same inspection points are important here as well – the sliders and the pad carrier. On early cars, you’ll need to remove the wheel bearings and races to replace the rotor. Make sure you have seals available, as the factory ones don’t like to come out. On later models, the rotor slides off the hub after removing a retaining screw.
The rear-wheel bearing on A4 cars is a sealed hub unit. It can be removed from the spindle after removing the retaining nut. When ordering parts, make sure that you get the correct one since the ABS tone wheel is also part of the hub.
 When pressing the pistons back into the caliper, I use a bleed bottle connected to the open bleeder to prevent pushing fluid back into the reservoir. Especially on ABS cars, this can prevent problems associated with contamination. We routinely advise a brake flush whenever pad replacement is performed. Bleeding is standard practice on all models, starting at the bleeder farthest from the master cylinder (right rear).
No special procedures are needed, except when a master cylinder or hydraulic unit is replaced on early V6 cars with Teves 20 ABS. You will need to be able to open and close the valves in the hydraulic unit with a scanner to get the system back to normal operation, without air in the lines. If the fluid flow to the rear calipers appears restricted on non-ABS cars, pull the operating lever on the brake pressure regulator toward the rear of the car.
Like most European manufacturers, VW uses brake rotors of fairly soft metal compound. Because of this, the rotors will most likely be too thin to turn safely. Assess whether to machine them by measuring and comparing to specs. With the increases in horsepower and top speed potential, the brakes should be more than adequate for safety.
PARKING BRAKE
Before going to the trouble of adjusting the parking brake cables at the console lever, you should always make sure that the rear brakes are adjusted properly, especially after a shoe or pad replacement. If the cables need to be adjusted, it’s because they’ve stretched, so look for broken strands at the hand lever. If someone previously adjusted the cables, the rear brakes may never work properly. For drum brakes, parking brake adjustment usually involves only the manual adjustment of the rear shoes. Use the method noted above to adjust the wedges through a lug bolt hole, then check that the lever will move at least four clicks. Adjust the cables only as a last resort.
 On disc brake models, you can manually adjust the rear calipers either by hand or with the help of a screwdriver at the operating levers. The lever must be able to move fully back to the stop to catch the next tooth inside the caliper. To make this work if the cables are too tight, you may need to disconnect them to make the adjustment. After lever movement at the caliper is reduced to a reasonable range, the cables can be reattached to check for free movement of the wheels. If the adjustment is too tight, then you can loosen the cables. When proper adjustment is reached, the brakes should hold at less than four clicks at the lever.
FRONT SUSPENSION
Again, there are variations in suspension design between the various models.
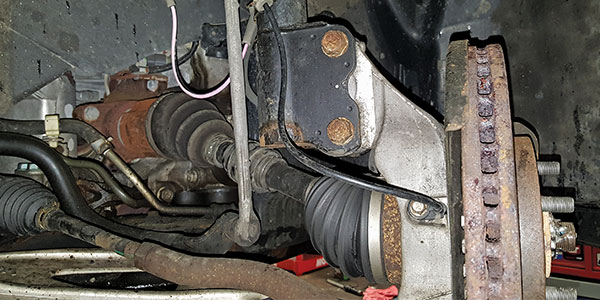
The differences are difficult to notice until you get the car in the air. For the front suspension on A3 models, the basic difference between “base” and “plus” designs is the attachment of the ball joint at the bearing housing. The base design uses the older slip fit with a through-bolt to clamp the ball joint in place. On the “plus” design, the ball joint has a tapered press fit into the housing. Both designs use bolts for attachment to the lower control arm, making ball joint replacement fairly easy.
Strut removal on A3 cars will affect the alignment, since the connection between the strut and wheel bearing housing allows a small amount of adjustment. Most of these cars don’t have replaceable strut inserts, in spite of what some service manuals indicate.
On A4 cars, the same design is used throughout the lineup. The main design change is the elimination of the bolted connection to the bearing housing. This design eliminates any possible adjustment for camber. The strut assembly with spring is inserted into the round hole at the top of the bearing housing, and a through-bolt indexes with an alignment tab to secure the two components.
 Strut assembly replacement is otherwise totally conventional, except for the slotted nut that secures the upper mount to the shock absorber shaft. To remove or install this nut, you’ll need a special socket with tabs that engage the nut at the slots. Make sure you attempt to remove or install this nut with the spring compressed only in a suitable fixture.
On A3 models, one of the most common complaints is a rattle or drumming sound from the front suspension when the vehicle is driven over small bumps or washboard surfaces. There have been a couple of design upgrades to reduce the noise during the production of these cars, and the updated parts can and should be installed any time the struts are replaced, or the noise is present. Part numbers for this upgrade are available in TSBs, or just give your parts supplier a call.
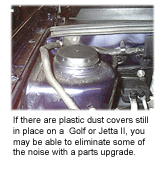
 To perform the upgrade, you don’t even have to put the car on a hoist. In fact, the car needs to be on the ground. Lift the hood, and if you notice plastic dust covers on the upper strut caps, the upgrade probably hasn’t been done – or it just wasn’t done correctly.
- With the weight of the car on the front suspension, remove the upper strut nut.
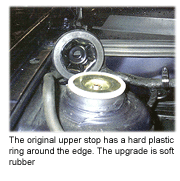
- Remove the upper strut stop cap (the original type has a hard plastic ring around it).
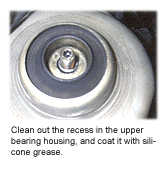
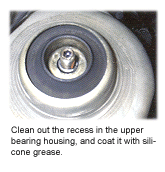
- Clean out the recess a-round the shock absorber shaft and slotted nut.
- Check that the slotted nut is tight by using the special tool.
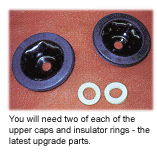
- Using silicone paste grease, coat the area around the shaft and nut, then install the soft plastic insulator and the updated stop cap. The newest cap design has a soft rubber coating around the outer edge of the cap.
- Reinstall the strut retaining nut and tighten it to 44 ft.-lbs.
- Throw away the plastic dust covers.
- Road-test the vehicle.
REAR SUSPENSION
The big difference between the two series of cars in this area is that on A3 models, a fairly conventional, coil spring strut assembly is used, with the upper mount residing inside the luggage compartment. The same slotted nut that is used to hold the upper mount to the shock shaft is used on the front struts. The spring is under tension when the nut is installed.
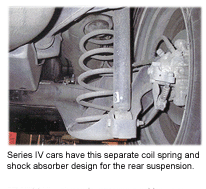
A4 cars have a separate coil spring and standard shock absorber that can be removed and replaced from outside of the body. You will need some special sockets to remove the upper shock mount on these cars.
Here are a couple of cautions for both designs:
- Make sure you support the rear axle if you are going to disconnect either the shocks or struts, to prevent damage to the brake hoses.
- Even though the rear spring on strut models is low tension, it is much easier to use a spring compressor to remove and install the spring, instead of risking injury.
 EXHAUST
There isn’t too much to write about concerning the exhaust systems on these cars. Conventional, very durable pieces have held up well, making replacements necessary usually only at relatively high mileage. At least that’s the case up here in rain country.
One of the most common problems is with resonant rattles from the heat shields on the A3 with 2.0L engines. The first place to look for the rattle is at the heat shield on the exhaust manifold. In the left rear corner, the retaining tab cracks and sets up a real racket at a certain rpm. The heat shield is still a pretty pricey item to replace, and can cost more to try and remove than most customers are willing to pay. Plus the shield does prevent a lot of heat from getting to the intake manifold above it. I have used a couple of different tricks to stop the racket, or at least reduce it to a reasonable level.
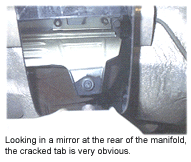 One way is to remove the retaining nut after a generous amount of penetrant is applied. Add a fender washer big enough to span the two pieces of the tab and tighten.
If the lower tab half is gone, make a small “L-shaped” tab with a hole on one leg to go over the stud and press down on the top of the shield to hold it in place. Both methods resolve the noise issue, possibly until there is a factory “fix,” or a replacement shield becomes more reasonably priced.
IN SUMMARY
Volkswagen continues to update and improve its line of cars. Maintenance intervals and associated costs have been reduced, while the vehicles’ durability and reliability are still quite good. Just a few special tools are needed to maintain these cars, and the procedures for repair are very much standard. These cars will be around for a long time to come, so get to know them. Learn the few common failure items, and you’ll be able to make and keep happy customers.
|
HISTORICAL PERSPECTIVE
The original Beetle design lasted for a lot longer than many people know. It was only in the last year that production of that design was finally stopped in Mexico. The durability of the torsion bar suspension, compact, modular powerplant design and simplicity of repair made it the car of choice for the most remote, undeveloped areas of the world. Designed in the 1930s by Professor Porsche, the car has been the basis for everything from a military reconnaissance vehicle to a plastic-bodied sand buggy. |

