By Corey Smith
Director of Training
AP Exhaust Products
When installing universal OBD II converters, the most important consideration is mounting the converter so that the rear of the replacement converter catalyst brick is the correct distance from the rear, post-cat O2 sensor, which remains in its original location.
First, clean cut the exhaust pipe immediately in front of the original converter, and immediately to the rear of the converter, leaving the post-cat O2 sensor intact.
Measure from the cut at the rear of the original converter to the rear of the converter’s substrate brick (dimension A). Measure from the end of the replacement OBD II converter’s outlet pipe to the rear of the replacement OBD II substrate brick (dimension B). Subtract dimension A from dimension B, which becomes dimension C.
Mark the outlet pipe exactly dimension C back from where the pipe was cut at the rear of the original converter. Slip the replacement OBD II converter rear pipe onto the outlet pipe to the mark at dimension C. Caution: The rear pipe CANNOT be longer than two inches when inserted into the rear of the replacement converter. Trim the outlet pipe if necessary after marking it at dimension C.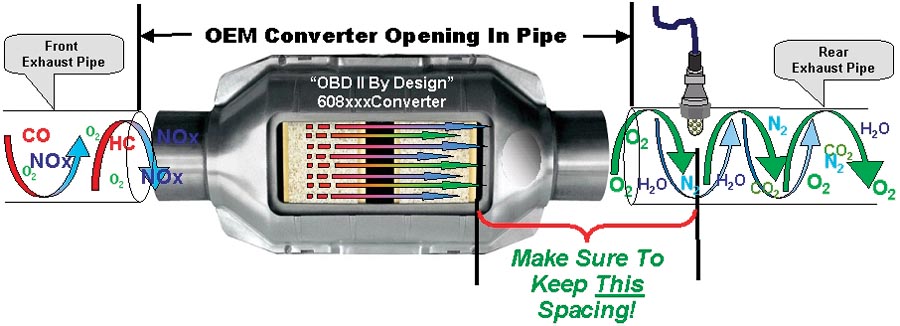
Weld the converter rear pipe to the outlet pipe. Slip the front converter pipe onto the front exhaust pipe, and weld to pipe. If necessary, install a “fill” pipe between the exhaust pipe and the front pipe of the converter.
When installing the standard (pre-OBD II) universal converter, compare the dimensions of the replacement standard converter with that of the existing converter. Next, clean cut the pipe so that the center of the replacement unit will “sit” in the center of the opening left by the OEM converter. You may have to install “fill” pipe on one or both ends to position the replacement properly. Next, weld or clamp the converter in position. Caution: The rear pipe CANNOT be longer than two inches if inserted into the rear of the replacement converter.
Which should you install, a universal or direct fit? There are advantages to each. With a limited inventory of universal part numbers, you can cover a high percentage of potential customer vehicles, but you will have to install them correctly in place after carefully cutting the old converter out. Direct-fit converters, on the other hand, are bolt in and go replacements designed to fit in those tight fit areas with ease. AP, for instance, supplies quality direct-fit replacement converters, designed and tested for domestic and imported vehicle applications. It’s your call. But whether you install the proper design” direct-fit assembly or a universal converter, remember to “Fix The Real Problem” first!
For information of products offered by AP Exhaust Products, visit www.apexhaust.com.

