Any technician who has worked extensively with Asian-made vehicles has more than a casual acquaintance with head gasket replacements. It comes as no surprise that when you put an aluminum head on a cast iron block, the different expansion rates of the two metals will eventually weaken the head gasket.
With that fact in mind, it is amazing how many miles these vehicles can log before the head gasket has to be replaced. On the other hand, some vehicles can experience a leaking head gasket with only 30,000 miles on the odometer. So, when water is leaking out from behind a timing belt cover, no matter what the mileage, what is the first thing that comes to your mind? It must be a leaking head gasket. But maybe this time, it’s not.
Such is the case with 1990 to 1995 Nissan Pathfinders or trucks equipped with a VG30E engine. These vehicles can develop a coolant leak that runs down behind the timing belt covers and appears to be coming from the head gasket(s). But my friends, you want to be sure. It’s a good idea to spend the time to remove the timing belt covers to check out this problem completely.
Use the following procedure for identifying and repairing the source of the coolant leak:
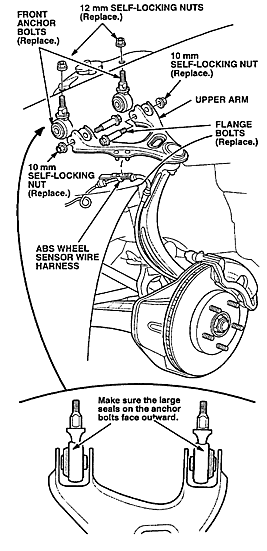 1. Drain the coolant and remove the following components: cooling fan, all drive belts, water pump pulley, distributor protector, A/C compressor drive belt idler bracket, fresh air intake tube for rocker cover, water hose from thermostat housing, crankshaft pulley bolt and pulley.
2. Remove the front timing belt covers, timing belt, upper camshaft timing gears and the rear belt cover/dust shield. Prior to removing the timing belt, manually rotate the engine so that #1 cylinder is on its compression stroke and align timing marks (this will ease re-assembly).
3. Inspect the threaded blind plugs located directly below each camshaft. If coolant, corrosion or a powdery residue is noticeable around the outside edges of either blind plug, use a suitable Hex wrench and remove the offending blind plug from the cylinder head.
NOTE: It is not necessary to remove and disassemble the cylinder head for this repair.
4. Clean off all traces of coolant, sealer and residue from the blind plug and cylinder head threads.
5. Apply Teflon tape or a suitable pipe thread sealer to the threads of the blind plug.
6. Re-install the blind plug into the cylinder head. Torque to 50 ft. lb. +/- 2 ft. lb.
7. Re-install the components mentioned in steps one and two and add fresh coolant.
NOTE: Make sure to bleed all the air from the cooling system before a test drive.
The vehicle owner knew what it would have cost to replace one or both of the head gaskets. You told them, right? In this case, the labor charge for the repair will be only slightly higher than the diagnostic time. This is the kind of pleasant surprise that customers remember for years. Not only will they be happy to pay this bill, the great "word of mouth advertising" they generate will be priceless.
Written by ALLDATA Technical Editor, Rich Diegle. Rich is an Advanced Engine Performance Certified and ASE Master Technician with an Associate of Arts degree in automotive technology and 22 years of dealership and independent shop experience.
Courtesy of ALLDATA.
For additional information, visit www.alldata.com.