Tech Tip: Installing Shaft Mount Rocker Arm Systems on SBC Gen III Engines

Tech Tip: Installing Shaft Mount Rocker Arm Systems on SBC Gen III Engines

This information is from Comp Performance Group and is intended to cover the shaft-mounted rocker systems for Small Block and GEN III Chevrolet engines only. For information specific to other shaft rocker systems you should refer to the manufacturer's instructions.

This information is from Comp Performance Group and is intended to cover the shaft-mounted rocker systems for Small Block and GEN III Chevrolet engines only. For information specific to other shaft rocker systems you should refer to the manufacturer’s instructions.

1) The rocker arm roller tips must be immersed in oil for a minimum of 3 hours to allow full lubricant penetration of the roller tip and axle. A household ice tray works well for this purpose. Please note that it is absolutely critical that all shaft rocker components be thoroughly pre-oiled prior to use.

2) Thoroughly inspect both cylinder heads to ensure that they are free of any obstructions that may prevent the rocker stands from bolting down evenly.

3) After removing the old rocker arm studs from the cylinder heads, inspect all rocker stud bolt holes to ensure that the threads have not been damaged during removal of the studs. Running a thread chaser through all of the holes will guarantee clean threads and a secure mounting point for your new COMP shaft rocker system.

4) Prior to torquing any of the rocker stand bolts, verify that all rocker stand bolts can be threaded completely through the rocker shafts and into the rocker arm stud holes. Any bolt that does not thread all the way into the stud hole should be shortened using a bench grinder. Be sure to clean up the threaded bolt ends with a thread chaser after grinding.

5) Torque the 7/16˝ stand bolts to 45 ft.lbs. Bolts that thread into an intake runner should be coated with a good thread sealant.

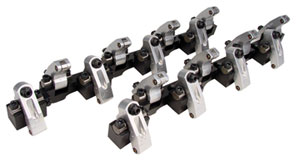
6) Install the rocker arms onto the rocker arm shaft with a shim on either side of the rocker, and place a lock ring on the outside of each shim. The shims prevent side pressure from damaging the shaft bearings. Install the 5/16” Torx head bolts through the rocker shafts into the rocker stands, and torque them to 25 ft.lbs.

7) Place a few drops of oil on the valve lash adjuster threads prior to installation in each rocker arm. Tighten the adjuster by hand until bottomed out. Back the adjuster out 1 turn, and thread the adjuster nut onto the adjuster. Tighten the adjuster nut to 45 ft.lbs. to seat the adjuster. Note that it is absolutely critical that the adjuster is backed out one full turn prior to torquing the adjuster nut. Failure to do so will result in damage to the adjuster and rocker arm.

8) Once the valve lash adjuster has been seated, loosen the adjuster nut and set the adjuster for valve lash. Retighten the adjuster nut to 35 ft.lbs. Do not run the rocker arm with the adjuster bottomed out, as doing so will result in damage to the rocker arm and other engine components.

9) Place the tip of an oil can against the oiling hole in the adjuster, and pump the handle until oil comes out of the oil passage behind the rocker arm roller tip.

Post Installation Maintenance

• The synchronized oil system must be inspected periodically for obstructions that may prevent proper rocker arm oiling.

• After the valve has been adjusted to camshaft specifications, verify that the 12 pt adjuster nut has been torqued to 35 ft.lbs. Failure to do may result in severe engine damage if the adjuster nut should come loose while the engine is running.

Note: Do not re-tap the 7/16” adjuster hole with any type of tap other than a 7/16˝-20 roll forming tap (Union-Butterfield p/n 1310209 or similar) as doing so will damage the rocker arm beyond repair.

Tech Tip courtesy of Comp Cams (www.compcams.com).

You May Also Like

Embracing Cutting-Edge Solutions the Industry has to Offer

Embracing cutting-edge solutions is strategic and imperative for technicians navigating the constantly changing landscape of automotive maintenance and repair.

Nadine Battah

Remember last month how I said 2024 was your year to be the technicians you always wanted to be? Remaining stagnant as a technician is simply not an option anymore if you want to be successful in the automotive industry. You must proactively seek out opportunities to embrace new tools, techniques and solutions that promise to enhance efficiency, accuracy and customer satisfaction.Embracing what’s new is strategic and imperative for technicians navigating the constantly changing landscape of automotive maintenance and repair.One of the top reasons I can give you for embracing new technology is the potential for improved diagnostic accuracy and efficiency. With the arrival of advanced diagnostic tools, like the Bosch ADS 625X, the Autel IA900, or the Hunter ADASLink, technicians can pinpoint issues with precision, reducing guesswork and minimizing the risk of a comeback. Whether it’s sophisticated tools or cutting-edge software solutions, the ability to leverage these new tools should empower you to deliver next-level service and drive positive repair experiences for your customers.Another thing to keep in mind is that embracing new technology and equipment opens doors to expanded service offerings. From state-of-the-art lifts and alignment systems, to specialized tools designed for specific makes and models, investing in the latest equipment enables you and other technicians to tackle a larger range of repairs and maintenance with confidence and precision. As the technology in cars continue to evolve, so too must the tools and equipment that technicians rely on to get the job done.Embracing new technology and equipment can also lead to improved productivity in the shop. By leveraging high-quality products that are specifically designed for today’s vehicles, you can streamline workflow, minimize downtime and deliver exceptional results for your customers.At TechShop, we understand the importance of embracing new technology, equipment and products in the automotive repair industry. That’s why we’re excited to announce the debut of our all-new “Tool Time” video podcast series, where guests from brands like Ingersoll Rand, Clore Automotive, SATA Spray Equipment and many more will sit down and join Eric Garbe and myself to discuss education and training on the latest products our industry has to offer.Join us as we embrace the future of automotive tool supply and equipment advancements together. And, be sure to subscribe to the TechShop newsletter to stay tuned!

TPMS: Are Retrofits in Your Future?

Installing a retrofit kit can be performed with the tools and equipment you already own and use on a daily basis.

Tire tread
Maximize Your Scan Tool

Are you maximizing your scan tools to their full potential? Don’t let them be just an expensive code reader.

Scan Tool
2024 Is Your Year to Be the Technician You Always Wanted to Be

As we enter 2024, strategic career planning is essential for success in the automotive repair industry.

happy new year 2024
Impact Wrench Technology

Interchangeable anvils are a feature on some new impacts.

Other Posts

Tools in the Eye of the Beholder

We’re here to help you see all the tools, so you can invest wisely.

Multimeter Accuracy: How Important Is It?

Multimeter accuracy is critical for EV diagnostics.

multimeter
More Than A Scan Tool

Scan tools serve as indispensable diagnostic hubs, offering access to a wealth of resources, from OEM technical bulletins to community-documented repairs.

scan tool
Battling Stress and Burnout

Here are some quick tips for managing stress and avoiding burnout in the fast-paced automotive repair industry.

Nadine Battah