Tech Tip: Replacing Kia Sorento Coolant Reservior

Tech Tip: Replacing Kia Sorento Coolant Reservior

Certain Sorento vehicles may overheat due to small cracks found on the bottom of the coolant reservoir due to repetitive temperature and pressure fluctuations. The new and improved coolant tank allows some expansion and contraction found in many pressurized cooling systems. This bulletin describes the proper service procedure for identifying and replacing the coolant reservoir tank.

Certain Sorento vehicles may overheat due to small cracks found on the bottom of the coolant reservoir due to repetitive temperature and pressure fluctuations. The new and improved coolant tank allows some expansion and contraction found in many pressurized cooling systems.

This bulletin describes the proper service procedure for identifying and replacing the coolant reservoir tank.

Note: The previous design (P/N 25430 3E200) is ribbed; the new design (P/N 25430 3E200QQK) is ­reinforced. Verify that the reservoir has not been previously replaced by reaching underneath and checking the lower surface of the reservoir. figure 1

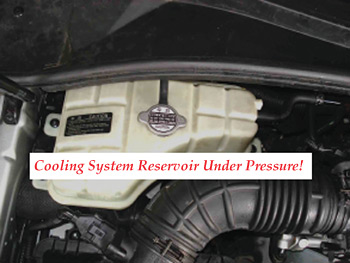
Effective Vehicle Information: 2003-’05 Sorento vehicles produced from June 30, 2002 to Oct. 3, 2004.

Repair Procedure:

1. Raise the hood and locate the coolant reservoir, cover the cap with a cotton shop towel and slowly ­remove the reservoir tank cap. See Fig. 1.

Warning: ­Engine coolant is flammable at certain temperatures. If coolant is spilled during the service procedure, all residual coolant must be removed from all surfaces before releasing the vehicle back to the customer. Make sure that the engine has cooled down to outside temperature before starting the ­repair to avoid being burned by hot coolant.figure 2

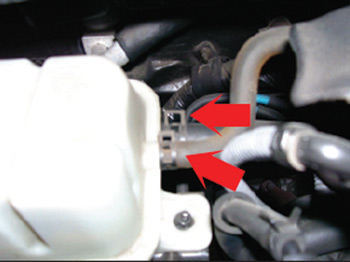
2. Use a suction pump to remove the coolant or ­install a rubber plug or equivalent to prevent the coolant from leaking completely out of the coolant reservoir tank when the hoses are removed.

a. Remove the two hose clamps and hoses from the coolant reservoir tank. See Fig. 2.

b. Transfer the overflow hose from the old to the new tank

3. Remove the three retaining nuts holding the coolant reservoir tank. See Fig. 3.

a. Drain the remaining coolant into the transfer container.

b. Install the new replacement tank to the vehicle, tighten the retaining nuts to 84-108 in.-lbs. (9.4-12.2 Nm).

c. Connect the rubber hoses and clamps as ­removed.Figure 3

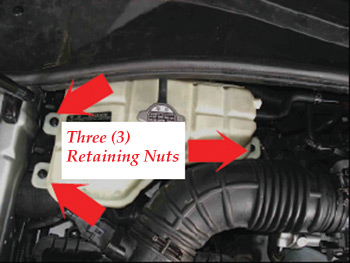
d. Fill the coolant reservoir to the correct level and  ­install the pressure cap. Coolant should be a 50/50 mixture, unless otherwise specified on the container.

Courtesy of Kia Motors America, Inc.

You May Also Like

Registration Open for ETI ToolTech 2024

The event will be held on April 22-24, 2024 in Newport Beach, CA, at the VEA Newport Beach Marriott.

The Equipment & Tool Institute's (ETI) Mission is to advance the vehicle service industry by providing technical data and open dialog between the manufacturers of transportation products, government regulators and the providers of tools, equipment, and service information. 

This mission is put into action at the annual ETI ToolTech event. This year, the event will be held on April 22-24, 2024 in Newport Beach, CA, at the VEA Newport Beach Marriott.

Brake Lathe Basics

Resurfacing drums and rotors is a machining process with its own specific guidelines.

Refrigerant Oil Has to Be Right

Oil type is just as important as oil capacity.

Three bottles of refrigerant oil
Top 5 Tools: Steve Coffell, Auto World, Hazelwood, MO

Steve Coffell, a technician at Auto World in Hazelwood, MO, says his Top 5 Favorite Tools are: Related Articles – Lisle Low Profile Fuel Line Disconnect – Dent Fix Soft-Shock Mallet DF-SM76 Reduces Damage – New ProMAXX Diesel Fuel Injector Seal Puller/Saver ProKits   OTC Genisys Touch – Quick scan, bidirectional control Snap-on VANTAGE Pro

Wheel Bearing Adjustment Tools & Equipment

A wheel bearing that’s out of adjustment can reduce bearing life and can affect more than just the bearing. It’s important to adjust the wheel bearing endplay to the proper specifications. If the bearing set is adjusted too loose or too tight, it can cause the bearing to fail prematurely. There are a few types of assemblies, so using correct procedures and tools will ensure a comeback-free wheel bearing installation.

Other Posts

New Snap-on Limited Edition Speed Demon Roll Cab

Features include next-level organization, durability, security, mobility and exclusive Speed Demon emblem.

TEXA Releases IDC5 CAR 76.5.0 Update

IDC5 CAR 76.5.0 is characterized by over 2600 new possible selections for the major makes on the market worldwide.

ISN Expands Freedom Program for Mobile Tool Dealers

ISN’s Freedom Program is designed to provide experienced, successful mobile tool dealers with support to become an independent mobile dealer and expand their growth.

Snap-on Continues to Offer Free Weekly Product Training Sessions

The online training and question and answer sessions are free of charge.