
The Sebring was replaced with a new model based on the JS platform for the 2007 model year. There are several brake packages available featuring either a disc/drum combination or a disc/disc combination. All models are equipped with five possible brake system options:
• 11.8” vented front disc/9" rear drum;
• 11.8” vented front disc/9" rear drum with ABS;
• 11.8” vented front disc/10.3” solid rear disc with ABS;
• 11.8” vented front disc/10.3” solid rear disc with ESP; and
• 11.8” vented front disc/11.8” solid rear disc with ESP.
Chrysler likes to name their brake systems after what sized wheel diameter the rotors are designed to fit in. The front brakes are called “16-inch” brakes, while the some rear brakes are called “14-inch” brakes even though not a single Sebring or Avenger came with 14” wheels.
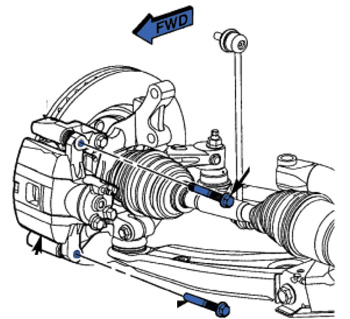
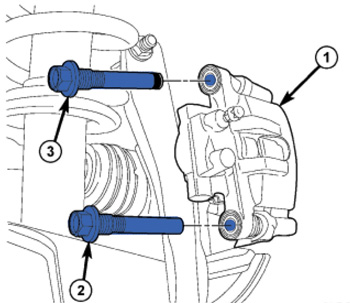
All brake calipers are the low-drag type utilizing a single-piston floating design. There are two different caliper guide pin bolts used at each brake caliper, one of which has a special sleeve at the tip of the guide pin. It is there for anti-rattle and noise suppression issues and must be placed correctly to work properly. At each front brake caliper, this bolt is placed at the upper location.
PADS
Brake pads must be replaced when usable material on a brake pad lining measured at its thinnest point measures one millimeter (0.04 inches) or less. It is important to inspect both front and rear brake pads during the same inspection. Chrysler claims that front and rear brake pads should wear out at the same time due to electronic brake distribution.
Front disc brakes are equipped with an audible wear indicator on the left side inboard brake pad only. The right side pads do not include an audible wear indicator. Rear disc brakes are equipped with audible wear indicators on both left side and right side inboard brake pads.
REAR DRUMS
The drum brakes are all two-shoe, internal-expanding type with an automatic adjuster screw. After replacing the shoes, road test vehicle stopping in both forward and reverse directions. The automatic-adjuster will continue to adjust brakes as necessary during road test.
Adjust the brake shoes to the drum diameter using a brake shoe gauge. The brake drums should lightly drag on the shoes. Further adjustments may be done using the adjustment procedure as necessary.
To adjust the shoe diameter, turn the adjuster wheel using a screwdriver inserted through the adjusting hole in the rear of the shoe support plate. Once the tip of the screwdriver contacts the adjuster wheel teeth, move the handle of tool upward using the support plate as a pivot to adjust the shoes outward. To back the shoes off, push on the pawl with the screwdriver to disengage it from the adjuster wheel teeth, rotate the wheel upward to back off the adjustment using another screwdriver or a brake adjuster tool.
REAR DISC & PARKING BRAKE
Install the rear brake rotor and install a couple wheel mounting nuts to hold it in place while a final adjustment is made. To find the adjuster wheel with the drum on, position the rotor’s access hole in the front of the rotor drum. The left side will appear at seven o’clock and the right side will appear at 5 o’clock. When adjusting the parking brake shoes with the drum-in hat rotor installed, rotating the adjuster wheel upward will loosen the adjustment. Rotating the adjuster wheel downward will tighten the adjustment.
ABS/EPS/EBD
All rear disc-brake models have ABS. Some of these models are equipped with ESP/Traction Control. All models have Electronic Brake Distribution(EBD) that eliminates the need for a proportioning valve. This system also helps to even out brake wear between the front and rear pads.
At the end of an ABS stop, ABS is turned off when the vehicle is slowed to a speed of 5-6 km/h (3-4 mph). Some drivers may complain that after an ABS stop, the brake pedal felt low. This is not a problem. Anytime the ABS is deactivated, such as at the end of a stop when the vehicle speed is less than 3 mph or during an ABS stop where ABS is no longer required, the pedal might sink. These conditions exist when a vehicle is being stopped on a road surface with patches of ice, loose gravel or sand on it.
When the ignition is turned on, a popping sound and a slight brake pedal movement may be noticed. The ABS warning lamp will also be on for up to five seconds after the ignition is turned on. When the vehicle is first driven, a humming may be heard or felt by the driver at approximately 12-25 mph. All of these conditions are a normal function of ABS as the system is performing a diagnosis check.
In 2008, Chrysler recalled more than 50,000 2007 Sebring and Avenger models due to rear brake lock up. The remedy for this recall was to re-program/reflash the ABS control module. See recall campaign number: 06V493000 for more information.
Six months later in 2008, Chrysler issues a TSB concerning ESP/Traction control sensitivity for 2007 Sebring and 2007-2008 Avenger models with the Touring Suspension. Drivers of these vehicles were experiencing overly sensitive ESP/Traction Control activation on tight curves such as freeway entrance and exit ramps along with the amber ESP/Traction control indicator lamp flashing during the incident. Chrysler recommends reprogramming /reflashing the ABS ECU.
Files for reprogramming/reflashing the ABS ECU are available on the Chrysler service information website at www.techauthority.com.
BLEEDING
The base brake’s hydraulic system must be bled anytime air enters the hydraulic system. The ABS must always be bled anytime it is suspected that the HCU has ingested air. Systems with ABS must be bled as two independent braking systems. The non-ABS portion of the brake system with ABS is to be bled the same as any non-ABS system.The base brake’s hydraulic system must be bled anytime air enters the hydraulic system. The ABS must always be bled anytime it is suspected that the HCU has ingested air. Systems with ABS must be bled as two independent braking systems. The non-ABS portion of the brake system with ABS is to be bled the same as any non-ABS system. Bleeding the ABS system requires the use of a bi-directional scan tool.
Bleeding Sequence
1. Left rear wheel
2. Right front wheel
3. Right rear wheel
4. Left front wheel