Applies To: All 2007-’10 CR-V models
A customer may complain of a grinding, thumping or groaning noise coming from the rear brakes. This occurs during the first several stops after the vehicle has been parked overnight. Note: This symptom is typically found in the northeastern part of the United States due to climate and road conditions.
Under normal braking, corrosion from the disc surface is not quickly removed, allowing for a temporary grinding or thumping noise. A new brake pad is now available, which has improved corrosion-removal characteristics.
Replace the brake pads, and refinish the brake discs. Note: Because these brake pads clean the brake discs more efficiently, some minor noise may occur. Consult with your customer before proceeding with the repair.
Repair Procedure:
1. Remove some brake fluid from the master cylinder, and release the parking brake. 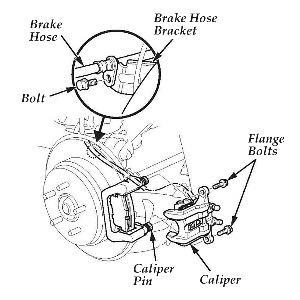
2. Raise and support the vehicle.
3. Remove the rear wheels.
4. Remove the brake hose from the brake hose bracket. See Fig. 1.
5. Remove the flange bolts while holding the brake caliper pin with a wrench. Be careful not to damage the pin boot. Remove the caliper, and hang it from the chassis with a wire or strap. Check the hose and pin boots for damage and deterioration. 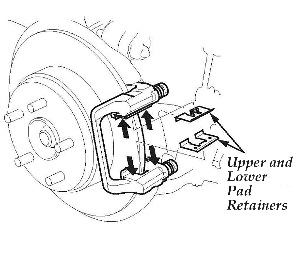
6. Remove the brake pads and the shims.
7. Remove the pad retainers. See Fig. 2.
8. Clean the caliper bracket thoroughly, remove any corrosion, and check for grooves and cracks. Verify that the caliper pins move in and out smoothly. Clean and lube as needed.
Note: If the corrosion cannot be removed, replace the caliper assembly.
9. Remove the two washers.
10. Inspect the disc/drum for damage and cracks. Replace the disc/drum if it is damaged beyond repair. 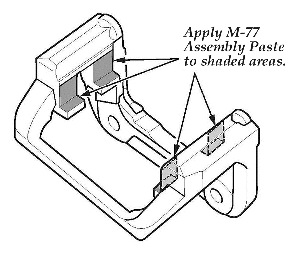
11. Refinish the brake discs using an on-car brake lathe. Refer to Service Bulletin 00-088, Brake Disc Refinishing Guidelines.
12. Apply Molykote M-77 Assembly Paste to the areas indicated by the arrows in Fig. 3.
13. Reinstall the caliper bracket. Torque the bolts to 108 Nm (80 lb.-ft.).
14. Clean the upper and lower pad retainers and remove any corrosion.
15. Install the upper and lower pad retainers. Wipe off excess assembly paste from the retainers. Keep the assembly 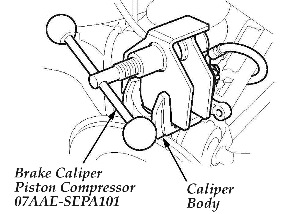 paste off the brake discs and the pads.
16. Mount the brake caliper piston compressor on the caliper body. See Fig. 4.
17. Press in the piston with the brake caliper piston compressor tool (T/N 07AAE-SEPA101) so the caliper will fit over the brake pads. Make sure the piston boot is in position to prevent damaging it when pivoting the caliper down.
Note: Be careful when pressing in the piston; brake fluid might overflow from the master cylinder’s reservoir. If brake fluid gets on any painted surface, wash it off immediately with water.
18. Remove the brake caliper piston compressor tool. 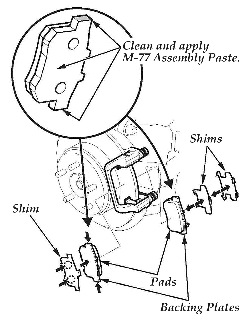
19. Apply Molykote M-77 Assembly Paste to the brake pad backing plates and the shims in the areas indicated by the arrows (See Fig. 5). Wipe off any excess paste; do not get any paste on the disc or pad surfaces.
20. Install the brake pads and the pad shims. Make sure the brake pad with the wear indicator is installed on the bottom inside of the caliper bracket.
21. Install the caliper into position (See Fig. 6). Install the flange bolts, and tighten them while holding the caliper pin with a wrench. Be careful not to damage the pin boots.
22. Install the brake hose to the brake hose bracket.
23. Clean the mating surface between the brake disc/drum and the inside of the wheel, then install the rear wheels.
24. Lower the vehicle.
25. Torque the wheel nuts to 108 Nm (80 lb.-ft.). 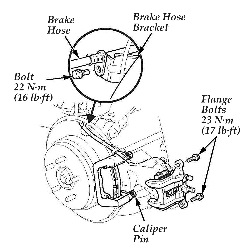
26. Press the brake pedal several times to make sure the brakes work.
Note: Engagement may require a greater pedal stroke immediately after the brake pads have been replaced. Several applications of the brake pedal will restore the normal pedal stroke.
27. Add brake fluid as needed.
28. After installation, check for leaks at hose and line joints or connections, and retighten or repair as necessary.
29. Test-drive the vehicle, then recheck for leaks.
Courtesy of Mitchell 1.