With your customer. Since the engines that have VVT-i rely on oil pressure to control camshaft timing, sludge can be a killer.
In a search of pattern failures on these engines, it’s very obvious that the source of many problems is the use of non-OE or OE-equivalent timing belts. Tooth count and timing alignment markings are critical, especially on the VVT-i engines. Be careful to compare the replacement belt to the original for tooth count between the alignment markings, as even a half tooth might make you redo the job. A belt that does not have alignment marks identical to the OE belt should not even be installed.
Another source of codes and driveability complaints after belt replacement is damage to the crankshaft position sensor reluctor wheel, that must come off during the process of replacing the belt. Extreme care should be taken to prevent any scratches or other damage to the wheel. Harsh cleaners or abrasives should not be used to clean this part or any of the pulleys or sprockets. Typical codes that are related to timing belt misalignment or potential sensor wheel damage are P0011, P0021, P0016 or P0018.
TIMING BELT REPLACEMENT
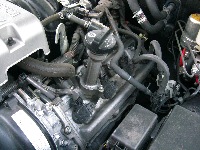
Due to the size of this engine, clearances are very tight for the timing belt repair, especially on the smaller 4Runner (see Photo 4). The Tundra, Sequoia, Land Cruiser and Lexus car and truck models have more room, but are still tight for removal of some of the accessories.
You will need a tool to hold the crankshaft pulley to remove the crankshaft bolt, and you may need a puller to get the pulley to release from the crankshaft. The rest of the job is pretty straightforward. Do not consider this article to be a replacement for the proper repair information for the model you are working on. Rather, this article is intended to give you a heads up on some things to look out for; it’s not an instruction manual.
Since the water pump is run by the timing belt on these cars, and you will be removing some of the cooling system components, include refilling and bleeding of the system, or a complete coolant replacement, as part of the job estimate. As noted above, if any indication of oil leakage is observed on first removal of the timing belt covers, take the time to read through the procedure for camshaft removal and seal replacement before proceeding on VVT-i models.
1. Start by removing the ignition key and putting it somewhere known only to you. Once the timing belt is off, a touch of the key for any reason could spell problems.
2. You will need to remove the upper engine covers; use care with the plastic pieces. The lower engine shields could be left in place, but working around them would add time to the job. Due to a sometimes difficult-to-remove crankshaft pulley bolt, it’s much easier to remove the radiator (after removing the shroud), especially if you are planning to do cooling system work. You will need to drain the cooling system anyway to remove the water manifold.
3. The serpentine belt tensioner is released by putting a socket on the pulley bolt and turning it counterclockwise (the pulley bolt is left-hand threaded). Once the drive belt is off, you can unbolt, but don’t remove the various accessories (alternator, compressor, power steering pump). Toyota does a good job of providing enough slack in the connecting pieces to allow the various pieces to be moved out of the way enough to get the covers off and provide working room.
4. The fan is supported by a bracket and bearing assembly that must be removed. Keep track of where the various length bolts come from.
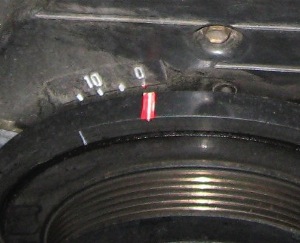
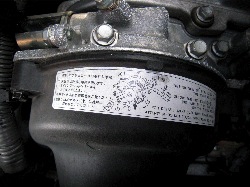
5. Before removing the covers for the timing belt, mark the timing marks on the cover and crankshaft pulley (see Photo 5) so they are easy to see. On VVT-i models, read and head the warning sticker pertaining to the timing adjustment sprockets (see Photo 6). Removing the wrong bolts will cause a lot of headaches, and you cannot replace the camshaft seals from the outside.
6. Once the timing covers are off, in sequence, line up the timing marks, again making paint marks on the pulleys and rear covers to allow easier alignment. Now comes the time to remove the crankshaft pulley bolt and pulley. It’s easy if you removed the radiator, but difficult at times if the radiator is in place. An old timer’s trick is to place a thin piece of wood or cardboard over the face of the radiator to protect it.
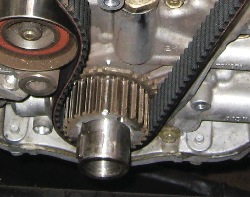
7. Once the pulley bolt and pulley are removed, recheck alignment of the timing marks. If they don’t line up perfectly (within 1/2 tooth), turn the engine over by hand, one rotation, and recheck. Turn the crankshaft approximately 50 degrees clockwise, then backward to TDC to relieve tension in the camshaft timing gears. The timing marks should be lined up at this point (see Photo 7). If not, determine the reason (jumped timing, failed tensioner, failed idler pulley bearings) and make sure that it’s corrected during the repair.
8. Remove the hydraulic tensioner by loosening the bolts alternately. Take the tensioner and dust cover out and reset and pin the tensioner. Check it for obvious leakage or weakness. You may need to rotate the right- side (passenger-side) camshaft slightly to relieve tension on the belt between the crankshaft and right cam.
9. If you’re using an OE or OE-equivalent timing belt, it should have three alignment marks and arrows pointing to the front. There should be obvious markings for the left and right cam and crankshaft. If there are markings remaining on the original belt, lay the two belts together and verify that the belts are marked the same. Reports of aftermarket, non-OE equivalent belts being mismarked are quite common.
10. Before starting reassembly, check for leaks from the water pump, seals or front engine cover area. Check for smooth bearings in the idlers and for any deterioration or scratching of the belt sprockets. Make sure that the cupped side of the crankshaft belt guide/reluctor wheel is to the outside, and treat the guide as a VIP (very important part).
11. Using the painted marks you made earlier, turn the cam sprockets just slightly to make installing the timing belt easier. Turn the right-side sprocket 1 tooth clockwise and the left-side a 1/2 tooth clockwise. Make sure the crankshaft is still aligned properly and install the belt with the printed marks lined up on the various shafts. Start at the crankshaft, then the left-side idler and camshaft, go around the water pump and then the right-side sprocket and tensioner pulley.
12. Install the tensioner hydraulic unit, tighten to spec and remove the retaining pin. Allow a couple of minutes for the tensioner to fully tension the belt, then turn the crankshaft two full turns clockwise, back to TDC and recheck the alignment of all timing marks. If they’re not correct, start over with the belt installation. Reassemble in reverse order using a torque wrench on all fasteners to prevent pulling or damaging threads in the aluminum housings.
13. Refill the cooling system, using a vacuum type filler system to prevent overheating due to air pockets.
FINISHING UP
There really isn’t anything about this job that is out of the ordinary. If you’ve done the hundreds of Toyota V6s that most professional mechanics have, you will find this job a piece of cake. Just realize that with VVT-i technology, some procedures and cautions need to be researched before you start taking things apart.
Remember that the vast majority (70-90%) of Tundra and Sequoia models have the 5.7L engine, so there is no timing belt. That also means that the other 20-30% will need a timing belt as maintenance, so there are jobs to be sold.
The shear numbers of these vehicles that have been sold over the last 20 years (Lexus models) means there are a lot of opportunities to provide service to your customer — better to sell as maintenance than a repair. Since these vehicles may have engine damage if a belt breaks or jumps time, preventive maintenance makes a lot of sense.


