The owner of a 2004 Malibu says that there is a squeaking noise coming from the right front wheel. A quick inspection shows that the master cylinder is low on fluid and the pads are down to the sensor.
You tell the owner that she needs to have the brake pads replaced. She responds that the brake pads were replaced five months ago and produces a repair order. Mileage on the odometer is 48,420 miles. Total mileage since the pads were replaced is 6,472 miles. The repair order states: “Replace front pads and rotors. Replace rear pads and turn rotors.”
What do you tell your customer? “The other shop did a poor job,” or imply that she is a bad driver. That may make you suspect too. Explain that there may have been a condition not found when the other shop inspected the braking system.
Typically, It comes down to the calipers and hardware. Like a piston ring is an engine, the internal components of a caliper can only be diagnosed by the symptoms and not visuals. Understanding what is behind the boot is critical to preventing comebacks.
Caliper Inspection:
All calipers are not the same. Just as all uneven brake pad wear patterns are not the same, nor are the remedies. Before you start condemning calipers, you should first understand the differences between a fixed and floating caliper.
Fixed calipers have two or more pistons that are opposed in each mirrored half of the caliper housing. The two housings are bolted together and the caliper is mounted directly to the knuckle or axle housing. The following are key inspection items specific to fixed calipers that can cause piston knock back. A warped rotor will push the pistons on one side of the caliper into its bore. This can increase the distance that the pedal will travel when the brakes are applied. A warped rotor can also cause a pulsation in the brake pedal.
Wheel bearings that are out of adjustment or a hub bearing with excessive end play and/or run out can cause a low pedal condition after the vehicle is driven for some time and the brakes are applied. When the vehicle is driven in stop-and-go traffic, the pedal may operate normally.
Floating calipers can have a single piston or dual pistons located on the inboard side of the caliper and pressed on an outboard flange of the caliper. The body of the caliper is supported by bridge bolts that allow the caliper to slide in its bracket.
The piston forces the inboard pad against the rotor while sliding the outboard flange and pad against the rotor. The floating caliper allows greater negative wheel offset for front-wheel-drive applications. Key inspection items specific to floating calipers include inspecting the bracket for rust and corrosion that could prevent the caliper from moving. An indication of this condition is excessive wear of the inboard pad. Seized bridge bolts caused by corrosion can also cause this condition.
Worn and/or damaged seals and bushing can affect the alignment of the caliper. This condition ca also affect pad wear.
Rear Calipers that incorporate a mechanical parking brake feature require special service operations and tools to replace pads.
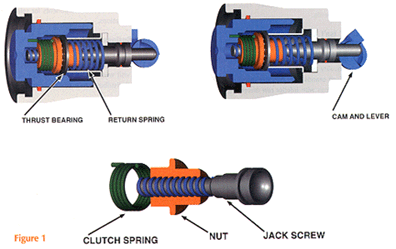
The piston for the caliper is inverted when compared to a front caliper application. The mechanical parking brake caliper uses a jackscrew, nut and clutch to operate the parking brake. Introduced in the late 1970s, this type of mechanism continues to be used on current vehicles. The jackscrew and nut push the piston. A clutch allows the nut to turn on the jackscrew to compensate for pad wear. The spring is used for the clutch. The wrap of the spring allows the nut to turn in only one direction. The adjusting spring pushes the nut to turn on the jackscrew to maintain contact with the piston as the pads wear. The brake is actuated by a cam and lever that pushes the jackscrew nut and piston to engage the parking brake, see Figure 1.
All calipers should be inspected for wear and damage to the piston boots, seals. Piston boots can be punctured by road debris or improper installation. A puncture will allow moisture and other corrosive material into the piston seal area causing damage to the seal. The seal on most applications is designed to retract the piston after the brake has been applied, as shown in Figure 2. The return force for the piston comes from the flexibility of the rubber seal.
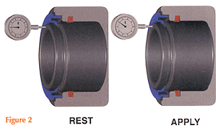 The seal loses its flexibility as it ages or becomes contaminated. This will not allow the piston to return to its rest position. This can cause the brakes to drag and increase pad wear. This is why it is very important that there should not be any restriction in the hydraulic line, such as a deteriorated hose. The mechanical stack up of the piston, pad and rotor can create an uneven pressure on the piston in its bore that could cause the piston to seize. The piston-to-bore clearance in relation to the thermal coefficients of expansion between piston, caliper and seal are crucial. The use of the right part for the right application is the only way to ensure proper operation.
Service considerations
Get the C clamp out and seat the pistons. Remove the bridge bolts and caliper. If the rotor has 0.002 run out, install a new set of pads. Top off the master cylinder. Test drive. Job complete?
It is a good idea to check the master cylinder before using a C clamp to seat the pistons. If a C clamp has to be used to remove the caliper, it may indicate a problem with the caliper and /or the rotor. Removing the caliper with the piston extended will give you the opportunity to inspect the boot and piston. The surface of the boot can be checked for punctures and damage. By pushing the boot back on the piston, the piston can be checked for contamination to its surface that could damage the seal when the piston is seated in the caliper (Figure 3).
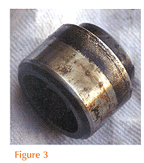 If contamination is present in the boot area, there is the possibility of contamination in the bore of the caliper. The presence of any contamination should require the caliper to be rebuilt or replaced. In the case of the floating caliper, it’s all about the bracket and hardware. The bracket should be checked for alignment and cleaned. Bridge bolts should be cleaned or replaced. All bushing and seals associated with the bridge bolts should be replaced. New pad hardware should also be installed. Proper torque of the bridge bolts can eliminate squeal under light brake applications.
The chemical composition of brake fluid’s Glycol Ether base makes it hygroscopic. The hygroscopic absorption of water and the boiling point is a concern in the case of high ambient temperatures and heavy brake applications. Low ambient temperatures are also a concern. As the temperature decreases the viscosity of the fluid increases. Moisture also is a contributing factor to the change viscosity at low temperatures. This is especially important for ADS and traction control. A sluggish ADS solenoid valve could cause an increase in stopping distances. A fluid flush is a good idea for a high mileage vehicle. Many systems have a quick take up master cylinder. This cylinder incorporates a large bore piston behind the primary and secondary apply pistons. The purpose is to quickly apply the primary and secondary pistons to the large displacement caliper pistons.
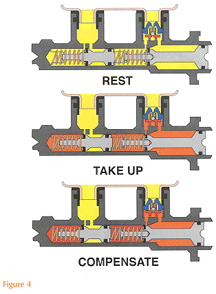 When the pedal is depressed, the large bore piston closes the quick take up valve and forces fluid past the primary piston seals until a backpressure seals the primary piston. This is called take up mode. After this occurs, fluid from the large bore is returned to the reservoir through check valve in the center of the valve. This is called compensation mode. When flushing a system with this type of master cylinder, the brake pedal can be depressed with a bleeder screw open to allow the large bore to purge its fluid (See Figure 4).
When the brake system is filled on the assembly line, it is evacuated to 11 to 15 inches Hg at the master cylinder and the fluid is drawn into the system. This is a one-time fill procedure for a new vehicle. Anti-lock brake systems are installed on a majority of vehicles produced today and have required bleeding procedures to ensure that any trapped air in the system is purged when bleeding the brakes.
This information should be listed in your service information database. Pressure bleeding at the master cylinder is one method for bleeding, and is recommended by most vehicle manufacturers. Vacuum and pressure bleeding at the caliper is also a method for bleeding. The attitude of the vehicle is important in that the bleeder screw must be located above the piston to ensure no trapped air will remain in the caliper bore. The braking system is the single most important safety device in a vehicle. Your life depends on the brakes. If the engine quits at 70 mph, the brakes are there to bring you to a safe stop. If your brakes fail at 70 mph, it’s another story that may not have a happy ending.

