Anyone who has ever changed a water pump on a 1985-’95 Cadillac 4.1L, 4.5L or 4.9L knows that it is a job they don’t want to have to redo due to a false step during installation. However, there is some useful information available that could help avoid a potentially big installation headache.
These particular Cadillac models’ water pumps are tough to get to under the hood because of their tight location. Plus, the pumps are secured with what seems like hundreds of fasteners. What some installers may not realize is that there are two bolts located very close to the outside edge of the water pump that must not be disturbed during the pump’s replacement. THESE BOLTS SHOULD NOT BE REMOVED! (See figure below.)
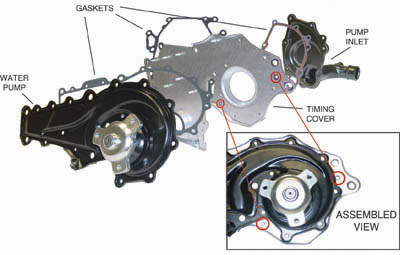
Two bolts connect the timing cover to the water pump inlet cover located behind the timing cover. If the bolts are removed, the inlet cover gasket, which is sandwiched between the timing cover and the inlet cover, will likely shift and leak upon installation of the new pump. Coolant can seep downward, clinging to the timing cover as it runs, making it appear that the new water pump has developed a leak. Several unproductive hours (and more banged up knuckles) can result while locating and correcting this new leak. Additionally, the timing cover should be checked for flatness prior to pump installation. It may be dimpled where the 6mm studs protrude from the cover because of prior over-tightening of the corresponding nuts. A dimpled cover will prevent proper gasket sealing. Repairing today’s vehicles can be frustrating enough without allowing either of these unnecessary headaches to occur.
Be sure to remember that the fasteners should be tightened to proper torque value in a staggered pattern, alternating from one side of the pump to the other in a circular fashion, to make sure the gasket seats evenly. The torque specifications and sequence for the fasteners are as follows:
1. 4 torx head bolts = 30 FT. LBS.
2. 7 hex head nuts = 5 FT. LBS.
3. 1 stud = 30 FT. LBS.
4. 7 hex head bolts = 5 FT. LBS.
For more selling tips, technical information or water pump installation assistance, visit ASC Industries, Inc., online at www.asc-ind.com.