Models Affected: 1995-’99 Saturn S-Series vehicles.
Some customers may comment that one or more of the following conditions has occurred:
• Intermittent no start;
• Intermittent stall after start-up; or
• Loss of radio presets.
These conditions may be caused by terminal tightness at PIN F-5 within the Instrument Panel Junction Block (IPJB Black 68 way).
Service Procedure
Instrument Panel Junction Block (IPJB) Removal:
1. Disconnect the negative battery cable.
2. Disconnect the positive battery cable.
3. Remove the left and right lower trim panel extensions by pulling outward at dual lock locations. Rotate the panels outward to disengage the hinges from the console.
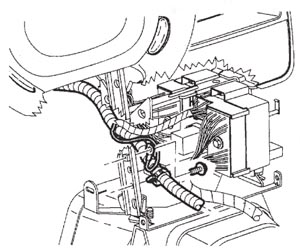 4. Remove the screw and ground wire from the H-bracket. See Figure 1.
5. Remove the wiring harness from the H-bracket.
6. Remove the screw and disconnect the rear electrical connector from the IPJB. Remove the IPJB screw.
7. Using a small screwdriver, release the lock tabs on the IPJB and slide off of the mounting tabs.
8. Feed the IPJB through the H-bracket toward the front of the car.
9. Inspect PIN F-5, circuit 402 on the black 68-way connector of the instrument panel junction block for signs of arcing. If signs of arcing are present, replace the IPJB and terminal (see instructions below).
10. If there are no signs of arcing, verify the terminal tightness using the gray probe. Replace the terminal (see instructions below).
IPJB Installation
1. Feed the IPJB back through the H-bracket.
2. Slide the IPJB into the mounting tabs and lock into place.
3. Install the rear black 68-way electrical connector into the IPJB and then install the screws in the connector into the IPJB.
4. Reconnect the wiring harness to the H-bracket.
5. Reconnect the ground wire to the H-bracket.
6. Reinstall the left and right lower trim panel extensions.
7. Reconnect the positive battery cable.
8. Reconnect the negative battery cable.
Terminal Replacement
1. If terminal replacement is required, remove the CPA from the black 68-way connector. Insert tool 12094430/J04898 to remove the terminal.
2. Put the connector seal (if equipped) on the wire.
3. Remove the insulation from the end of the cut lead and the harness. Recommended strip length is 9.5 mm (3/8”). Caution must be used to prevent cutting the wire strands.
4. Position the stripped ends in the sleeve until the wires hit the stop in the center of the splice.
5. Hand crimp using the approved crimping tool. Gently tug on the wires to make sure they are secure before applying heat to them.
Important: Do not use a match or open flame to apply heat to the seal.
6. Apply heat using the heat gun or some other device, heating to 175° C (347° F) until the glue flows around edges of the sleeve.
7. Insert the terminal into the connector. Check to make sure the terminal lock tab is engaged by gently tugging on the wire.
8. Replace any terminal position assurance devices.
Courtesy of ALLDATA.
For additional information, visit www.alldata.com.