Tech Tip: 'Braking' the Code on a Ford Hybrid

Tech Tip: ‘Braking’ the Code on a Ford Hybrid

The owner of a Ford Escape Hybrid or Mercury Mariner Hybrid may complain of an illuminated malfunction indicator lamp (MIL). If you obtain the diagnostic trouble code (DTC) of U2062, the problem may originate in the brake system control module, part of the hydraulic control unit (HCU). Follow the steps in the Service Procedure to correct the condition.

By Ed Dorowski, ALLDATA Editor and Jeff Webster, ALLDATA Technical Writer.

Applicable Models
2005-2008 Ford Escape Hybrid
2006-2008 Mercury Mariner Hybrid

Parts Information

W711254-S437M: Ground Stud
W705790-S901:Nut
8M6Z-13N850-A: Harness Service Kit

Service Procedure
Diagnose and fix any other DTCs before performing the Service Procedure for DTC U2062. If the DTC U2062 is present alone or after diagnosing other DTCs, perform this Service Procedure.

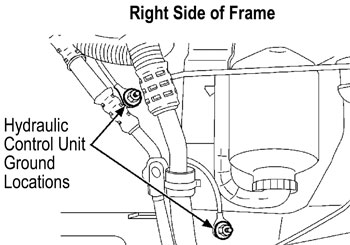
1.Disconnect the battery ground cable, following factory and/or industry standard approved practices.

2. Locate the two grounds for the ABS controller using the wiring diagram. Grounds for 2005 to 2007 are G102 and G104. 2008 grounds are G109 and G110. The grounds are located on the right hand side frame rail under the hydraulic control unit (HCU).

3. Disconnect the grounds G102/G104 or G109/G110, clean the ground stud threads and contact surface. If the vehicle was built prior to October 2005, replace the two ground studs and nuts with the updated service parts.


4. Disconnect connector C1462, the 47 pin HCU connector and remove red plastic lock from inside the connector. 


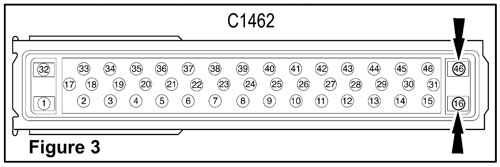
5. Open the back cover of connector C1462 and locate the black ground wires in pin locations 16 and 47 (Figure 3). Remove pins 16 and 47 from connector C1462.  Remove tape from harness loom and cut the two ground circuits 1 inch into the harness loom. Tape the ends of the ground circuits and re-tape the harness loom into original position using vinyl tape or equivalent.

6. Using the ground wires provided in the jumper harness service kit, insert the pins into C1462 at pin locations 16 and 47. Tape the jumper harness service kit wires to the existing harness until you reach the ground locations G102/G104 or G109/G110. Install the red plastic pin terminal lock into C1462 and connect to the HCU.

7. Locate the existing ground eyelets for G102/G104 or G109/G110 that were removed in Step 3.

8. Cut the existing ground eyelets for G102/G104 or G109/G110 near the harness and tape exposed ends to the existing harness.

9. Route the ground jumper harness service kit eyelets to the ground studs on the HCU bracket and secure the grounds (Figure 4).

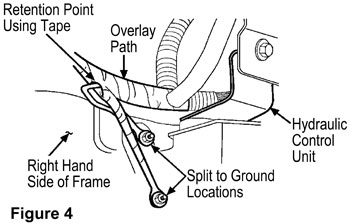
10. Connect the battery ground cable following factory and/or industry standard approved practices.

Ed Dorowski has 19 years of Domestic and Import dealership and independent shop experience as a service consultant, ASE Certified Master Technician, Nissan Certified Master Technician, & California Smog Test & Repair Technician. Jeff Webster has 20 years of experience as a writer/editor.

2009 ALLDATA LLC. All rights reserved. All technical information, images and specifications are from ALLDATA Repair.

Technical service bulletin courtesy of ALLDATA.

For additional information, visit www.alldata.com.


You May Also Like

TEXA Releases IDC5 CAR 76.5.0 Update

IDC5 CAR 76.5.0 is characterized by over 2600 new possible selections for the major makes on the market worldwide.

TEXA has released a major update IDC5 CAR 76.5.0 which enhances Car, Supercar and Light Commercial IDC5 diagnostic features & coverage. This latest software update enables more efficient troubleshooting, enhances existing special functions and topology module mapping features, while increasing technical information accessibility that is essential for accurately completing complex workshop operations. IDC5 CAR 76.5.0 includes the update of 37 makes, including electric and hybrid vehicles, while increasing the coverage of ADAS calibration, enhancing the visual live data "DASHBOARD" screens and other interactive technical information features like wiring diagrams, maintenance guides and component location diagrams.

Brake Lathe Basics

Resurfacing drums and rotors is a machining process with its own specific guidelines.

Refrigerant Oil Has to Be Right

Oil type is just as important as oil capacity.

Three bottles of refrigerant oil
Top 5 Tools: Steve Coffell, Auto World, Hazelwood, MO

Steve Coffell, a technician at Auto World in Hazelwood, MO, says his Top 5 Favorite Tools are: Related Articles – Lisle Low Profile Fuel Line Disconnect – Dent Fix Soft-Shock Mallet DF-SM76 Reduces Damage – New ProMAXX Diesel Fuel Injector Seal Puller/Saver ProKits   OTC Genisys Touch – Quick scan, bidirectional control Snap-on VANTAGE Pro

Wheel Bearing Adjustment Tools & Equipment

A wheel bearing that’s out of adjustment can reduce bearing life and can affect more than just the bearing. It’s important to adjust the wheel bearing endplay to the proper specifications. If the bearing set is adjusted too loose or too tight, it can cause the bearing to fail prematurely. There are a few types of assemblies, so using correct procedures and tools will ensure a comeback-free wheel bearing installation.

Other Posts

New Snap-on Limited Edition Speed Demon Roll Cab

Features include next-level organization, durability, security, mobility and exclusive Speed Demon emblem.

ISN Expands Freedom Program for Mobile Tool Dealers

ISN’s Freedom Program is designed to provide experienced, successful mobile tool dealers with support to become an independent mobile dealer and expand their growth.

Snap-on Continues to Offer Free Weekly Product Training Sessions

The online training and question and answer sessions are free of charge.

TechShop, ShopOwner Offer $50 For Good Guesses

Guess the Tool for a chance at cold hard cash!