The GMT 900 debuted in 2007 as the replacement for the GMT 800. The first GMT 900 vehicle was the Chevrolet Tahoe, which arrived at dealers in January 2006. The GMC Yukon (regular and Denali) and Cadillac Escalade soon followed. Chevrolet Avalanches and Suburbans, GMC Yukon XLs, and Cadillac Escalade ESV and EXT were next to hit the roads.
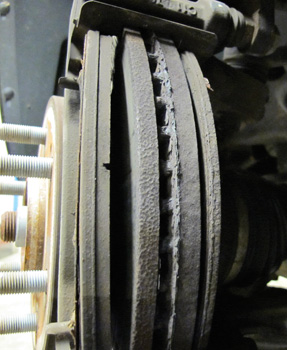
Pads
Both front and rear disc brake pads have integral, audible wear sensors placed on the inboard pad. Replace the disc brake pads when the friction surface is worn to within 0.76 mm (0.030 in) of the mounting plates.
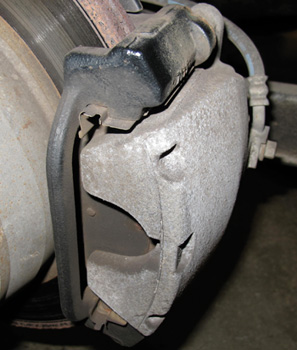
Do not use any air tools to remove the guide pin bolts. Use hand tools only. Use an open-end wrench to hold the caliper guide pin in line with the brake caliper while removing or installing the caliper guide pin bolt. Do not allow the open-end wrench to come in contact with the brake caliper. Allowing the wrench to come in contact with the brake caliper will cause a pulsation when the brakes
are applied due to misalignment. Torque front caliper guide pin bolts to 74 ft/lbs, the rears require only 28 ft/lbs.
The caliper brackets should be cleaned and inspected every time the pads are replaced. New pad abutment clips should be used every time.
The bolts that secure the bracket use red thread-locker compound on the threads. Make sure to clean the old compound from the threads before applying new compound. The front bolts have a torque spec of 148 ft/lbs for the front and 122 ft/lbs for the rear.
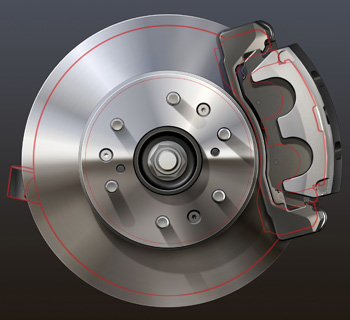
Rotors
The rotors for the 1500-Series or JD9 option package have few reported problems and owners have reported the ability to machine the rotors twice before replacement on both the front and rear.
Bleeding
The base hydraulic brake system must be bled before performing this automated bleeding procedure.
Bleeding Sequence (manual or power): RIGHT REAR; LEFT REAR; RIGHT FRONT; and LEFT FRONT.
After hydraulic component or line replacement, it is necessary to perform an automated bleed procedure with a scan tool. Before you start the automated procedure, check to see if the truck is equipped with StabiliTrak or Vehicle Stability Enhancement System (VSES). This can be done by checking for a light at start up, checking the options sheet or some scan tools can detect the option.
With JL4 (StabiliTrak) option
The base hydraulic brake system must be bled before performing this automated bleeding procedure.
1. Install a scan tool to the vehicle.
2. Start the engine and idle.
3. Using the scan tool, begin the automated bleed procedure.
4. Follow the instructions on the scan tool to complete the automated bleed procedure. Apply the brake pedal when instructed.
5. Turn the ignition off.
6. Remove the scan tool.
7. Fill the brake master cylinder to the maximum-fill level.
8. Bleed the hydraulic system.
9. With the ignition off, apply the brakes three to five times, or until the pedal becomes firm, in order to deplete the booster power reserve.
10. Slowly depress and release the pedal. Observe the feel of the pedal.
11. If the brake pedal feels spongy, repeat the automated bleeding procedure. If the pedal still feels spongy after repeating the automated bleeding procedure, inspect the brake system for external leaks.
12. Turn the ignition key on, with the engine off. Check to see if the brake warning lamp remains illuminated.
13. If the brake system warning lamp remains illuminated, do not allow the vehicle to be driven until it is diagnosed and repaired.
14. Drive the vehicle to exceed 8 mph to allow ABS initialization to occur. Observe brake pedal feel.
15. If the pedal feels spongy, repeat the automated bleeding procedure until a firm brake pedal is obtained.
Without the JL4 option
This procedure may be performed on all vehicles except those equipped with option code JL4, StabiliTrak or VSES. The base hydraulic brake system must be bled before performing this automated bleeding procedure.
1. Install a scan tool to the vehicle.
2. Start the engine and idle.
3. Depress the pedal firmly and use steady pressure on the pedal.
4. Using the scan tool, begin the automated bleed procedure.
5. Follow the instructions to complete the procedure. Release the pedal between each test sequence.
6. Turn the ignition off.
7. Remove the scan tool.
8. Fill the brake master cylinder reservoir to the maximum-fill level.
9. Bleed the hydraulic brake system.
10. With the ignition off, apply the brakes three to five times, or until the brake pedal becomes firm, in order to deplete the booster power reserve.
11. Slowly depress and release the pedal. Observe the feel of the pedal.
12. If the brake pedal feels spongy, repeat the automated bleeding procedure. If the brake pedal still feels spongy after repeating the automated bleeding procedure, inspect the brake system for external leaks.
13. Turn the ignition key on, with the engine off; check if the brake system warning lamp remains lit.
14. If the brake system warning lamp remains illuminated, DO NOT allow the vehicle to be driven until it is diagnosed and repaired. Refer to Symptoms – Hydraulic Brakes.
15. Drive the vehicle to exceed 13 kph (8 mph) to allow ABS initialization to occur. Observe pedal feel.
Parking/Emergency Brake
The park brake shoes must be adjusted before the park brake cable tension is adjusted. This is done with the shoe-to-drum gauge. Use the gauge to position the shoes so that it contacts the inside diameter of the rotor. Once on the vehicle, turn the adjuster nut until the lining just contacts the rotor. The clearance between the park brake shoe and the rotor is 0.6604 mm (0.026 in).
Next, move to the adjustment of the parking cable tension. First, verify the self adjuster lock-out pin has been removed. Second, fully apply and release the park brake pedal three times. Replace the lock-out pin.