With the reliability that late-model cars and especially their engines enjoy, we don’t find ourselves doing too much heavy engine work anymore. Many of us miss the feeling of accomplishment we’d get when completing an in-house engine rebuild. I know I always enjoyed the moment when the fresh engine would light right off and run well.
On the other hand, today’s modern engine doesn’t necessarily lend itself to the types of repairs we did a few years ago. In most cases, it’s simply more efficient to replace a badly damaged engine with a rebuilt or recycled unit, getting the car out of the shop and back to the customer in a timely manner. Lately, the only engine work we seem to be doing is cylinder head gasket replacements. Some of these replacements stem from design issues that show up as the mileage accumulates, but most are the result of overheating.
PINPOINTING THE PROBLEM
Like any repair, the diagnostic process begins at the service counter. Many times, the complaint will be as simple as the heat comes and goes as the car is driven. More serious problems may involve misfire codes being set and the car putting out steam on start-up.
You have a couple of choices when it comes to confirming that the head gasket is the reason for the low coolant level. While taking compression is an important step, only the most severe cases of head gasket leakage will be found using this method. But it will give you a quick indication of the engine condition and help you determine the best strategy for this repair.
Another quick test is a dye test where you draw the air from the cooling system through a liquid that will change color if exhaust gasses are present. This test works well as long as you follow some precautions. The first is to be sure the dye is good; it doesn’t have a long shelf life. The other is to be careful that none of the coolant finds its way into the tester and gives you a false reading. Some guys have had good success using their gas analyzer to look for hydrocarbons coming out of the radiator, but be very careful about the coolant being ingested here.
 We find the most reliable test to be a cylinder leak-down test that rarely misses a problem and gives us the added advantage of knowing which cylinder is leaking. This lets you look more closely at that cylinder for cracks or problems that will affect the success of the repair. The leak-down test also gives the best look at how well the cylinder is sealed from a mechanical perspective.
A leak-down test is more labor intensive than the other methods and the customer has to understand the costs involved, but it beats pulling a head off without being sure there’s a problem. This test involves removing the spark plugs and filling the cylinder with compressed air, while monitoring how well the cylinder holds pressure.
 The necessary tools generally have two gauges with one showing the pressure in and the other reading what the cylinder holds. We use 100 pounds as an inlet pressure giving us the percentage of leakage. Of course, the cylinder has to be at TDC on the compression stroke so both valves are closed. This seems to be where most techs struggle when performing this test. I find it easiest to start with the number one cylinder and follow the firing order. While the air is in the cylinder, remove the radiator cap and watch for signs of the air entering the cooling system (be sure the cooling system is full and bled). At the same time, listen at the intake and exhaust for leakage at the valves and the dipstick for an indication of how well the valves and rings are sealing. Like any diagnostic tool, it’s important that you check good cylinders so as not to be fooled by sounds that you’ll hear that are normal. Another tip is to listen in the other cylinders through the plug holes. While the valves are closed in the cylinder, you’re testing that they’re open in the other cylinders, which will allow air escaping from the test cylinder to find its way into the other cylinders by way of the intake or exhaust manifolds.
This month, we’ll be looking at a 2004 Nissan Sentra that found its way to our shop after recently being serviced, including a coolant change. The customer’s initial complaint was that the heat was coming and going and the temp gauge was fluctuating. The initial inspection showed a low coolant level, after a refill, bleed and pressure test with no leaks found and a five-mile road test. We returned the car and told our customer to let us know if the problem persisted, thinking the system may not have been bled thoroughly when the coolant was changed.
Within a week, the Sentra found its way back, with the customer reporting that the same problem returned. Only this time, he added some coolant to prevent any overheating, but it was clear more intensive testing was in order. The leak-down test resulted in the coolant level rising in the number three cylinder. Although it showed only 5% leakage, it was obvious the head gasket was no longer doing its job.
This Sentra is equipped with the QG18DE 1.8L
4-cylinder powerplant. Outfitted with twin cams, four valves per cylinder and chain-driven variable valve timing, I certainly don’t recommend just diving in and taking stuff apart. While not a difficult job, it pays real dividends to consult your service information before putting a wrench to any engine.
SERVICE PROCEDURES
In the case of this Sentra, precautions are required for both the camshaft gears as well as the timing chain tensioner.
The first step after disconnecting the battery is to drain the coolant from both the radiator and the engine. I always like to drain the block, if possible. It just makes sense to prevent coolant from getting in the engine and it goes a long way in keeping the work area clean.
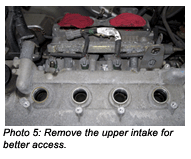
The next step involves removing the air intake ducting. In this case, the intake manifold would be removed with the head, but we found access was better with the upper plenum removed. Don’t forget the intake manifold rear supports. The exhaust manifold does have to come off.
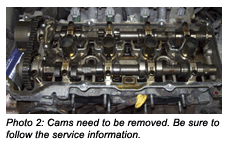
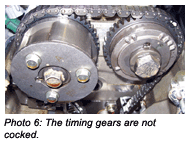
With the cam and front cover removed, it’s time to review the service info and remove the camshafts.  The first step is to bring the engine up to TDC. Always turning in the direction of rotation (clockwise), confirm that the timing marks are aligned and make your own marks on the chain to be used on reassembly.
Now it’s time to prepare the timing gears for removal. Nissan, like most manufacturers, uses oil pressure to adjust the cam timing. The intake cam is at the most retarded position when the engine is off and has to be locked in the most advanced position for removal. Nissan uses an internal lock pin in the pulley that has to be released, so you can put the cam in the advanced position and lock it there.
Apply air pressure to the rear most oil port in the head where the valve timing control solenoid mounts. Listening closely, you can hear the internal pin disengage in the sprocket. Keeping the air applied, turn the cam clockwise with an open-end wrench on the hex part of the cam. Don’t force it; if the pin is released, the cam won’t be hard to turn. If necessary, “wiggle” the cam to dislodge the pin; the most stubborn cases may require some easy taps with a plastic hammer on the face of the gear.
You’ll know you’re at the most advanced position when the sprocket starts to move with the cam. At this point, insert a locking pin in the sprocket to lock the gear in the most advanced position. Your service information will describe the pin that’s required, but it’s basically an Allen wrench. Tape the pin in place to be sure it stays put.
Now the timing chain tensioner can be removed. The tensioner is a ratchet type; to release the ratchet, push down the release lever allowing you to push the plunger into body. At that point, insert a stiff wire through the lever into the tensioner housing to lock the release and plunger in place. Skip this step and you have a good chance of the plunger and spring ending up in the oil pan.
Now we can remove the cam sprockets. Again holding the cams with a wrench on the hex section of the shaft, remove the bolts that secure the gears to the cams.
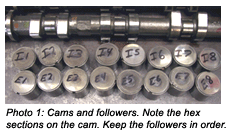
Now the camshafts can be removed and we can get to the head bolts; again refer to the service information for the recommended removal sequence of the cam cap and head bolts. Make note of the cam cap bolts; they’re color-coded to ensure they go back where they belong. Be sure to mark the cam followers as they’re removed. Nissan uses shim-type adjusters on this engine, and to maintain the proper clearance, it’s critical that the lifters go back in the same location.
It’s a good habit to check the valve lash before the camshafts are removed, as this is the best time to change a shim if it’s necessary. Valve lash will also give us an indication of the valve condition. If you find lash that has tightened up, it’s a pretty good indication that some wear has taken place between the face of the valve and the seat. With the cylinder head already coming off, it might make sense to have the valves serviced. Of course, this is a different job than a simple gasket replacement and the estimate will need to be updated and approved.
With the cams out of the way, the head bolts can be accessed and removed; do so in a couple of steps and it can’t hurt to follow the recommended loosening sequence in your service information.
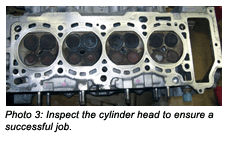
Now that the head is off and on the bench, it’s time to do some inspections to ensure a successful job. In our case, we were concerned that the head may have warped as a result of the overheating. Using a straight edge, the head checked within the 0.003 tolerance, so we’re good with a simple gasket replacement. We were confident that a gasket replacement was going to take care of our problem with the distortion evident on the original gasket. Unfortunately, it didn’t photograph well, but the damage was apparent.
If we found that the head was out of tolerance, it would’ve required resurfacing. Nissan warns against cutting too much, and I agree that a badly distorted head should be replaced with a quality rebuilt unit. Excessive cutting can get you into trouble on timing chain tension, cam timing and camshaft journals that are no longer in line. The other consideration is if the engine got that hot, it may just make more sense to replace it with a rebuilt or recycled unit.
With no cutting required and no indication of cracking, we’re ready to reassemble. I always use an OEM head gasket to be sure we have the latest part available. We’ve used copper spray with good success, but, in the case of the Nissan, the service information guides us where to apply sealer on installation, as well as the proper sequence and angle required when tightening the bolts. As always, be sure the threads are clean and lubed, as well as the contact area between the bolt and washer.
Reinstalling the valvetrain is fairly straightforward. Use the marks you made to set the cam timing and be sure to hold the camshafts on the hex area when you torque the cam gear bolts.
Reinstall the chain tensioner before removing the locking pin on the intake cam. When the pin is removed, turn the crank clockwise until the camshafts start to rotate, locking the internal lock pin in the retarded position.
Reinstall the other parts that were removed, install a new thermostat and you’re almost ready to fire it up.
But before you do, be sure to bleed the cooling system. Remember, this was the cause of our problem. We use a funnel that attaches to the radiator cap opening allowing the coolant to be higher than any part of the cooling system. With this engine, you’ll notice a copper sealing washer under one of the thermostat bolts; that bolt acts as the bleed valve. Fill the system with this bolt removed, allowing air to escape.
When you get solid coolant, reinstall the bolt, start the engine with the heat set to maximum warm and allow the engine to run until solid heat is felt at the vents. It’s also a good time to ensure that the cooling fans are working as they should.
At this point, turn off the engine and let it cool; when it’s cool, remove your service funnel, top off, if needed, and road test. I always like to do the first road test with heat set to warm in the vent position so I can confirm we have solid heat with no air in the system.
When all is said and done, there’s no reason that Nissan head gasket replacement shouldn’t be a profitable job for your shop. This article is not intended to replace good service information and, like any big job, it truly pays dividends to read up on the job before you start, but there’s no reason to be intimidated by things like variable cam timing and complex-looking timing chain configurations. It’s what the carmakers are using today, so get used to it and prepare for the challenge.


