By John Forro | Contributing writer
I was fortunate to have been raised in my father’s auto shop. From the early age of 11, I could be found performing various tasks around the shop from cleaning to observing and helping the technicians whenever an opportunity would arise. One observation that always stuck out most in my mind was that even though there were always at least six ASE-certified technicians employed by the shop, any time one of them encountered a tough driveability or electrical diagnostic issue, it would always be pushed off onto Dad at some point before it would be completed. That was just how it was done.
In my early years as a technician, I too fell prey to this practice. Don’t get me wrong, all the technicians were very qualified and the shop had a phenomenal reputation.
Looking back on my younger years, I realized that this practice of dumping the tough jobs off onto my father gave me and the other techs a false sense of superiority. I can remember my dad’s comment to me like it was yesterday. When I was 25 years old and thinking I was a superhero among technicians, Dad said to me, “I don’t know why you walk around here thinking you are some sort of super mechanic.”
This comment caught me totally off guard and I really didn’t have a clue what he was talking about. In fact, in my narcissistic young mind I was thinking maybe it was time to start looking for a nice retirement home for dear old Dad.
Shortly after, some state-mandated training became available in which one could take a test and pass out of the required classes. Needless to say, Dad passed and I failed! Once enrolled in the electrical and computer-controlled classes I finally realized what my dad meant by his comment. I didn’t know half of what I thought I had prior to taking these classes. It was at this point in my career that I learned a very valuable lesson.
The lesson I learned was education is a lifelong personal commitment. There you have it, the secret is out! That guy who every tech has known throughout their career who was always the smart one when it came to these types of repairs was not a mythical superhero sent from another planet, but instead was an individual who takes his or her career seriously. They can be found attending training classes, watching training-related materials and reading everything they needed to gain a personal comprehension level of various subjects. In fact, if you’re reading this article, then you have what it takes to be this type of individual!
To this day, I keep striving to learn all I can about various areas of automotive repair. I now have my own one-man auto repair facility where I am the only person involved with the repair process of the vehicle. This mandates me making the most efficient use of my time. So, over the next several articles, it is my plan to share with you some of my time-saving diagnostic strategies.
CASE 1: 2000 Daewoo Leganza 2.2L Automatic
This vehicle was brought into the shop for an intermittent complaint of rough running and, at times, stalling out. The customer had the computer scanned at a parts store and retrieved the following codes: P0300 Random Misfire and P0351 Ignition Coil A Primary/Secondary Circuit Malfunction.
At this time the customer had replaced the coil pack assembly, the spark plugs and the ignition wires. All of the above components had no effect on the problem at hand, and he brought it to me to change the engine controller. (See, even a do-it-yourself mechanic with the right attitude will do the necessary research when faced with a driveability concern.)
I always start my diagnostic process as follows: I obtain the necessary information from the customer, then I will attempt to duplicate the complaint and then start my diagnostic process from there.
After feeling the condition on my preliminary road test, I brought the Daewoo into the shop and retrieved the codes. Primarily I just wanted to make sure that the codes I pulled were the same as what he had pulled from the parts store. After verifying the codes were the same, I logically analyzed the two codes at hand.
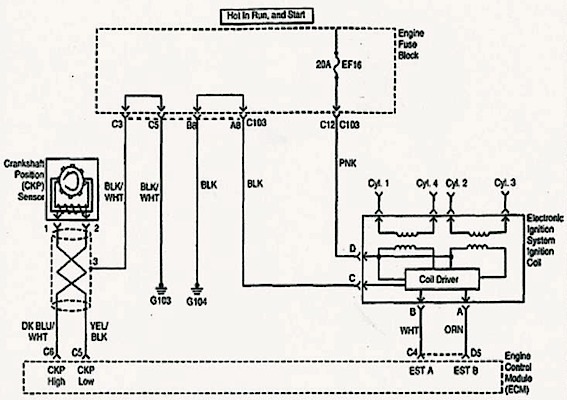
I felt safe in concluding the P0300 random misfire code would be repaired once I found the cause of the P0351 coil circuit-related code. After all, common sense would tell you that if we had a primary circuit-related issue this would indeed cause a random misfire code to be stored. At this point in my diagnosis I knew that although I feel I have a firm grasp of ignition systems and how they are supposed to work, I am in no means an expert on Daewoo. I decided I should take a little time and see how this Daewoo ignition circuit is comprised. The best place to gain the necessary information needed to see how this ignition system is engineered was a wiring schematic. I quickly went to my information system and pulled the needed schematic. See Figure 1.
After reviewing the schematic I knew I was correct in my thought process that this vehicle was engineered to work as follows. The crankshaft position sensor would supply the PCM with the necessary coil dwell period to allow the appropriate coil saturation to take place. Once coil saturation is achieved, the magnetic field in the coil primary circuit will collapse, allowing for secondary spark to be achieved. See Photo 1.
My thought process at this point was that I could have a faulty ignition coil (although not likely since it was previously replaced by the customer), a faulty PCM, or a wiring issue on either the pink power wire to the ignition coil or the black ground wire to the ignition coil. I should note that if I were to follow the recommended flow chart for this trouble code it would have taken me through as many as nine different steps. While all of them are valuable steps, I need to make efficient use of my time, so I decided to try to gain the most information I could in the quickest possible ways.
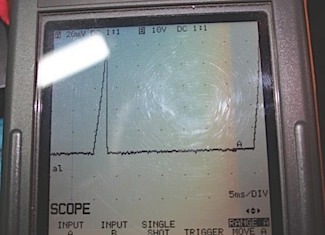
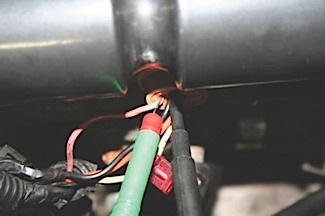
I first decided that the easiest step was to verify the ignition coil’s integrity. I pulled out my low amp probe and attached it to the pink wire at the coil pack. See Photo 2. I was primarily looking for a nice amperage pattern showing no signs of any shorts even though I knew that the coil was new. With the pattern I was able to obtain, I quickly knew the coil was indeed good due to the fact that I had no sharp vertical rise in the pattern indicating a shorted winding.
Instead, a gradual rise in current is displayed like one would expect from a coil without a shorted winding.
My next step was to verify the ignition coil’s power and ground circuits.
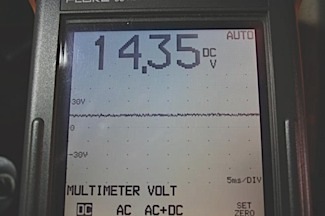
I decided to back-probe the four-wire connector at the ignition coil itself. My red lead was attached to the coil’s power 12-volt ignition feed and my black lead is connected to the ground wire of the circuit. This circuit on the diagram is labeled G104. I then started the vehicle in my service bay and, as expected, I see the charging system voltage of 14.35 volts. See Photo 3.
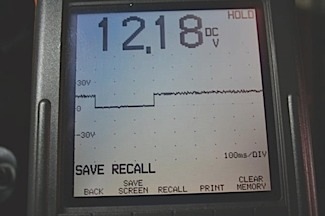
I should note that I fully expected this to be the case under these conditions because the vehicle had only acted up while driving and under load. I decided to route my leads into the passenger compartment, as we so often do, and take the vehicle for a short road test to duplicate the rough-running and cut-out complaint. Once the vehicle started to sputter, I quickly hit the freeze button on my scope.
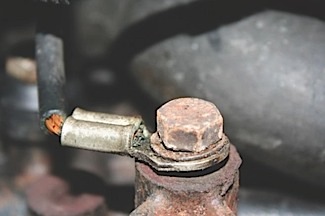
As you can easily see in Photo 4, my main power voltage signal to the ignition coil is dropping out under the loaded driving conditions at times. At this point I referred back to the schematic and saw the battery voltage comes right from the fuse block from fuse 16. While I could have a break in the harness at either the power or ground side, I feel it is more likely that I will have a ground issue at the G104 location found on the backside bottom of the engine block. Once I raised the vehicle on a hoist and located the G104 location I found the trouble! See Photo 5. A loose engine ground bolt that under engine torqueing conditions would cause the intermittent concern that was plaguing this vehicle.
A simple cleaning and tightening of this bolt repaired the vehicle. This was a fairly simple and quick diagnostic and repair job. In fact, I had less than 40 minutes in this job from start to finish.
My goal for this article was to explain how I used my education obtained from the schematic, along with a little common sense, to decide which diagnostic tests would warrant the time to obtain the information I needed to repair this vehicle. After all, none of us makes any money in this industry until the job is completed and paid for! I would have found the answer if I had chosen to follow the diagnostic flow chart, but it would have taken me longer to arrive at the same conclusion.


