Tech Tip: Hyundai Engine Overheating Concerns

Tech Tip: Hyundai Engine Overheating Concerns

A replacement connector is available for the radiator fan connector (E25). This bulletin provides the procedure to replace the radiator fan motor connector with the replacement connector. Some Santa Fe (SM) vehicles may exhibit an overheating engine and inoperative A/C.

A replacement connector is available for the radiator fan connector (E25). This bulletin provides the procedure to replace the radiator fan motor connector with the replacement connector.
• Some Santa Fe (SM) vehicles may exhibit an overheating engine and inoperative A/C.
• Inspection of the radiator fan connection reveals it’s abnormal.
• Repair action of this TSB is to replace the incident radiator fan motor connector with the new connector of the parts kit by following the Service Procedure below.

Applicable vehicles: 2004-’06 Santa Fe

Parts Information/Components of Kit:
• Connector & Wire Kit — 91200-26000FFF
• Radiator Fan Side Connector and Wire — 25387-26000FFF
• Radiator Fan Harness Side Connector and Wire — 91201-26000FFF
• Solder Sleeve Tube — CWT-9004

Service Procedure:

1. Disconnect the negative ­battery cable from the battery post.

2. Disconnect the radiator fan connector.

3. Pull away the wiring fixed to the radiator fan shroud.

4. Open the fan motor side connector cover by releasing four cover locks (C). See Fig. 1.
fig. 1
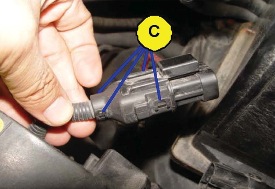
5. Remove the connector cover (C1).

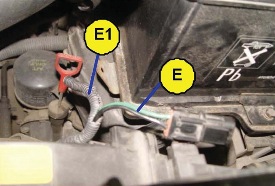
6. Using a cutter, vertically cut the corrugated tube (D) 120 mm (4.7 in.) from the end of the connector.

7. Partially remove the cut corrugated tube (E1) from the wire (E). See Fig. 2.

8. Cut off the black wire 30 mm (1.2 in.) and the green wire 50 mm (2.0 in.) from the end of the connector. Discard the connector.
fig. 2
9. Strip the wire coverings 8 mm (0.3 in.) from the cut ends.

Caution: Be careful not to damage the wires.

10. Insert the stripped wires into the solder sleeve tubes.

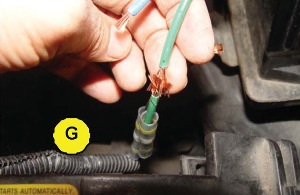
11. Overlap the green wires by squeezing them into each other; do not twist them. Place the solder sleeve tube (G) over the overlapped wires. See Fig. 3.

 fig. 3

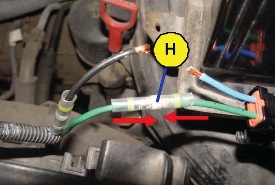
12. Align the solder part (H) of the solder sleeve tube with the center of the overlapped wires. See Fig. 4.


Fig. 4

Caution: Make sure to keep the stripped wires overlapped by holding them with both hands.

13. Subject the solder part to heat. Once the solder is melted, evenly heat the entire solder.

14. After the solder part is melted completely, wait approximately 10 seconds until the solder sleeve tube becomes cold. Pull both ends of the solder sleeve tube outside slightly, then subject both ends of the solder sleeve tube to heat.

15. Apply the above procedures (step 11 to 14) to the black wire.

16. Insert the wires of the new fan motor side connector into the cut corrugated tube, then tape the cut corrugated tube and install the connector cover.

17. Apply the above procedures (step 4 to 15) to the fan motor harness side connector.

18. Fix the fan motor side connector to the fan shroud, then connect it to the fan motor harness side connector.

19. Reconnect the battery cable to the negative terminal of the battery.

20. With the engine running at idle, turn on the A/C or ­defroster and verify that the cooling fan connection was ­repaired properly. The cooling fan should come on.

Courtesy of ALLDATA.

You May Also Like

TEXA Releases IDC5 CAR 76.5.0 Update

IDC5 CAR 76.5.0 is characterized by over 2600 new possible selections for the major makes on the market worldwide.

TEXA has released a major update IDC5 CAR 76.5.0 which enhances Car, Supercar and Light Commercial IDC5 diagnostic features & coverage. This latest software update enables more efficient troubleshooting, enhances existing special functions and topology module mapping features, while increasing technical information accessibility that is essential for accurately completing complex workshop operations. IDC5 CAR 76.5.0 includes the update of 37 makes, including electric and hybrid vehicles, while increasing the coverage of ADAS calibration, enhancing the visual live data "DASHBOARD" screens and other interactive technical information features like wiring diagrams, maintenance guides and component location diagrams.

Brake Lathe Basics

Resurfacing drums and rotors is a machining process with its own specific guidelines.

Refrigerant Oil Has to Be Right

Oil type is just as important as oil capacity.

Three bottles of refrigerant oil
Top 5 Tools: Steve Coffell, Auto World, Hazelwood, MO

Steve Coffell, a technician at Auto World in Hazelwood, MO, says his Top 5 Favorite Tools are: Related Articles – Lisle Low Profile Fuel Line Disconnect – Dent Fix Soft-Shock Mallet DF-SM76 Reduces Damage – New ProMAXX Diesel Fuel Injector Seal Puller/Saver ProKits   OTC Genisys Touch – Quick scan, bidirectional control Snap-on VANTAGE Pro

Wheel Bearing Adjustment Tools & Equipment

A wheel bearing that’s out of adjustment can reduce bearing life and can affect more than just the bearing. It’s important to adjust the wheel bearing endplay to the proper specifications. If the bearing set is adjusted too loose or too tight, it can cause the bearing to fail prematurely. There are a few types of assemblies, so using correct procedures and tools will ensure a comeback-free wheel bearing installation.

Other Posts

New Snap-on Limited Edition Speed Demon Roll Cab

Features include next-level organization, durability, security, mobility and exclusive Speed Demon emblem.

ISN Expands Freedom Program for Mobile Tool Dealers

ISN’s Freedom Program is designed to provide experienced, successful mobile tool dealers with support to become an independent mobile dealer and expand their growth.

Snap-on Continues to Offer Free Weekly Product Training Sessions

The online training and question and answer sessions are free of charge.

TechShop, ShopOwner Offer $50 For Good Guesses

Guess the Tool for a chance at cold hard cash!