Tech Tip: Erratic Fluid Level Readings/Filler Tube Leaks in Ford Vehicles

Tech Tip: Erratic Fluid Level Readings/Filler Tube Leaks in Ford Vehicles

Vehicles affected: Ford: 2000-’07 Taurus and Windstar; 2004-’07 Freestar; Mercury: 2000-’05 Sable; 2004-’07 Monterey

figure 1

Vehicles affected: Ford: 2000-’07 Taurus and Windstar; 2004-’07 Freestar; Mercury: 2000-’05 Sable; 2004-’07 Monterey

Some of the above vehicles, equipped with a 4F50N, AX4N or AX4S transaxle, may exhibit an erratic fluid level reading on the transaxle dipstick and possible leaks around the filler tube and grommet.

The condition may be due to a restricted transaxle vent.

Repair the transaxle vent restriction by replacing the transaxle vent with a 90° vent stem, small hose clamp, two tie raps and 24” (61 cm) of 5/16” (8 mm) vacuum hose.

The 5/16” (8 mm) vacuum hose will be routed from the 90° vent on the transaxle back to the cowl area, next to the brake master cylinder and tie rapped in place with the end of the hose facing down.

Refer to the following Service Procedures.

figure 2Note: On Windstar, Freestar and Monterey vehicles, seal the cowl panel grille (cowl to vent panel) area; see TSB 06-14-10.

Note: Leaks may be misdiagnosed as coming from the pan gasket. Always follow workshop manual, Section 307-01 to locate the source of a leak, and leak check with black light and dye.

Service Procedure
1. Disconnect the mass air flow (MAF) sensor electrical connector.

2. Disconnect the crankcase vent tube(s) from the air cleaner outlet pipe.

3. Loosen the clamp and disconnect the air cleaner outlet pipe from the throttle body.

4. Release the air cleaner housing clamp(s).

5. Separate the air cleaner cover from the air cleaner tray.

figure 36. Windstar, Freestar and Monterey only: Remove the cowl panel grille by following the procedure in TSB 06-14-10.

7. Disconnect the shift cable if located over the top of the vent.

8. Remove the vent; pull straight up on the vent with locking pliers, or carefully pry the vent from the transaxle case.

9. Install the replacement 90° vent stem.


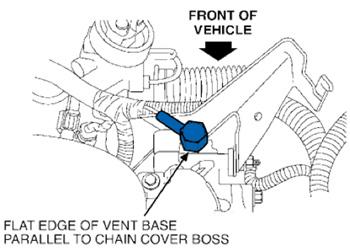
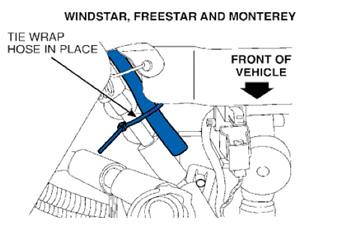
– Windstar, Freestar, Monterey, Taurus and Sable with column shifter: Must face to the right rear of the vehicle with the flat edge of vent base parallel to the chain cover boss (Figure 1).


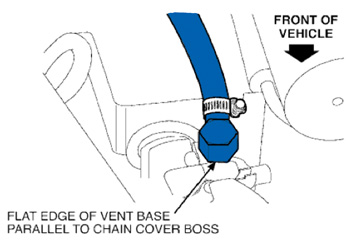
– Taurus and Sable with floor shifter: Must face to the rear of the vehicle with the flat edge of vent base parallel to the chain cover boss (Figure 2).


10. Install one end of a 24” (61 cm) long piece of 5/16” (8 mm) vacuum hose to the 90° vent stem and secure with a small hose clamp.


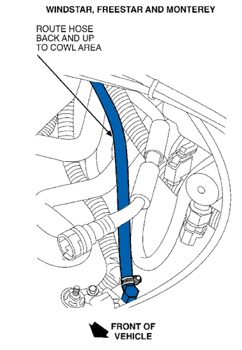
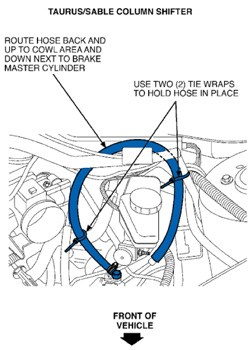
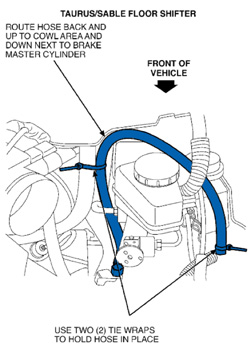
11. Route the vacuum hose back and up to the cowl area and down next to the brake master cylinder. figure 4


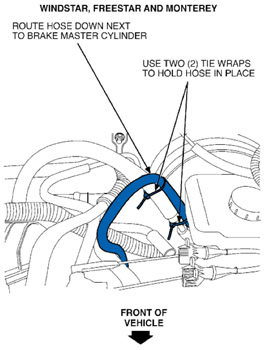
Carefully tie rap the hose in place next to the brake master cylinder (do not tie rap to brake lines), be sure the end of the hose is facing down and not directly above anything hot.


– Windstar Freestar and Monterey (Figure 3, 4 and 5)


– Taurus and Sable with column shifter (Figure 6)


– Taurus with floor shifter (Figure 7)


12. Connect the shift cable, if removed.


figure 513. Install the air cleaner cover and outlet pipe.


Note: Use the alignment notches to correctly align the air cleaner cover to the air cleaner tray.


14. Install the air cleaner housing clamp(s).


15. Connect the air cleaner outlet pipe to the throttle body and tighten to 35 lb.-in. (4 Nm).

  figure 6

16. Connect the crankcase vent tube to the air cleaner outlet pipe.


17. Connect the MAF sensor electrical connector.


18. Windstar, Freestar and Monterey only: Follow TSB 06-14-10 to seal and install the cowl panel grille.


Figure 7


Courtesy of Mitchell 1.

You May Also Like

Embracing Cutting-Edge Solutions the Industry has to Offer

Embracing cutting-edge solutions is strategic and imperative for technicians navigating the constantly changing landscape of automotive maintenance and repair.

Nadine Battah

Remember last month how I said 2024 was your year to be the technicians you always wanted to be? Remaining stagnant as a technician is simply not an option anymore if you want to be successful in the automotive industry. You must proactively seek out opportunities to embrace new tools, techniques and solutions that promise to enhance efficiency, accuracy and customer satisfaction.Embracing what’s new is strategic and imperative for technicians navigating the constantly changing landscape of automotive maintenance and repair.One of the top reasons I can give you for embracing new technology is the potential for improved diagnostic accuracy and efficiency. With the arrival of advanced diagnostic tools, like the Bosch ADS 625X, the Autel IA900, or the Hunter ADASLink, technicians can pinpoint issues with precision, reducing guesswork and minimizing the risk of a comeback. Whether it’s sophisticated tools or cutting-edge software solutions, the ability to leverage these new tools should empower you to deliver next-level service and drive positive repair experiences for your customers.Another thing to keep in mind is that embracing new technology and equipment opens doors to expanded service offerings. From state-of-the-art lifts and alignment systems, to specialized tools designed for specific makes and models, investing in the latest equipment enables you and other technicians to tackle a larger range of repairs and maintenance with confidence and precision. As the technology in cars continue to evolve, so too must the tools and equipment that technicians rely on to get the job done.Embracing new technology and equipment can also lead to improved productivity in the shop. By leveraging high-quality products that are specifically designed for today’s vehicles, you can streamline workflow, minimize downtime and deliver exceptional results for your customers.At TechShop, we understand the importance of embracing new technology, equipment and products in the automotive repair industry. That’s why we’re excited to announce the debut of our all-new “Tool Time” video podcast series, where guests from brands like Ingersoll Rand, Clore Automotive, SATA Spray Equipment and many more will sit down and join Eric Garbe and myself to discuss education and training on the latest products our industry has to offer.Join us as we embrace the future of automotive tool supply and equipment advancements together. And, be sure to subscribe to the TechShop newsletter to stay tuned!

Brake Lathe Basics

Resurfacing drums and rotors is a machining process with its own specific guidelines.

Refrigerant Oil Has to Be Right

Oil type is just as important as oil capacity.

Three bottles of refrigerant oil
Top 5 Tools: Steve Coffell, Auto World, Hazelwood, MO

Steve Coffell, a technician at Auto World in Hazelwood, MO, says his Top 5 Favorite Tools are: Related Articles – Lisle 61860 Oil Filter Housing Torque Adapter – Mueller Kueps Presents Redesigned Sensor Tap Series – Lisle Low Profile Fuel Line Disconnect   OTC Genisys Touch – Quick scan, bidirectional control Snap-on VANTAGE Pro –

Wheel Bearing Adjustment Tools & Equipment

A wheel bearing that’s out of adjustment can reduce bearing life and can affect more than just the bearing. It’s important to adjust the wheel bearing endplay to the proper specifications. If the bearing set is adjusted too loose or too tight, it can cause the bearing to fail prematurely. There are a few types of assemblies, so using correct procedures and tools will ensure a comeback-free wheel bearing installation.

Other Posts

TPMS: Are Retrofits in Your Future?

Installing a retrofit kit can be performed with the tools and equipment you already own and use on a daily basis.

Tire tread
Maximize Your Scan Tool

Are you maximizing your scan tools to their full potential? Don’t let them be just an expensive code reader.

Scan Tool
2024 Is Your Year to Be the Technician You Always Wanted to Be

As we enter 2024, strategic career planning is essential for success in the automotive repair industry.

happy new year 2024
Impact Wrench Technology

Interchangeable anvils are a feature on some new impacts.