article, I’ll focus on common repairs we see on at least a weekly basis. The series of cars covered in this article will be the A4 and A6 line from 1998 to 2004. These cars are all very similar in design and equipment, and most repairs are consistent between models. Be aware that many Audi models are close cousins of VW models so they share platforms and powertrains.
Increasing numbers of distinct models, multiple manufacturing plants and countries of origin, and constantly changing technology make vehicle identification ever more important (See Photo 1), especially as it relates to obtaining the proper parts and data needed to complete repairs.
Most Audis will have engine and transmission ID tags that are easy to access and read. With many models, having the VIN is all that’s needed to determine the drivetrain. I won’t get into specifics in this article, but just remember that having a clear determination of the exact model and equipment will make parts ordering and repair much easier.
 TRANSMISSION SERVICE
With Audi service still a little foreign to some shops, we see a number of cars come in after a misdiagnosis or attempted repair that actually made the transmission operate worse than the initial complaint. The days of drain and refill or filter replacement have morphed into a job that needs to be done in a very deliberate and concise manner. Transmission dipsticks and fill tubes disappeared from most Audi models in the late 1990s and, on most models, remotely mounted coolers with accessible lines went away even earlier. On models built since 1998, the procedure to change, add or refill a transmission requires some additional steps to successfully complete a service.
Failing to get the fluid level in the transmission correct will cause shifting problems, codes to set and possible damage. There is a very delicate balance between too much and too little fluid, depending on temperature and the fill status of the torque converter. This process requires a scan tool, a means to fill the transmission while it’s elevated and running, and planning to complete the steps before the transmission temp climbs too high. Each year, model and transmission has a specific procedure, although most are based on the same principle.
 Following are the steps involved with performing a basic tranny service on a 2003 Audi TT, 1.8T, FWD. The design of this car differs from other Audi models and is based on the platform used by VW for a number of its models, but the fluid changing procedure is the same.
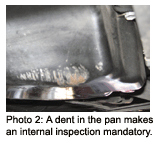
This car came from another shop with erratic, sometimes delayed, shifting, and the customer felt the transmission was slipping. A quick inspection showed no fault codes, a dent in the transmission pan (See Photo 2), a fluid level inspection plug that had been removed, but a fill plug that hadn’t been removed since the factory installed it.
This car does not have a dipstick, fill tube or “drain” plug. The small level check plug on the pan is an access point for the fluid level tube (See Photo 3). If the transmission is “cold” (under 30° C), removing this plug will allow some fluid to escape, which makes performing a refill procedure necessary. Failing to properly go through the refill steps will cause shifting problems and potential damage. In short: If the transmission has no fault codes, take the time to explain and recommend a transmission service and refill as a first step. Bear in mind that special fluid, tools and equipment will be needed, so be prepared before you pull that plug.
 In this case, the dent in the pan appeared to be large enough that there could be internal damage; on earlier models this type of impact has dislodged the filter from the valve body. Though that was not the case here, it was a reasonable assumption and needed to be investigated. At this point, it was discovered that there was yet another new type of fluid for VAG cars and we ordered that along with a filter and pan gasket. Due to the cost of these transaxles, substituting another fluid isn’t advisable. When the check plug was pulled with the transmission cold, there were about three drops of fluid that came out. There should have been more. Even with the level-checking tube removed, there was probably only about a quart of fluid in the pan. I don’t know why, as there were no significant leaks, but since this was a new car for the customer, there was no service history.
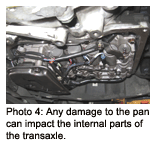
The pan was pulled and a basic inspection revealed no internal damage (See Photo 4), discolored but not burnt fluid and a filter that showed very few impurities. A point worth noting here is that the filter is actually a metal screen that when wet looks like a piece of sheet metal because it’s so fine. We replaced it in this case since it took a week to get it. Unless it’s seriously contaminated, a thorough cleaning could allow it to be reused.
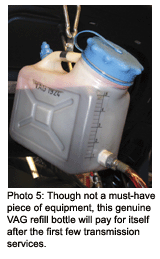 With the pan and new gasket in place, the level tube was reinstalled but not the level-check plug. The filling bottle was prepared with the new fluid, and hung from the hood latch loop (See Photo 5). Although the factory fill bottle isn’t absolutely necessary, it has paid for itself in allowing this job to be completed in a much more controllable manner. In this case, the filler plug is on the differential housing, high on the back of the transaxle. It took a couple of hits with an air hammer to get it to move, but with a 55 torx bit it was removed and the O-ring seal was inspected.
To start the procedure, the transmission temperature must be under 30° C, with the dispenser valve and tube inserted in the fill hole (See Photo 6). On other VAG cars, the hooked end of the dispenser makes more sense. The valve is turned to the open position and fluid fills the transmission pan until it starts to drip from the check hole. With the dispensing valve closed, the car is lowered and a scanner is attached to the DLC connector under the dash.
After carefully inspecting the route of the fill hose and running the lead from the scanner to a place where it can be read with the car on a lift, start the car in park and let it idle. Raise the car in the air and allow the transmission fluid to warm while monitoring with the scanner. A less precise way to do this would be to use a temp probe or non-contact thermometer, but getting actual fluid temps this way could be difficult.
 As the fluid temp rises above 30° C, open the dispensing valve and allow the transmission to fill. It will take a few minutes, so keep track of the fluid temp and watch for the fluid to start spilling out of the checking hole. It will be obvious that by not filling in this manner, it would be impossible to get enough fluid into the transmission for proper operation, or result in grossly overfilling and causing similar problems or leaks due to excess fluid.
Once the fluid has reached 40° C (higher in warmer climates; see the workshop manual), add or remove fluid until there is just a small amount of fluid coming from the level check hole. Remove the filler unit and install the plugs at the check hole and filler hole.
Check for leaks and do a road-test. A final check for codes is a good idea. This service often makes a significant difference in tranny operation, and will most likely save your customer a lot of money and gain you a new customer for life.
 FINDING THE SOURCE OF LEAKS
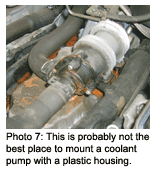
Leak detection and repair can be a constant struggle for any shop. Tracing the actual source of a minor leak is always a challenge. With engine compartments getting smaller and crammed with even more equipment, even a small leak can require removing a number of components to actually determine the leak’s source. For example, a leak appeared to be coming from under a twin-turbo A6, at the rear face of the engine — possibly a head gasket or coolant transfer tube. After removing the intake manifold, the source was obvious; however, there is an auxiliary coolant pump (See Photo 7) mounted in the valley between the heads.
Other common leak points with these engines are oil leaks at the valve (cam) covers, and at the valley pan on early models. Both of these leak points require some investigation to determine the actual source before repair.
BELTS
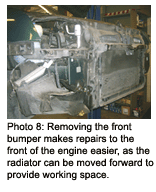 I’ve covered the timing belt replacement procedures on these cars with the V6 engines in previous articles. The procedure for the 4-cylinder models is similar, but, in most cases, the space restrictions are even worse. The removal of the front bumper cover (See Photo 8) and movement of the core support (lock carrier in VAG speak) to the service position is mandatory. On the TT, the procedure is the same as on the New Beetle, and just as tight.
This is one repair where it’s very important to know exactly which engine series you’re working on. There have been a number of design changes and different repair procedures as well as updated parts to consider when replacing the belts on the 4-cylinder turbo cars. The basic differences are whether the water pump is externally mounted and driven by a serp belt, or internally driven by the timing belt. The same failures of the water pump impeller occur on these engines as on VW engines. An inspection of the water pump while the timing belt is off is a good idea, if you don’t have an automatic replacement policy. On the models with the external water pump, it’s easier to remove the thermostat cover than the water pump to inspect for a cracked or otherwise damaged impeller.
One tip for this job is that the belt is barely long enough to reinstall, even with the tensioner locked in the relaxed position. Be extremely careful to double-check the timing marks before starting, and it’s always a good idea to turn the engine over by hand several times to check for interference. Depending on the engine code, there will be two or three external belts. On some models, the power steering belt is a non-adjustable type with a split pulley for removal and installation, so having the exact replacement belt is very important.
UNDERCAR SERVICE
There are two specific areas to look for service under these cars: the front brake flex lines and the front suspension.
The front brake flex lines on these cars tend to crack at the connection point to the caliper. Although the manufacturer has recalled some of these cars for this fault, not all are covered. Even if you’re not doing brake work, this is one inspection that should be done on every VAG car that comes into your shop. Replacement hoses are readily available, but again, specific hoses are needed depending on how the car is equipped.
Like the cautions above concerning identification of the engine and transmission, there are several very different brake systems used throughout this model run, so be ready to pick parts based on rotor diameter and caliper design.
The front suspensions on the A4 and A6 cars are a multiple-link system with up to four ball joints. The ball joints are not replaceable, but instead need to be replaced with their respective suspension arm. Most problems are with the upper ball joints where they attach to the bearing carrier. By grasping the wheel front and rear, and turning (steering action) slightly, the joints will very obviously show wear and movement. Do not mistake this movement for the tie rod ends, which are also prone to failure on the earlier models in this series (many were recalled).
Adding Audi to the list of models serviced by any shop will ensure maintenance work for a long time to come. Since many tools, parts and software interchange with VW models, the purchase of model-specific equipment is well worth the investment.


