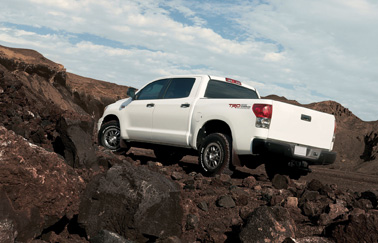
 For the Tundra line (including the Sequoia), the main miscalculation was in the brakes. Someone forgot to inform the engineers that American pickup trucks get overloaded and driven hard on a regular basis. As a result, the early models of the Tundra and Sequoia suffered from moderate to severe brake pulsation.
At first, most customers and repair facilities just regarded this as a normal brake problem, but it soon became obvious that the brakes were not up to the hard use customers were putting the trucks through. An upgrade was engineered and information was provided through a service advisory, as production changes added a larger caliper system in front and disc brakes in the rear to substantially improve braking performance, while reducing the incidence of pulsation complaints. This upgrade became the standard brake system on late 2005 truck models.
Though some of these trucks were updated under warranty, others have been transferred to new owners and the problems show up again as these new owners subject them to heavier-duty use. That’s where this update becomes an opportunity for independent repair shops to educate and earn the trust of owners of these vehicles.
In this article, I’ll highlight the procedure we’ve used to update the front brakes while shaving expense and procedures to lower the cost and the time required to perform the upgrade, yet still providing all of the benefits of the later-type brakes.
The reason this is such a problem is due to the very nature of the brake system used on these trucks. For years, the standard Toyota truck brake type was a fixed caliper with dual inner and outer pistons. By design, this type of caliper cannot tolerate even a small amount of runout in the rotor or hub, or looseness in the wheel bearing. Any deviation as the rotor turns is transferred directly through the hydraulic system to the pedal.
Diagnostics
If a 2000-’05 Tundra or Sequoia comes into your shop with a complaint of brake pulsation, there are a few diagnostic steps that should first be taken before repairs are recommended.
Are the front brakes causing the pulsation, or are the rear? The only way to know for sure is to test drive the truck and get a feel for the severity of the problem. This will also eliminate the possibility that the customer is feeling the ABS when braking on slippery roads, and not a mechanical problem. Tire condition, balance and alignment faults can also cause braking problems that may need attention to make a full repair possible. Braking with light and heavy application and use of the park brake on models with rear drums will help isolate the source of the vibration. We’ve updated the front brakes on a number of these trucks, only to find that there is also pulsation from out-of-round drums in the rear.
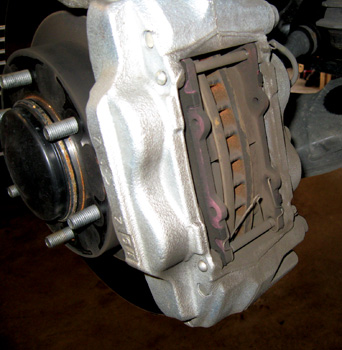
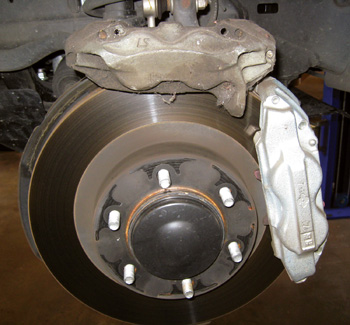 A visual inspection of the brakes on the particular vehicle is the next step. The Toyota service bulletin #BR001-03 REV gives a pictorial view of the two different types of calipers used on these vehicles. The mechanical difference boils down to the updated caliper being much larger to hold a larger pad. The difference between the two styles is obvious when they are seen together (See Figure 1), but can be a little hard to distinguish individually.
The easy way in this case is to measure the size (width) of the brake pad (See figure 2). The early style pad will be less than 5” (4-11/16” or 199.5 mm) in width; the later update is more than 5” (5-5/16” or 231 mm). Both of the calipers have the same dimensions on the mounting bosses.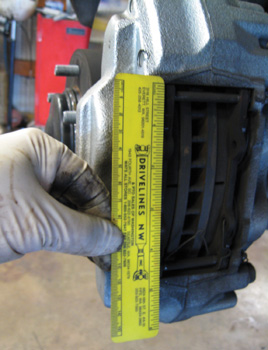
Once it’s been determined that the truck is a candidate for the update, a look at Toyota bulletin #BR004-02 REV will provide reference numbers for parts that you may need.
But read through this article first. The update will replace the calipers with a larger set that will provide additional swept area and fluid capacity for heavy-duty use. The service bulletin gives a very complex and involved procedure for changing the components that’s just not necessary to get the benefits of the update.
In our shop, we’ve done this upgrade a number of times with mixed results and have come to some conclusions about how the repairs and upgrades should be done, with the least possibility of a comeback. Even after the upgrade, some customers may exceed the loading and use recommendations that these vehicles were designed for. That may require a heart-to-heart talk with the customer regarding the intended use of the vehicle, and its limitations.
If you get a vehicle in that already has the upgrade, but still has pulsation problems and no indication that the vehicle is being abused, additional diagnosis may be needed to get to the root cause of the problem.
Caliper Upgrade
The TSB mentioned earlier involves replacing a number of components in the front brakes. The calipers are changed only after removing the axle, wheel hub, wheel bearing and other attached parts, such as the ABS sensor and shock absorber. Although the listed warranty time is sufficient for the repairs, the chances of damaging the wheel hub and the cost of a new bearing adds time and dollars to the upgrade.
Following are the procedures we use, and the reasons why this is a better approach to the brake upgrade, saving time and dollars. The factory procedure is a good, complete upgrade, but as noted above, it may not totally resolve brake pulsation on all vehicles. The procedure we use gains all of the benefits of doing the job as directed in the TSB, but eliminates steps that add time and cost.
1. After the road test, allow the brakes to cool. Look for obvious signs of a bent wheel, missing wheel weights or obstructions that might cause the wheel to not seat properly on the hub.
2. Disconnect the brake line from the caliper and use a container to catch the fluid. Since the caliper is being replaced, there is no reason to retract the pistons or push the old fluid back into the system.
3. Remove the caliper, complete with pads and hardware. Remove the brake disc.
4. Clean the mounting surface of the wheel hub. Use a dial indicator to check runout on the hub. There should be almost no runout at the hub-to-rotor mounting surface. If the hub runout is good, do not remove the axle nut or any other parts as listed in the bulletin; this is where you save money and time. The only reason the factory bulletin has you remove the bearing housing, hub and wheel bearing is so the dust shield can be changed to one with a larger cut out for the larger caliper.
 5. Hold the replacement caliper in place, lined up with the mounting bosses, and scribe or paint a line on the backing plate (dust shield) that will provide the added clearance needed for the new caliper (See Figure 3). By the way, rebuilt calipers are available from a number of sources in both the old and new types. New calipers do not have to be used for the upgrade.
Use your metal cutting tool (my preference is an air-powered reciprocating saw) to cut out the backing plate to accommodate the caliper. Round off any sharp edges and spray a little rust preventive paint on any bare metal.
6. Mount a new rotor to the hub, check for runout on the normal pad surface (maximum allowable runout is 0.03 mm or 0.0012 in.) and install the upgraded caliper. The mounting bosses on the new caliper are slightly thinner than the originals, so a new set of mounting bolts (listed in the bulletin) are recommended unless you want to spend the time grinding on the old ones. Though not absolutely necessary, replacing the metal fluid lines to the calipers, rather than rebending the old ones, makes a better repair. Be sure to follow the torque specs in the TSB.
7. If the replacement calipers did not come with pads, use an OE-quality replacement. You will need new hardware if it’s not supplied with the calipers.
8. Fill the brake fluid reservoir with fresh fluid and bleed the system. Reinstall the wheels using the proper tightening sequence and torque. Set tire pressures and adjust the rear brakes.
9. The road-test and break-in procedures are critical to the completion and success of this repair/upgrade. Take the time to follow the pad manufacturers’ recommended break-in steps, and then drive the vehicle on a normal test-drive to verify that the pulsation is gone.