Over the last 25 years or so, Subaru has been the top- selling all-wheel-drive car here in the Pacific Northwest. For beachcombers and skiers alike, as well as rock hounds and hikers, having all-wheel drive is a big plus.
Stop-and-go commuting, and difficult mountain driving take their toll on both drivers and vehicles. Of all the different systems on a car, the brakes stand out as the most important system to be operational on a consistent basis. In this article, I’ll discuss some of the more common procedures for producing a quality brake job, and hit some highlights to avoid problems.
The Legacy series, which Subaru has been carefully developing for almost 20 years, will be the focus of this article. It includes virtually the entire line of Subaru vehicles. From the Impreza to the Forrester, Baja and the Outback, this line is very similar in powertrain and features. The main differences are size, weight, performance and number of options. Even the two-wheel-drive models share most of the mechanical parts of the 4WD models. Except for the Forrester and Impreza, almost all of these cars have four-wheel disc brakes.
GETTING BACK TO THE BASICS
Although brake work is pretty much a daily maintenance item for most shops, I’m still amazed at the number of “defects” in repairs that still come into our shop. Without getting specific, there are some basic procedures that a lot of techs still miss or bungle. One of the most basic faults we see, especially with shops that do the bolt-on rebuilt caliper-type of reline, is twisting the flex lines by not repositioning the inner fitting or the hose. Many times we’ve seen very dangerous results of this oversight, when the hose has been rubbed through on the wheel or tire, or kinked to the point where fluid won’t flow. This would seem to be a no-brainer, but it still happens.
Another often-missed part of brake repairs is failing to lube the friction points, which leads to seizing of the calipers, specifically the slides. This step usually takes only a couple of minutes to complete, but makes all the difference in operation. Using the wrong lube for the various locations on a brake job can also lead to failure. Getting to know the products you use is a very important part of ongoing education in our industry. Using a standard anti-sieze compound, in place of a caliper lube that will withstand the heat of braking, can be a critical mistake.
 A lot has changed in the technology of braking systems, even though the basic operational parts appear to be much the same. Keeping up to date is more important than ever before for technicians with the influence of weight-saving alloys, different friction material compounds and ever-more-powerful cars. Almost all manufacturers now use a special grease to eliminate metal-to-metal contact in the brake system. Most manufacturers have also gone to thin metal shims between the pad and caliper, not for noise reduction, but for heat protection. The heat of braking should be transferred to the rotor, not the caliper. I still see some mechanics throwing the shims away.
FRONT BRAKES
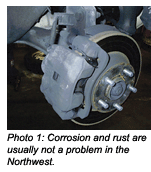
Standard Legacy brakes had vented rotors with single-piston floating calipers until 1998 (See Photo 1). The caliper housing pivots on a fixed upper pin that is 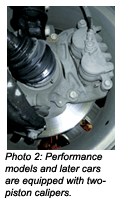 replaceable. The lower pin is a sleeve, held in place with a through-bolt. Performance models have had full floating two-piston calipers (See Photo 2). With either design, the critical areas of wear and operational movement are the pins. Both designs use a fixed-pad carrier, with a floating fluid housing. The following is a normal sequence for replacing the front brakes. A note here is that in the Northwest, we don’t have many problems with corrosion or rust as everything gets washed with clear water on a regular basis. For this reason we don’t usually replace calipers in our shop. The reasons for this go beyond cost considerations. Unless there are obvious problems with a seized or corroded piston, leakage or damage, we would be hesitant to replace an unrusted, operational caliper with a rebuilt unit that came off of a severely rusted Midwest or East Coast car, regardless of the rebuild quality.
Remove the wheel and inspect for any obvious leakage at the flex line or caliper. Inspect parts for obvious damage from contact with the wheel or suspension.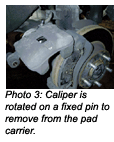 Clean the caliper with a brake cleaning machine or brake parts spray. Remember that brakes may still contain small amounts of asbestos, or other damaging compounds, so wear a dust mask or respirator.
Loosen or remove the caliper retaining bolt or bolts. Connect a bleeder hose to the bleed fitting and use a suitable container to catch the old fluid. Open the bleeder and either pry or compress the piston into the caliper housing to expel the fluid from the caliper to prevent this tired fluid from being forced back into the system.
Remove the caliper bolts and pull the caliper “knuckle” off of the pad carrier. In the case of the fixed pin-type, pivot it upward on the upper, fixed pin (See Photo 3), slide it inward and remove. Use a hook to hold the caliper out of the way; you should always avoid hanging the caliper with the hose.
 Inspect the caliper piston for leaks or torn seals. This is where the decision is made to reuse or replace.
Remove the bolts holding the pad carrier to the steering knuckle and remove the carrier. Clean all of the contact surfaces of the pad carrier with a wire brush and/or parts cleaner. Any machined or contact surfaces should be carefully inspected. Depending on the design, remove the sliding pins, clean and relube or replace the fixed pin if it’s corroded. I use a silicone-based caliper lube that has a temperature limit of more than 600° F for coating either type.
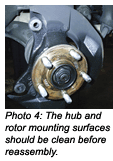
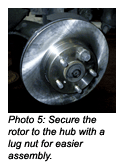 Measure the thickness of the rotor and compare to specifications. We do have some issues with warpage on Subarus, so be critical and conservative. Unless you can have a considerable margin left after turning, replacement is often the best choice for a quality repair. This is especially important when mountain driving is common. Whether you resurface or replace the rotor, clean and inspect the rotor mounting surfaces on the hub and the rotor (See Photo 4). Install the rotor and use a lug nut to hold it in place on the hub (See Photo 5).
Reinstall the pad carrier. Torque the bolts to specification; this is one component where over-tightening can be dangerous. There is still some dispute over whether to lubricate every contact point between the pad and the carrier. With some models, the use of shims (See 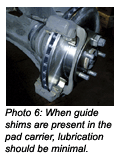 Photo 6) makes lubrication seem like overkill, but used sparingly, a little lube on contact points should be OK. Just don’t get the lube on the braking surfaces. Most quality pads these days have a powder coating or other protective covering that aids in the prevention of metal-to-metal contact.
Install the pads to the pad carrier, making certain that the shims and guides all stay in place. Generally speaking, the wear indicator goes at the trailing edge of the in-board pad.
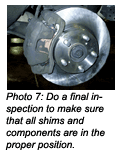
Reinstall the caliper housing over the pads and carrier, again making sure none of the shims are dislodged from their correct position (See Photo 7). Install and torque the retainer bolts for the caliper housing. You should be able to move the caliper housing easily on the pins. If not, find out why and correct as needed.
 Finally, inspect and reinstall the wheel. Torque the wheel lugs in a cross pattern to avoid warping the rotor or hub. Spin the wheel to make sure there is no contact between the rotor and dust shield or, in the case of aftermarket wheels, between the caliper and wheel.
Check the tire pressures and fluid level in the master cylinder before driving. Follow the pad manufacturer’s recommendations on breaking in the new pads. Some still recommend a standard break-in procedure, while some don’t.
REAR BRAKES
About the only difference between the front and rear brakes is the inclusion of a park brake. All of the front brake procedures apply. Additional steps are required to assure that the parking brake mechanism is cleaned and inspected. If new rotors are installed in the rear, sometimes it’s necessary to back off the adjusters to install the new rotors. The same thing goes for models with rear drum brakes. Again, be critical with either rotor or drum dimensions. I make it a standard practice to always adjust the parking brake shoes during regular services. One or two clicks on the adjuster will make a huge difference in the holding power and travel of the brake lever.
 HYDRAULIC SYSTEM
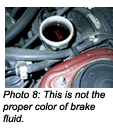
There are only a couple of notes here. First, there were some Legacy series cars recalled for master cylinder problems, but most should have been taken care of by now. Second, fluid condition is important. There seems to be some difference of opinion about the correct point to replace brake fluid. My opinion is, most people don’t change it enough. Brake fluid can be tested in a number of different ways — metal content, moisture saturation or with a test strip are all valid. My guideline is color. If brake fluid was meant to be the color of coffee (See Photo 8) or black paint, it would be made that way. For peace of mind, especially for mountain driving, flushing should be a part of any brake repair, and at least every two years, regardless of a test result.
FINISHING UP
The most important part of any brake repair is a road test that confirms the brakes are going to work under a number of different situations. Of course, you should avoid making any panic stops or especially hard braking at first, but you should get the brakes hot and let them cool down several times before returning the vehicle to the customer. Inspecting for leakage at the master cylinders and the ABS module, if equipped, is also important, but problems there are usually pretty obvious. Inspecting the wiring harnesses to the ABS sensors for contact with other components can also prevent failures.
In a lot of ways, being a technician is like being a doctor. You wouldn’t expect a doctor to take chances with your life, and most people don’t expect us to take chances with their lives either. A good brake job can often be the difference between a safe driving experience and a disaster. Take your time, stay current with the latest information and be thorough.