b’s face. Do not put on the studs.
2. Install the rotor.
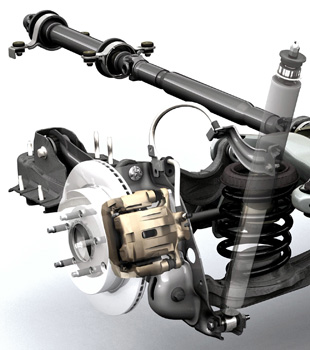
3. Position the brake caliper and anchor plate assembly and install the brake caliper anchor plate bolts. Tighten to 133 Nm (98 ft/lbs).
 REAR BRAKES
Rear Brake Pads:
1. Remove the two brake caliper guide pin bolts and position the caliper aside.
2. Install new brake pads if they are worn past the specified thickness above the metal backing plates. Install new brake pads in complete axle sets. Remove the two brake pads, shims and slide clips. Inspect the brake pads and shims for wear, damage or contamination. Discard the slide/abutment clips.
3. Push back the piston with the appropriate tool. Protect the caliper piston and boots when pushing the caliper piston into the bores.
4. Remove the caliper bracket if you are servicing or machining the rotor. Clean the surfaces the make contact with the slide/abutment clips. The torque specification is 55 Nm (41 ft/lbs).
5. Install the two brake pads, shims and new slide clips to the brake caliper anchor plate. Position the brake caliper on the anchor plate and install the two guide pin bolts. Tighten to 26 Nm (19 ft. lbs).
PARKING BRAKE
Cable tension is adjusted in two locations. The first location is at the parking brake control, the second location is at the parking brake cable equalizer. The tension must be adjusted equally at both locations.
1. With the vehicle in NEUTRAL, position it on a hoist.
2. The dimension will vary depending on the amount of cable stretch. New cables require cycling the parking brake control 5-10 times to remove the cable slack. Adjust the parking brake control adjustment so the stud protrudes 8mm ±1mm from the top of the nut.
3. Adjust the parking brake cable equalizer adjustment nut so the stud protrudes 24mm ±1mm from the top of the nut.
4. Fully apply the parking brake pedal three times to verify correct operation of the parking brake system.
5. With the parking brake cable in the fully released position, brake drag should not be present.
 Brake System Bleeding
Anti-Lock System Bleed
Bleeding the Hydraulic Control Unit (HCU) is required only when removing or installing the HCU, master cylinder or opening the lines to the HCU. A scan tool with the ability to interface with the HCU is required for bleeding.
Note: Carrying out the system bleed function drives trapped air from the HCU. Subsequent bleeding removes the air from the brake hydraulic system through the bleeder screws.
Note: Adequate voltage to the HCU module is required during the anti-lock portion of the system bleed.
1. Connect the diagnostic tool.
2. Access the system bleed function.
3. Manually bleed the brake hydraulic system.
4. Repeat the procedure carrying out a total of two diagnostic tool cycles and two manual bleed cycles.
Brake System Bleeding
If the vehicle is equipped with ABS, connect the vehicle communication module (VCM) and scan tool into the vehicle data link connector (DLC) under the dash and carry out the chassis brake bleeding procedure.
Manual
1. Clean all dirt from the master cylinder filler cap, then remove the cap and fill the brake master cylinder reservoir with clean, specified brake fluid. The Edge has a unique reservoir that is long and thin due to the rake of the windshield. Install the master cylinder filler cap.
2. If the vehicle is equipped with ABS, connect the vehicle communication module (VCM) and scan tool into the vehicle data link connector (DLC) under the dash and carry out the chassis brake bleeding procedure.
3. Place a box-end wrench on the right rear disc brake caliper bleeder screw. Attach a rubber hose to the right rear disc brake caliper bleeder screw and submerge the free end of the hose in a container partially filled with clean, specified brake fluid.
4. Have an assistant pump the brake pedal and then hold firm pressure on the brake pedal.
5. Loosen the right rear disc brake caliper bleeder screw until a stream of brake fluid comes out. Have an assistant maintain pressure on the brake pedal while tightening the right rear disc brake caliper bleeder screw. Repeat until clear, bubble-free fluid comes out.
6. Tighten the right rear disc brake caliper bleeder screw. Tighten to 8 Nm (71 inch lbs).
7. Repeat Steps 3 through 6 for the left rear disc brake caliper.
8. Move to the right front and then left front.
• Gravity bleeding is possible using the same sequence.
TSB: BRAKE DRAG ON 2007 EDGE
Some Edge vehicles may exhibit brake drag from the rear wheels or all wheels. Customers may notice an odor and/or reduced powertrain performance. In some cases, the driver may also note an integral vehicle dynamics (IVD) light after driving a given distance due to pressure noted in the module without a change in brake on/off (BOO) state.
SERVICE PROCEDURE
Raise the vehicle on a hoist, with engine running, and vehicle in park. Rotate all of the wheels by hand to verify excessive force is necessary to turn wheels.
• To resolve the brake drag concern from all wheels – Replacement of the BOO switch is necessary.
• To resolve the brake drag concern from the rear wheels only – Adjustment of the park brake cables is necessary.
BOO Switch Replacement (All Brakes Drag)
Removal:
1. With the vehicle shut off and in park, remove the stop lamp switch by rotating the stop lamp switch in the clockwise direction.
2. If the brake pedal moves up during the removal of the switch, the pedal was being inadvertently held down by the stop lamp switch, thus keeping the hydraulic circuits pressurized.
3. Disconnect the wire harness connector from the switch and discard the switch.
Installation
NOTE: Installation of the new stop lamp switch must be done with the brake pedal at its normally installed and resting position. Do not pull up or push down on the brake pedal during stop lamp switch installation.
1. With the brake pedal at its rest position, insert the new stop lamp switch into the keyed hole on the brake pedal and rotate the switch 45 degrees counter-clockwise to seat the switch. You may hear a click sound during this step, this is normal.
2. Plug the wire harness connector to the new stop lamp switch.
3. Verify that the brake lamps are functioning properly and that the brakes are no longer dragging.
Park Cable Adjustment (Rear Brakes Drag)
Brake drag noted on rear wheels only likely caused by over adjusted park brake equalizer adjustment (or all three cable lengths built at the minimum levels).
1. With vehicle on a hoist and shut off, verify rear brake pads are positioned properly.
2. With a fully released parking brake pedal, back off the adjustment until the wheels spin freely.
NOTE: Distance between the nut and end of the stud should be 7/8” (22 mm).